How to: Track an iPhone
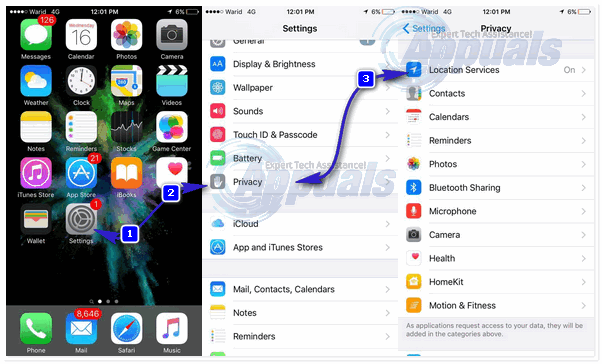
Tracking your iPhone in case it gets lost or stolen can prove crucial to its recovery, and with Apple’s exciting Find My iPhone feature it is all the more interesting and simple. The location services feature of the iPhone gives permission to location based apps such as Camera, Websites, Social Networking apps, Maps, etc. If your iPhone has location services switched on, your iPhone is able to track and keep record of places it has been to, including how many times you were there. To activate and see this information you need to:
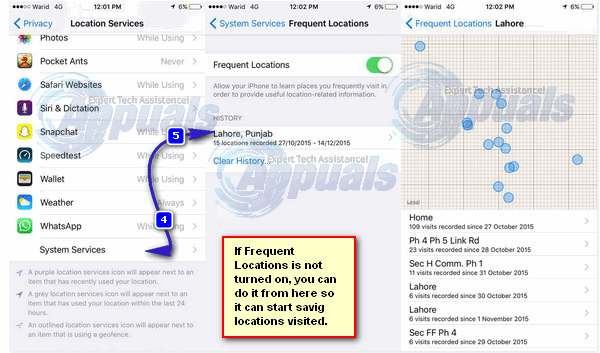
Go to Settings -> Then enter the Privacy section -> Access Location Services -> System Services -> Frequent Locations
By further scrolling down you will see a history section that provides a list of places you have been to. Once you tap on a particular location you are able to access more details, including map, with particular locations.


Logging into iCloud and accessing Find My iPhone
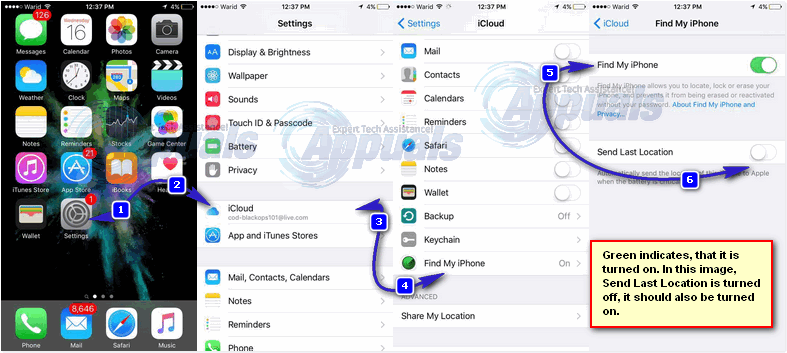
You can track a lost or stolen iPhone with your Apple ID from any computer using its browser. This can be achieved by logging into iCloud. However, in order for this to work your Phone must have Find My iPhone feature enabled, and signed into iCloud. If you’d be interested in tracking your last location via iCloud, then the Last Location feature must also be turned on.

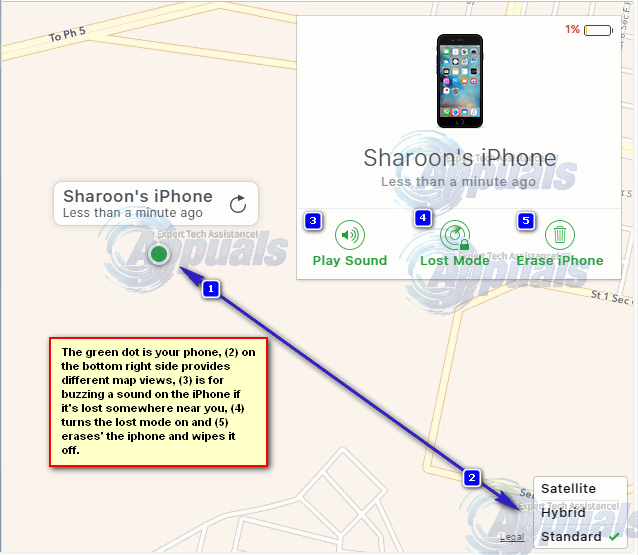
Access icloud.com from any browser and log in with your Apple ID. Once you are logged in, locate and click Click on the “Find My iPhone“. If this feature is turned on on your phone, which normally is by default you’ll be able to see the location of your Phone. If it’s lost, it can be reported to the police with it’s location and if it’s never recovered after losing it, you can lock the phone and wipe the data to save your private info. If it’s lost within your reach, you can BUZZ the sound signal so it can make a sound which will help in identifying where the phone is. If the device is powered off or not connected to the internet, this will not work but you can still send the instructions via Find My iPhone to the device so as soon as it is turned on, it’ll process those instructions. Such as if you’ve issued the wiping instructions.

Using Google Time Line & Location History
This method is only applicable if the Google Search app is installed in your phone and both the GPS and A-GPS options are active so they are able to keep track of the location.
This can be achieved by using Google Location History (also called Timeline now) to find your phone. This method however only works if you have the location reporting and history options activated on your iPhone.
Google’s Timeline puts all location data it has gathered from your iPhone onto a map, and makes it accessible to you as well. This tool allows you to access and see where your iPhone when lost was last located. If it is still on, and connected to the internet it will be able to continue sending its current location so you are able to see and be able to retrieve it. Even if the battery dies out you will still be able to see the last location it reported to Google Timeline.
To see and follow your iPhone’s location timeline:
Go to google.com/maps/timeline
Select the current date on the top left side or press the “Today” button.
You will be able to see the last sent location by going to the end of the timeline on the left.
But before you go to retrieve it check to see if your phone is moving about or suddenly switched off even if you remember it being charged enough or if the location keeps changing on the map. In this case it is probably stolen and the authorities should be contacted to help you retrieve it.