How to Root the LG V30 with Magisk and TWRP
The LG V30 is quite an amazing Android phone – it has the premium hardware specs you’d expect from an Android device in its price range, but most notable is the Hi-Fi Quad DAC that can play 32-bit/192kHz, making it a true “audiophile” phone.
Rooting the LG V30 isn’t very simple, however. It’s a bit of an involved processed with a lot of steps, but we’re going to walk you through the entire process from start to finish. This guide involves flashing something that will unlock your bootloader – which will hard reset your device and wipe all of your data, so please backup all of your data and read through this entire guide before proceeding.
Requirements:
- TWRP-3.1.1-0-h930.img or US998 TWRP unofficial alpha (they’re nearly identical except for a properties file change)
- Android Development Tools installed on your PC
- Magisk-v15.3.zip
- no-verity-opt-encrypt-6.0.zip
- (Optional)LG-rctd-disabler-1.0.zip
Make sure you back up everything (a full Nandroid backup is best).
If running Android Studio or Helium Desktop, shut it down. Otherwise you may see ADB version issues.
Side-note: Don’t trust Helium to let you restore your data. Look for “Helium ceases to recognize backups” at https://github.com/koush/support-wiki/wiki/Helium-Wiki – It’s simply the wrong tool for this job.
Before you begin, copy the following files to your External SD Card. Otherwise you’ll have to do it later or attempt an ADB sideload:
- Enable developer mode on your LG V30 if you don’t already have it enabled. Go to Settings – About Phone – Software Info, and Build number 7 times until “Developer Mode” is confirmed as activated via toast message.
- As per the LG page, http://developer.lge.com/resource/mobile/RetrieveBootloader.dev , ensure Developer Options “OEM Unlock” and “USB Debugging” are enabled.
- Connect to USB and switch to Photo Transfer Mode. (If you’re a normal user, you probably default to USB. You need Photo.)
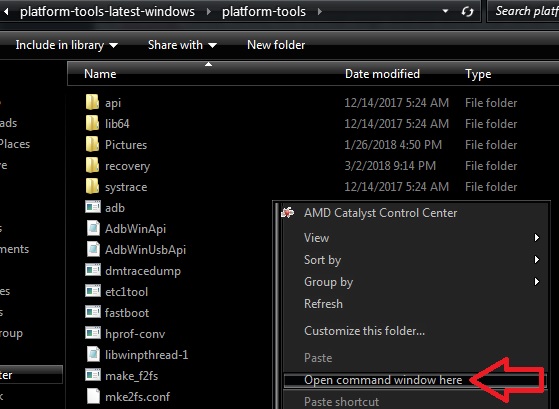
- On your PC, copy the unlock.bin file LG emailed you into your Android development tools directory (in my screenshots, sdk\platform-tools).
- Now launch an ADB terminal on your computer and run: adb devices
- Ensure the device (and only the device) is listed. If it’s not listed, verify that Photo Transfer mode.
- Reboot phone into Fastboot mode via: adb reboot bootloader
- You should hear the Windows sounds of USB devices going and coming. And the phone has an odd screen.
- From the same directory (Android tools): fastboot flash unlock unlock.bin
- Now reboot your LG V30 with this ADB command: fastboot reboot
- You will get entirely different start-up screens than normal. Including a warning that your device cannot be checked for corruption, and a reference to “Understand warning about operating system safety” from Google.
- Your phone has now been hard reset.
- Go through the initial phone setup options, to get to Android. Switch USB to Photo Transfer again.
You can verify that it’s unlocked either from the Developer Options – OEM Unlock is no longer available because it’s already unlocked.
Install TWRP on the LG V30
- Switch back to developer mode, USB debugging. (OEM Unlock is now not selectable, because it’s on permanently.)
- Switch USB to Photo again; default is charging.
- As before, on your PC from the Android tools directory, run these ADB commands:
adb reboot bootloader
Fastboot flash recovery twrp-3.1.1-0-h930.img
Please read this entire next part before continuing:
- Turn OFF the phone, using the volume key to change from Restart at the top to “Power off”.
- Disconnect the USB cable
- Holding both the Volume-Down and Power button, turn phone on.
- As soon as the LG logo appears, continue pressing “Down” but release and re-press Power. Continue holding both until a menu appears.
- Select to erase all data. You will be asked this several times; keep saying “Yes”.
- Eventually you will boot into TWRP.
- Back up the system. This isn’t essential, but you’d be silly not to.
- In TWRP, set system writable
- Select “back up”. Note there’s no data, because that partition is encrypted.
- Select the SD card (or USB; I use a micro SD card.)
- Back it up. This will take around seven minutes.
- Turn off data encryption and install stuff… all in TWRP:
- Wipe Data – Factory Reset
- Wipe Data – Format Partition
- Install – set storage to the External SD
- Install the Magisk zip
- Install the no-verity-opt-encrypt-6.0.zip
- Install the LG-rctd-disabler-1.0.zip; this reduces LG root checks, which may impede performance.
- Reboot – to System
If booting fails with an encryption error, did you format (b above) the partition? If not, reinstall TWRP (except you don’t need to backup again) and do both the wipe and format.


Thank you. Good crash course/refresher. HTC is almost exactly the same method. Down to having to request the token