How to Root the Chuwi Hi9 Air
The Chuwi Hi9 Air is a recently released mid-range tablet that sports some pretty good specs, especially for mobile gamers. With its 10.1” screen, 4GB RAM, and MTK6797 Helio X20 Deca Core SoC with the ARM Mali-T880 GPU, not to mention an incredible 8000mAh battery, its certainly a great device for the price-range.
Being a Mediatek-based device, the Chuwi Hi9 Air is fairly easy to root through various methods, and this Appual’s guide will show you exactly how to do it. Just follow the steps carefully and your Chuwi Hi9 Air will be rooted in no time!
Requirements:
- ADB Tools (see Appual’s guide “How to Install ADB on Windows”)
- MTK USB Drivers for PC (install these before following any of the root methods below)
- Root option 1: TWRP + SuperSU
- Root option 2: TWRP + Magisk
- Root option 3: Magisk + modified Boot.IMG (Build number O00623: Release-Keys 20180506 or release-keys 20180604)
How to Root the Chuwi Hi9 Air with TWRP + SuperSU
Please be advised you need an OTG cable + USB mouse for this method, as the TWRP version being used does not have touch support!
- First we need to enable Developer Mode on your Chuwi Hi9 Air. Go into Settings > About > tap ‘Build Number’ 7 times until Developer Mode is activated. Now go to Settings > Developer Options > enable USB Debugging.
- Download the TWRP file to your main ADB pathway on your computer, then download the SuperSU zip file and transfer it to your Chuwi Hi9 Air’s SD card.
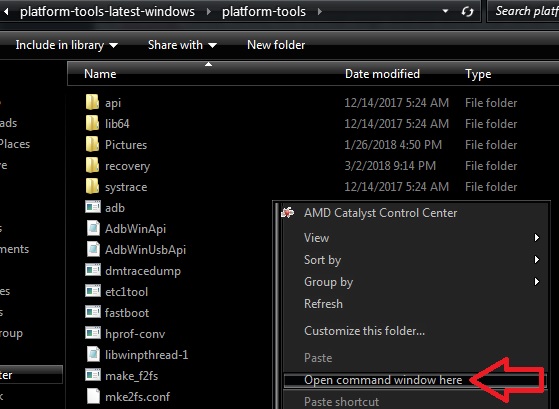
- Now launch an ADB terminal on your computer (hold shift + right click inside the main ADB pathway and choose “Open a command window here”).
- Connect your Chuwi Hi9 Air to your PC via USB, and in the ADB terminal type: adb devices
- You should receive an ADB pairing dialogue on your Chuwi Hi9 Air’s screen, so accept it to continue. To make sure it worked, type adb devices again, and the ADB terminal should display your Hi9 Air’s serial number. If it does not, you should troubleshoot either your ADB installation, or the phone’s drivers on your PC.
- If ADB returned the serial number properly, we can proceed to type into the ADB terminal: adb reboot bootloader
- This should reboot your Chuwi Hi9 Air into the Download / Bootloader mode, so now we will type into ADB: fastboot flash recovery twrpxxxxx.img (replace twrpxxxxx.img with the actual filename of the TWRP version we are using!)
- Once ADB confirms it has been successfully flashed, type into ADB terminal: fastboot reboot
- Now once your Chuwi Hi9 Air reboots successfully into the Android system, type into ADB: adb reboot recovery
- This will reboot your device into TWRP, so now you need to connect your OTG cable + USB mouse to your phone, and from the TWRP main menu click “Install”.
- Navigate to your SD card and choose the SuperSU .zip file you transferred earlier, then swipe to flash it.
- After SuperSU has been successfully flashed, you can now hit Reboot from the TWRP menu. The first time booting a freshly rooted Android device can take up to 10 minutes, so just leave your Chuwi Hi9 Air alone until it completely boots into the Android system!
How to Root the Chuwi Hi9 Air with TWRP + Magisk
For this method, you just follow nearly the exact same guidelines as installing TWRP + SuperSU, but instead of flashing SuperSU after installing TWRP, you will flash the Magisk .zip file.
After Magisk has been flashed and you reboot into the Android system, then launch the Magisk Manager app on your device, and check for any available updates and confirm that Magisk has rooted your device properly. That’s it!
How to Root the Chuwi Hi9 Air with Magisk + modified Boot.IMG
Warning: This method will factory reset your Chuwi Hi9 Air – please be sure to make backups of all your important data before proceeding!
- Begin by downloading the patched boot.img into your main ADB pathway on your PC – if you’re unsure which boot.img to download, check your build number in your phone’s Settings > About > Build Number.
- Now enable Developer Mode on your Chuwi Hi9 (steps can be found in the TWRP + SuperSU section of this guide). Then go into Developer Options and enable both USB Debugging and OEM Unlocking.
- Connect your tablet to your PC via USB, and launch an ADB terminal.
- Type into the ADB terminal: adb reboot bootloader
- When your Chuwi Hi9 Air reboots to the Download / Bootloader Mode, use the volume keys to select Fastboot.
- Once your device is in Fastboot Mode, type into ADB terminal: fastboot OEM unlock
- Press the Volume Up key to confirm, and your bootloader will be unlocked – this will also perform a factory reset on your device.
- After it is finished, type into ADB: fastboot flash boot patched_boot.img
- And when that is done flashing, type into ADB: fastboot reboot
- Now install Magisk Manager app on your Chuwi Hi9 Air, and launch it. Download and install any available updates.
- You can confirm Magisk root using an app like Root Checker.
How to Flash Stock ROM (Emergency Recovery)
If something goes horribly wrong during any of these procedures, like your Chuwi Hi9 Air goes into bootloop, you can easily flash a stock ROM using MTK FlashTool and start from square one.
- You will need the MTK USB drivers and FlashTool on your PC.
- Next download the latest Chuwi Hi9 Air stock ROM (build number O00623 release-keys 20180604 as of writing this guide).
- Move the stock ROM file to the FlashTool directory on your PC and extract it.

- Click the “Open Scatter File” button in FlashTool, then navigate to the stock ROM’s folder and choose the scatter file.
- Click the “Download” button in FlashTool, connect your Chuwi Hi9 Air to your PC via USB while its turned off, and wait for FlashTool to confirm that the file has been successfully flashed – you’ll be notified with a green “Ok!”


D:Minimal ADB and Fastboot>fastboot flash recovery twrprecovery.img
target reported max download size of 134217728 bytes
sending ‘recovery’ (16366 KB)…
OKAY [ 0.768s]
writing ‘recovery’…
FAILED (remote: not allowed in locked state)
finished. total time: 0.781s