How to Root Samsung Galaxy S20 Series
Samsung released their latest Galaxy S20 phone this past February 2020, in 3 model variants. The Galaxy S20, S20+, and S20 Ultra, in both Exynos and Snapdragon chipset versions, and the chipset version largely depends on the country of purchase.
This guide will involve unlocking the bootloader of your Galaxy S20, which will factory reset the phone and wipe all of your data. Also, it is known that U.S. models (U/U1) of the Galaxy S20 series cannot be unlocked.
This guide is rather involved with many steps to follow, so we advise reading very carefully before proceeding so you understand everything that is required. The methods given are tried and tested as working, but you assume all risk if something goes wrong.
Requirements:
- Latest Samsung Odin software
- Samsung Android USB driver
- Latest firmware package (try SamMobile, SamFirm, or other firmware websites)
- Vbmeta_disabled.tar
- Magisk Manager (Canary build mandatory)
Eligible Galaxy S20 models
Exynos models:
- SM-G980F or SM-G980F/DS (S20)
- SM-G981B or SM-G981B/DS (S20)
- SM-G985F or SM-G985F/DS (S20+)
- SM-G986B or SM-G986B/DS (S20+)
- SM-G988B or SM-G988B/DS (S20 Ultra)
Snapdragon models:
- SM-G9810 (S20, Hong Kong, Taiwan, China mainland)
- SM-G9860 (S20+, Hong Kong, Taiwan, China mainland)
- SM-G9880 (S20 Ultra, Hong Kong, Taiwan, China mainland)
- SM-G981N (S20, Korea)
- SM-G986N (S20+, Korea)
- SM-G988N (S20 Ultra, Korea)
Unlocking your Galaxy S20
- Start by copying down your model and carrier code. You can find this in Settings > About phone > Software information.
- Copy what you see for “Service provider SW ver.”, your model number (ex. SM-G9810), and the two 3-letter code after the model number (ex. OZL_CHC).
- Enable Developer Mode by going to About Phone > Software Information > tap on Build Number 7 times to enable Developer Mode.
- Now go into Developer Options, and enable “OEM Unlocking”. Skip to step # if your phone automatically reboots to “Unlock bootloader?” screen.
- Turn off your phone and hold Volume Down + Volume Up together while connecting your Galaxy S20 to your PC via USB.
- Release the Volume buttons when you see a “Warning” screen, then hold Volume Up.
- Agree to the “Unlock bootloader?” screen and confirm with Volume Up again.
- Your Galaxy S20 will proceed to unlock, including factory reset. It will reboot into Android system when its done, on the Android Setup Wizard. Skip everything and only connect to network via Wi-Fi or mobile data.
- Re-enable Developer Options and verify that OEM Unlocking is still enabled, re-enable it if not.
- Turn off your phone again and repeat the process of holding Volume Down + Volume Up while connecting the USB, but only press the Volume Up button instead of holding it down.
- You will enter a “Downloading” screen. Look at the top left corner, you should see OEM LOCK and REACTIVATION LOCK both read “OFF”. If they are both OFF, your bootloader is successfully unlocked.
If your bootloader was not successfully unlocked, you can try carefully following all of the above steps again incase you made a mistake somewhere, if it doesn’t work, your Galaxy S20 model may not support bootloader unlocking.
- While you are still in Download Mode, launch Odin on your PC.

- Attach the vbmeta_disabled.tar file to the USERDATA tab, and click the Start button.
- Your Galaxy S20 will reboot into Recovery Mode and ask you to confirm another factory reset. Agree to it.
Important note from XDA thread: If you don’t re-lock bootloader or re-enable the Android Verified Boot, you will not lose your data. Be aware, a stock firmware package contains a Android Verified Boot Metadata Image (vbmeta.img) with verifications enabled. You will need to flash the vbmeta_disable image (put into USERDATA slot) along with the stock firmware (use BL, AP, CP, CSC slots) to make sure AVB is not re-enabled and the data is preserved.
Rooting Galaxy S20 with Magisk
- Download the official firmware for your model and region (CSC). Your CSC is the last 3-letters of what you copied earlier, remember like OZL_CHC, where CHC would be your CSC code.
- Extract the firmware .zip file on your desktop, and it should contain 5 files (AP, BL, CP, CSC, and HOME_CSC).
- Check the version code, for example (G9810ZCU1ATD1). The last 4 letters (ATD1) indicates the version of the firmware. If the version is the same as your current firmware, you can skip ahead to the section on extracting boot (kernel) image from the firmware.
- Launch Odin on your PC and put your Galaxy S20 into Download Mode.
- Put the firmware package’s AP, BL, and CP files into their respective Odin tabs, and wait for Odin to verify the firmware.
- Put the HOME_CSC file in the CSC slot – do not put the CSC file in the CSC slot, only the HOME_CSC file!
- Put vbmeta_disabled file in the USERDATA slot, this will keep AVB disabled and preserve your data.
- Click “Start” and wait for it to finish. Allow the device to boot into Android system to complete the upgrade process. Do not interrupt the process or bad things will happen.
Extracting boot (kernel) image from the firmware
- The firmware’s AP file is also an archived file, so extract the file boot.img.Iz4 from it.
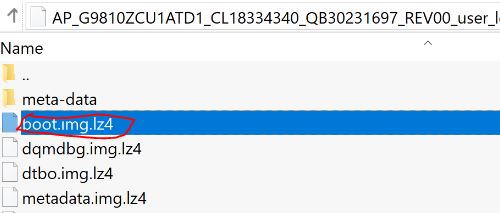
- Create a new .tar archive using 7-Zip and place the extracted boot.img.Iz4 inside of it.
Rooting Galaxy S20 with Magisk
- Transfer the tar archive you created to your device’s storage.
- Launch Magisk Manager on your phone and tap the Install button.
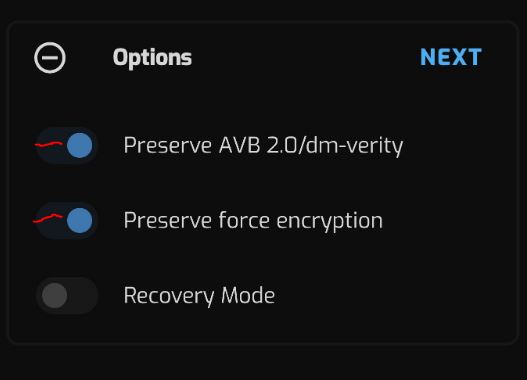
- Make sure “Recovery Mode” is off in Options.
- Click “Next” and select “Select and Patch a File” in Method.
- Choose the tar archive you created and click Next > Let’s Go.
- It will create a patched file (in Download/magisk_patched.tar), transfer this to your PC.
- Put your Galaxy S20 into Download Mode.
- Open Odin on your PC, and use the magisk_patched.tar in the AP slot, and click Start.
- After the flash process, your Galaxy S20 will reboot with Magisk root access installed.


