How to Repair Bad Blocks on Linux
Users who dual boot some distribution of Linux with a version of Microsoft Windows might occasionally try to shrink or grow certain partitions to leave more space for one operating system or the other. You may ultimately get a warning from GParted in Linux or chkdsk in Windows that there were bad sectors. Individual users of Linux might occasionally get the same. In spite of this, users might actually receive notices about two different types of bad sector masquerading as the same. One is the traditional notification of bad sectors that indicate a problem with the physical geometry of a disc platter or a NAND memory cell. This is what most people mean when they complain about a bad block, though there is a minor but very technical difference between a bad sector and a bad block. However, machines seldom incorrectly flag sectors as bad.
These are known as soft bad sectors or software bad blocks, and can be corrected merely through a simple file system operation. Considering the danger of writing to bad blocks, however, it’s always a good idea to start your investigation with a SMART data inspection when dealing with a fixed volume. This is non-destructive, and can weed out geometry problems before you proceed. If you’re not working with a fixed volume, then you might want to start your investigation with the next following method.
Method 1: Checking SMART Data
It’s easy to believe that these bad sectors are merely a software error, but there’s a way to check to see if that’s so. Using SMART data, it’s easy to inspect the disk’s own firmware and know for sure. Open the GNOME Disks Utility from the Dash in Unity, the Whisker menu in Xfce4, the Accessories menu in LXDE or from the GNOME Applications menu in KDE. You could also start it by typing gnome-disks at the terminal and pushing the enter key. Click on the menu next to the right-hand side window controls after highlighting your hard disk with the pointer in the left-hand column. On most GNU/Linux installs, the Disks utility will default to your primary hard disk.
Select SMART Data & Self-Tests from the menu. You could also hold CTRL and push S to open this window. This will show you the current health of your drive. If the values are blank, then click on the Start Self-test button to force your disk to run a self-check. The Overall Assessment line at the top will tell you what GNOME Disks Utility thinks of your drive.
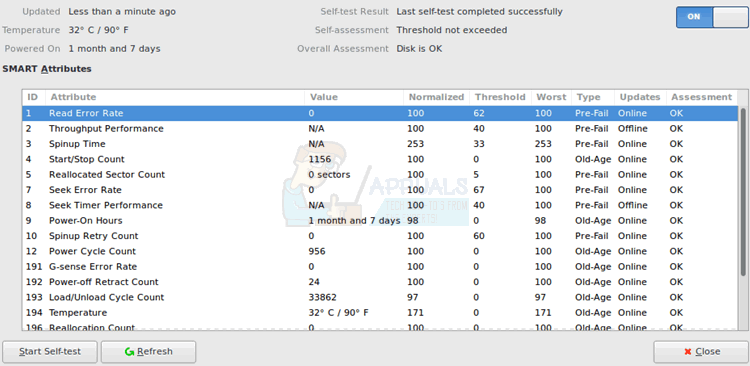
You may have to scroll through the SMART Attributes even on a full-screen display. Pay special attention to an option called Reallocation Count. This shows you how many sectors have already been reallocated. If there are many bad sectors, then it’s probably a good idea to replace the drive before it completely fails.
Method 2: Checking for the Correct Superblock
Sometimes you might find that SMART data showed everything in order, but you may have gotten a “Bad Superblock” error from certain disk utilities. If you were working with SD cards, USB memory sticks or other such memory, then you wouldn’t be able to read SMART data and yet still may have some errors. This very well could be a software problem. Consider the issue of running a command such as:
fsck.ext4 /dev/sda
This more than likely will indicate you have a bad superblock, which refers to the master block in your file system. This is the result of a CLI error, and not a genuine bad block. Since /dev/sdb refers to a drive and not a parition, your fsck command will look for a superblock where there isn’t one and incorrectly think something was wrong. Fortunately, this wasn’t a destructive command. Run:
sudo fsck.ext4 /dev/sda1
It may tell you now that your file system is clean. Make sure that the number that comes after ext matches your volume’s ext version.
You may also get this error if you were to try to run ext2/3/4 fsck on a FAT12/16/32, NTFS or HFS/HFS+ volume. The consistency checker gets confused and thinks that something is awry, when in reality the file structure type doesn’t match what’s expected. Run fsck.vfat or dosfsck on FAT volumes regardless of what bit version you’re using. You can use the -t switch after dosfsck or fsck.vfat (fsck.msdos on some versions of Linux) to mark out unreadable clusters as bad blocks.
Method 3: Checking for Bad Blocks on NTFS Volumes
Assuming that you’re dual-booting Microsoft Windows and Linux and you have superblock or other bad sector errors on an NTFS volume, then restart into Windows and from the command line run chkdsk /r c:, replacing c: with the drive letter of the NTFS volume in question. Windows will more than likely have to reboot to complete the surface scan. This can take some time, so if it appears that your operating system isn’t responding, then it’s merely because of the length of time in question. If you received an error about not having the right privileges, then right-click command prompt in the Start Menu and select Run as administrator before proceeding.
If you’re working with an NTFS volume exclusively under Linux, then you don’t have this much of a recourse, but if the bad blocks error was merely from a type mismatch you have a way of correcting it. Run sudo ntfsfix /dev/sdb1, replacing the letter and number after /dev/sd with the correct device and partition identifier. Remember that you can always run sudo fdisk-l or head back to the GNOME Disks Utility if its installed to check the names of every volume connected to your system. You can run it as sudo ntfsfix -d /dev/sdb1 if you’re sure that you want the dirty bit to be cleared.
If you’re sure that an NTFS volume has soft bad blocks that are not due to physical hardware geometry, such as when you cloned an old disk with bad sectors to a new volume, then run sudo ntfsfix -bd /dev/sdb1 on whatever volume you’d like. This resets the bad block marker list.
Method 4: Using the badblocks Linux Utility
Having booted into a live ISO Linux version or having found some other way to unmount an ext2, ext3 or ext4 file system, you can actually run sudo fsck.ext4 -c /dev/sda1 to conduct a read-only scan for bad blocks. Naturally you’ll need to use the correct volume identifier after /dev/sd and the correct ext version number after fsck.ext to run it properly. If you instead specify -cc, then the program will use an even more extensive non-destructive read-write test.
This is the normal way of using the badblocks utility, but you can technically use it on by its lonesome as well. Run sudo badblocks -n on a device name to run it by itself and report badblocks right in your terminal. You can use the -w option to use a write-mode test, but don’t use the -n and -w options together since they’re mutually exclusive. You should under no circumstance ever use the -w option on a volume that has data, since it will erase everything clean. Use the slower -n option since it will preserve your data in this case. The -w option is fine for volumes that you don’t mind erasing. The -v option can be combined with either, and will give your terminal some verbose output that’s useful for inspecting data-corruption. You can always use the -o option with the name of a text file to write out the information so you can look at it later. You might want to run it as sudo badblocks -nv -o badblocks.log /dev/sdb1 to get a snapshot, since you’ll see a lot of information if there are genuine bad blocks.
Thanks it worked . I ran the following command and accepted (y) all questions.
fsck.ext4 /dev/sda1