How to Remove DRM (FairPlay) from iTunes Movies
If you recently brought video content from iTunes, you might have noticed that you can’t really play it outside the Apple ecosystem. Have you tried to watch it on an Android device, push it to a media server or send it to your Smart TV? Regardless of the platform that you want to watch it on, it won’t work on anything that isn’t made by Apple. But why does this happen?
DRM Protected Content
DRM stands for Digital Rights Management. It’s a questionable technique that some vendors (especially Apple) use to restrict the platforms in which the media purchased from them can be used. All media content bought from iTunes is locked down by Fairplay (Apple’s DRM scheme).
Unlike other companies that have a more subtle approach on DRM restrictions, Apple isn’t shy with locking down all content present on iTunes. Everything you purchase from the iTunes (music, books, movies, TV shows, etc) will be DRM protected.
Now, Apple says that the DRM restrictions are enforced solely to discourage piracy and ensure that only the user who brought it can play it. Unofficially, they do this to keep their sale numbers high and make users remain loyal in their Apple ecosystem. But regardless of their reasons, you can’t help but notice that this is extremely unfair for the honest consumer. After paying a full price for the content you bought from iTunes, you should be entitled to play it on whatever platform you want.
I can vouch that most users that buy video content from iTunes are not pirates. How are they supposed to watch iTunes content on non-Apple devices? Well, the only option is to strip the video of it’s DRM.
We managed to identify three different methods that proved to be effective in removing Apple’s DRM. Two of them are extremely easy, but you will need to get your wallet out in order to use them fully. The third guide is free, but it’s a little more complicated than the rest.
Note: Even though Fairplay doesn’t deter piracy in any way, we don’t encourage our readers to use the following guides for unethical reasons. These guides are meant to assist those who seek the removal of DRM protection for legitimate reasons.
Method 1: Removing DRM protection from iTunes videos with M4VGear (Paid)
M4VGear is among the top DRM protection removers currently on the market. In addition to converting videos in other formats, M4VGear is able to produce DRM-stripped formats from movies and TV Shows brought from iTunes. After the DRM is removed, you can convert it to any popular format you want.
M4VGear is also capable of removing DRM protection from iTunes Rentals. But keep in mind that stripping down a rental of DRM is considered a serious violation of iTunes Terms of Service and will be treated as piracy. If you want to do it, do it at your own risk.
With minor exceptions, M4VGear is capable of losslessly converting M4V (iTunes format) to MP4, AVI or MOV. The original video and audio quality will be retained. Even more impressive, the software is able to retain 5.1 audio and preserve subtitles if the DRM content had them in the first place.
M4VGear is available for both MAC and Windows with a $45 price tag. You can buy it directly from here. If you want to test it first, you can download the free trial from here and see if it’s worth the money.
Even if the interface is quite intuitive, we decided to feature a quick step-by-step guide on stripping an iTunes video from DRM using M4VGear. Here’s how:
Removing DRM restrictions with M4VGear
- Start by downloading & installing the free trial from here.
- Launch the program and wait for the iTunes library to be imported. Tap on Add Movies in the top-left section of the screen. Soon enough, a list with your entire iTunes library will pop up, showing all the content you brought so far. You can import one it M4VGear by selecting a video and clicking on Add.
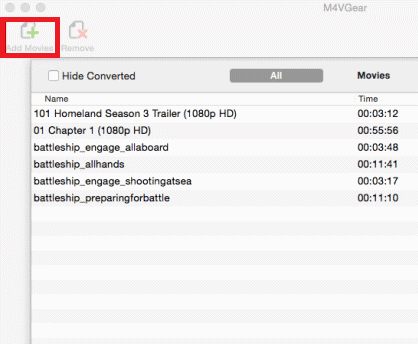
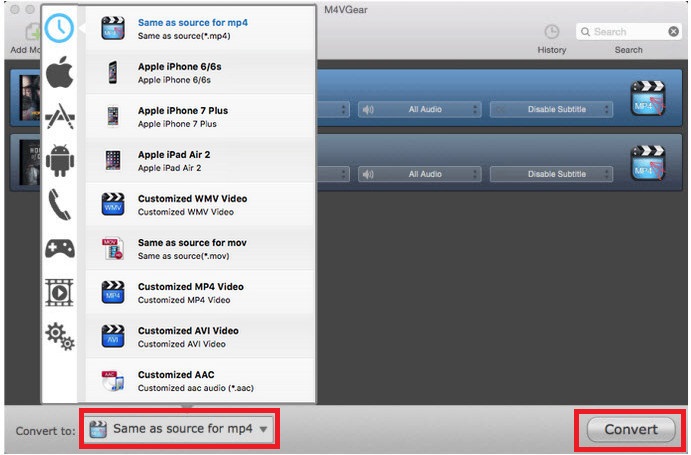
- When you add a video from iTunes, they will be automatically shown on the main screen of the software. Once you select all of them, you can choose from various output formats by expanding the menu next to Convert to. When you’re ready, hit the Convert button in the bottom-right section of the screen.
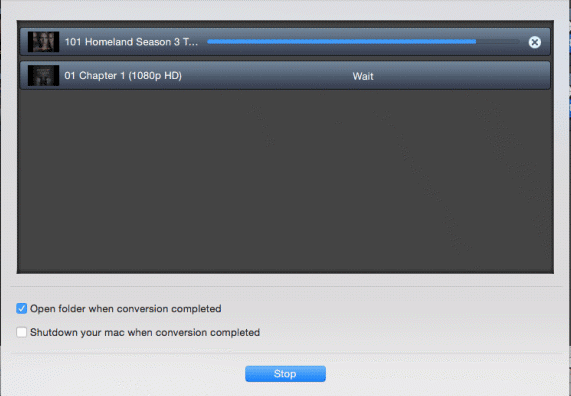
- Depending on how big the video is, you might have to wait over 10 minutes. Unless you tweak the setting, a folder with the stripped-down DRM videos will open when the conversion is complete.
Method 2: Removing DRM protection from iTunes videos with Tuneskit (Paid)
If you’re looking for another care-free solution, Tuneskit is definitely an option to consider. Tuneskit is a complete media converter that allows you to remove DRM from iTunes videos. Even more, it’s able to preserve the video quality of the original video, all of the audio tracks, subtitles, CC and AC3 Dolby 5.1.
You can use TuneSkit to losslessly unlock DRM copyright from both purchased and rented iTunes M4V movies, TV shows, and music videos. The software is available for both MAC and Windows, with free trial versions available for both platforms. The paid version costs $45 dollars on both platforms.
But keep in mind that TuneSkit isn’t compatible with an iTunes version higher than 12.6.2. If you’re over that, you’ll need to downgrade. Here’s a quick guide on using Tuneskit to remove DRM copyright encryption from video content bought from iTunes:
Removing DRM restrictions with TunesKit
- Depending on your platform, download the appropriate version of TunesKit. I advise you to start with the free trial before buying the full version. Download it from here. Additionally, you should make sure the Apple account you used to make purchases is authorized with iTunes.
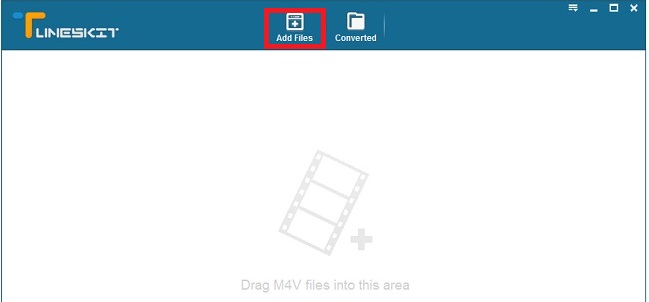
- Launch the TunesKit software and wait for the library to be loaded. To import a video from iTunes, click on Add Files. Shortly after that, you’ll be presented with a list of movies, TV shows and music videos that you bought from iTunes. Select a video and click on the Ok button to load them up into the conversion windows.
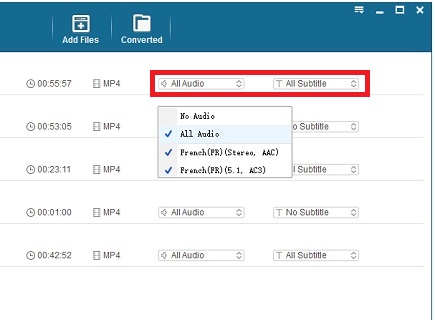
Note: You can also drag and drop the DRM videos from the iTunes folder to TunesKit. - Once you have all the DRM-protected files ready to be converted, you can begin configuring the audio tracks and subtitles. You can either choose to keep them entirely or remove the channels and CCs that you don’t want.
- Navigate to the bottom-left section of the screen and expand the menu next to format. Select an appropriate output format for your converted files. You can also change the output folder if you’re not happy with the default location.
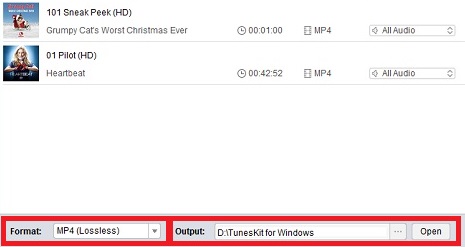
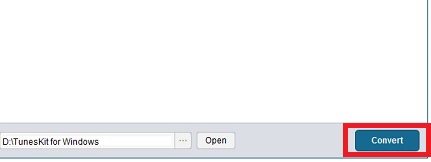
- Now all that’s left to do is clicking the Convert button in the bottom-right section of the screen. Depending on how many files you prepared, expect the process to last at least a half an hour.
Method 3: Removing DRM protection from iTunes videos with Requiem (Free)
Requiem is an open source, free DRM0-removing software developed in Java. Even if it hasn’t been updated for several years, it’s still capable of removing Fairplay DRM from Tunes, if you follow the appropriate guide. The thing is, Requiem only works with iTunes 10.7, which is already a seriously outdated version of iTunes.
Requiem is available for both Windows and OSX. If you want to lend a hand in maintaining it, you can download the source code from here.
Since Requiem only works with version 10.7 of iTunes, you’ll need to downgrade if you have a newer version. In the event that you have too much stuff on your current iTunes version, I advise you to use an additional computer (if you have one). If you don’t have a second computer, you can set up a virtual machine and used it specifically for this purpose.
In order to keep it simple, try setting up iTunes 10.7 on a machine that you don’t have iTunes already. Nevertheless, the guide below assumes you need to uninstall the newest version and replace it with an older one. If you have a secondary machine, skip the Step One.
Note: The steps below were only tested on a Windows computer. Altough Requiem is available for MAC, we can’t firmly confirm that it still works.
Step One : Uninstalling the newer version of iTunes
You should know that downgrading an already installed version of iTunes isn’t as easy as advertised. Navigate to Control Panel > Programs and Features and click on Uninstall or change a program. Once you’re there, locate every entry that has Apple Inc listed under the Publisher name.
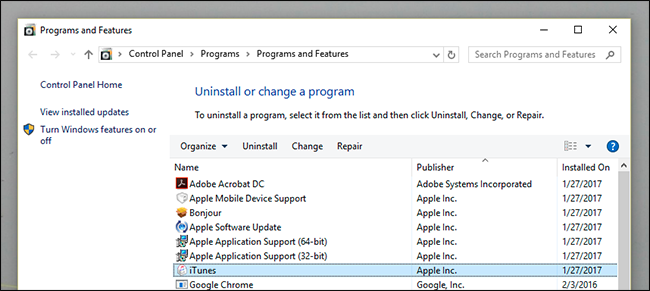
Note that it isn’t enough to remove iTunes. You won’t be able to install an olders version of iTunes unless you get rid of all the Apple software. Uninstall everything from Bonjour to Apple Application Support until you have nothing related to Apple on your computer.
There’s also a slight chance that even after you remove everything, the old iTunes kit will still refuse to install. If that’s the case, install a strong uninstaller like iObit Uninstaller or Geek Uninstaller and remove any leftover files by Apple.
Step Two: Installing the older version of iTunes
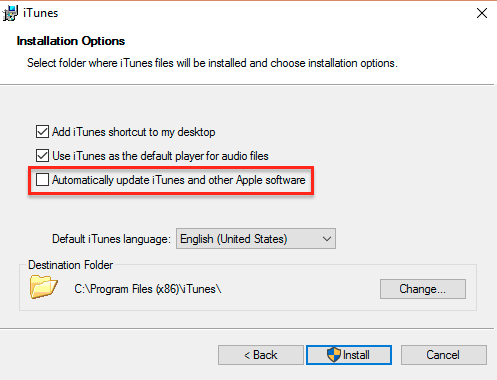
You can fetch the install kit of iTunes 10.6 from this official link. After you download the installer package, open it up. At this point, it’s very important that you un-check the box next to Automatically update iTunes and other Apple software. If you fail to do so, version 10.6 will be shortly updated to the latest iTunes version.
After you provide administrator privileges, wait until the installation is complete. Once it’s over, open it up and log in with your Apple ID. At this point, you’ll need to download the DRM-protected videos on this version of iTunes. After the download is complete, open them up and make sure they can play in iTunes.
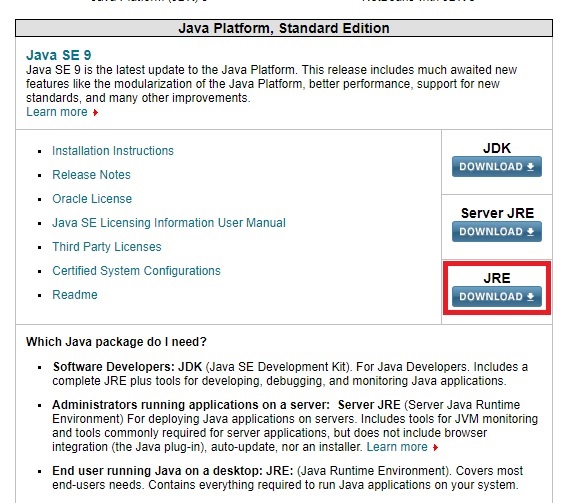
Step Three: Installing the Java Environment
Before we get to using Requiem, we need to make sure we have the appropriate environment for it to run properly. Since Requiem requires Java Runtime environment, you need to set it up on your PC. Visit the official download page and look for a JRE download button.
 Once you download the installer, open it up and install it to your system. Even if you already had a JRE version on your PC, it’s probably not the latest one. It’s always good to be updated to the latest Java version. Follow through with the java installer until you have JRE installed on your system.
Step Four: Installing Requiem
Before you attempt to install Requiem. Make sure you close iTunes completely. Download Requiem from here, extract the executable and install it on your computer.
Step Five: Running Requiem
Open Requiem and wait for the initial configuration to be over. The first time you run it, Requiem will automatically scan your iTunes account for any DRM protected files. After it locates the files, it will automatically begin to strip them of their DRM.
If you get an authorization error, make sure you have authorized iTunes with your Account. Additionally, you should check to see if the video in question is able to open in iTunes.
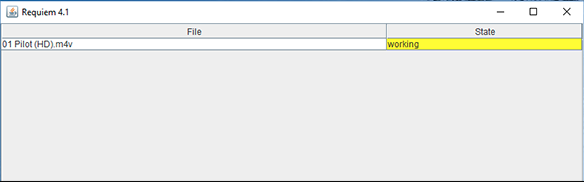
Do not close Requiem while “working” is showing under State. This means the video is engaged in the process of removing its DRM. When it’s done, you should get a message saying “Successfully Removed DRM“. Now all that’s left to do is to navigate to your iTunes Media folder and see if the DRM-protected version has been replaced with an unprotected version. Confirm that it’s’ working properly by opening it up with a media player like VLC or BS Player.

Conclusion
Regardless of which method you ended up following, I hope one of the methods above has helped you in removing the DRM from your iTunes videos! As you can see, using paid software is a lot easier than their free counterpart. If you only want to convert one or two videos, I recommend you to opt for a free trial on one of the paid apps from Method 1 and Method 2.
Method 3 is by no means lossless, but it will get the job done for free. If you have a lot of DRM-protected videos ready to be converted, Requiem is your best option if you’re not looking to spend money.
Thanks for great article. I used TunesKit as recommended. It works great and converts the iTunes movies nearly lossless. Wonderful tool.