How To Overclock Your RAM for Ryzen Using The Ryzen DRAM Calculator
Updated: 11 November, 2020
Performance enthusiasts in the PC world first and foremost look at their CPU processor and its functioning capabilities to determine the kind of performance they’re going to reap. In gaming PC configurations or graphics-intensive setups, the graphics card in the GPU is something they next look at when working on overclocking their setup. While overclocking the CPU and GPU will monumentally increase the speed at which your processor performs its general computing or graphics processing tasks, your performance will be impaired if your memory module is not operating at its maximum capability. This means that even after overclocking your CPU or GPU, there remains a window for further improvement which is directly controlled by how far you have overclocked your RAM. Therefore, it is apparent that spending some time overclocking your memory module is worth your time in the effort of optimizing your PC’s performance.

The traditional four steps to follow when it comes to overclocking any processing or memory modular component are to:
- Check the base values
- Adjust the clock and frequency parameters slightly
- Perform a stress test
- Repeat until optimum level reached
While third-party software applications such as CPU-Z work well in getting a sense of the parameters you’re already operating on and tweaking them repeatedly to see how far you can push, a bit of good news for AMD Ryzen users is that 1usmus has gone ahead and created a DRAM calculator that you can use to get a sense of your standard operating values and the best values to overclock your memory module to. In the layout of the traditional steps, you will need to use the DRAM calculator to check your base values and get a sense of your ideal overclocking values, head into your system’s BIOS to make the necessary tweaks and adjustments, and then start up your device to check your updated performance.
The Basics of RAM Overclocking
There are a few things you should know going into the RAM overclocking procedures to have a fundamental sense of the parameters that you will be tweaking and what the base values are expected to be.
Firstly, know that RAM overclocking is slightly more complex than CPU and GPU overclocking BUT it is notably safer as well because you do not have to fret over overheating systems and rising temperatures as much. RAMs produce significantly less heat as compared to the CPU and GPU units.
Secondly, know that for DDR4 RAMs and the like, the stock speed of approximately 2400 MHz that the memory module is stipulated to operate at is actually not the speed at which it runs. The actual speed is half of this because the stipulated amount is the double data rate.
Third, going back to the notion of the complexity involved, there are over two dozen different parameters you will need to adjust to improve your RAM’s latency (which directly impacts your memory module’s performance). The CAS Latency clock cycles will help you do just this.
Fourth, if you are someone who does not want to get into the nitty-gritty of manually overclocking your RAM, many manufacturers have created extreme memory profiles such as Intel’s XMP that you can apply through your system’s BIOS to implement a moderate overclocking that is safely recommended by the manufacturer. If you want to head into this yourself, though, you’ll have far more customizability and you’ll be able to push your RAM module beyond the XMP settings as well.
Using The DRAM Calculator To Find The Ideal Parameters
AMD Ryzen users out there are in luck because 1usmus has created a DRAM calculator to tell you exactly what the ideal values will be for your overclocking activity. The application is not the most fun one to use because it does require a decent amount of playing around to get the best set of values, but we will break it down for you to make it simpler.
- Download and install the Ryzen DRAM Calculator. Follow the on-screen instructions with administrator privileges until this is complete. Now, launch the application.
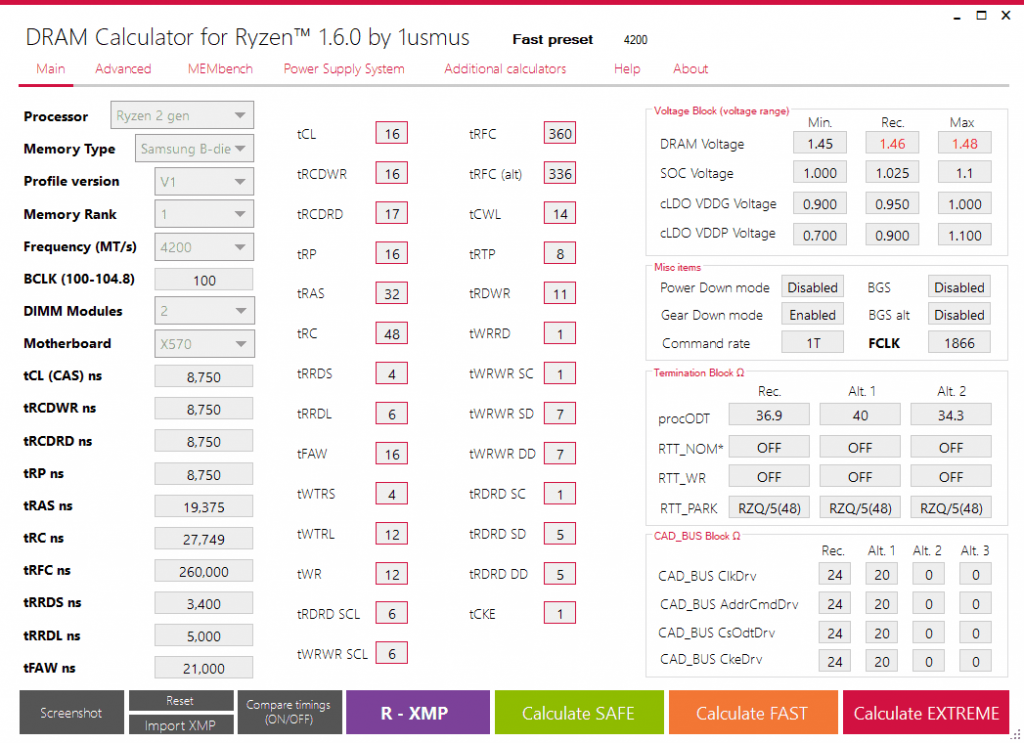
- On the launch screen, you will be able to see the details of the Ryzen memory that you are running. You can check any manufacturer documentation to identify and confirm its type as well. Your operating values will become visible
- At the bottom of the window, you will find a purple button that says “R-XMP.” Click on this.
- Type in your Ryzen memory type and the version you are using and click on the green button at the bottom of the window that reads “Calculate SAFE.” This will give you a sense of the safe values to adjust your parameters. These safe parameters will always work well once overclocked but they will not be the maximum that you can overclock your memory module to.
- If you want to push these values further, hit the orange button at the bottom that reads “Calculate FAST.” These values will overclock your RAM further but may not always be stable. Stress tests will be important in identifying which values work well for your system.
- There is also an option to “Calculate EXTREME” values at the bottom in the form of a red button, but keep in mind that these values may not necessarily be stable like the “Calculate FAST” ones.
- Once you’ve gotten your values for whichever setting you’re aiming for (we suggest taking screenshots of the R-XMP, SAFE, and FAST values), send these screenshots to yourself so that you can open them up on a separate device while you head into your system’s BIOS to make the tweaks.
Notice that when you calculate these values, your DRAM calculator lets you compare them to your XMP profile and standard base values to see how far you have pushed them. This is a good indicator to get a sense of how the overclocking ranges work and how far it’s safe for you to push.
Implementing The Tweaks In Your System’s BIOS
Now it comes down to actually implement the tweaks that you have jotted down from your DRAM calculator. Boot up your device and head into its BIOS. For most devices, this requires that you restart the device and press the F2 or Del key repeatedly.
Once you have entered your BIOS, do the following:
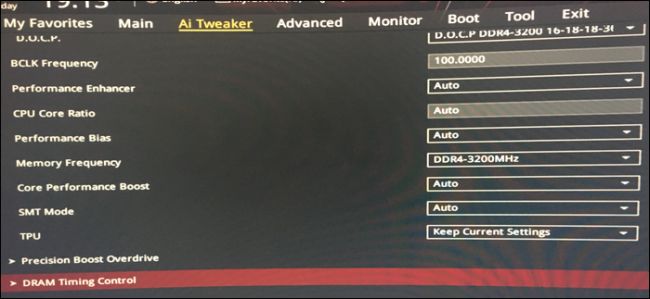
- Look for where your memory settings are located and apply your XMP profile values.
- Look for the section that says “DRAM Timing Control After Training.” Head into this and start typing in the values that you got from your DRAM Calculator.
- Depending upon your motherboard, the names for some of these value parameters may be different. Match them up against the values you got off of your DRAM calculator and fill them all in. Some of the parameters you will be tweaking include CAS latency, read/write delays, RAS precharge timing, and the RAS active timing.
- After typing in the memory clock and frequency related parameters in the above memory section, find the section that deals with your memory module’s voltage settings. Enter the voltage you were recommended in your DRAM calculator’s output. Be mindful of the fact that voltages above 1.45 V may be dangerous so as long as you remain under that amount, you will be safe.
- Save the setting adjustments you have made and restart your computer. If your computer does not restart at this point, don’t panic. Wait thirty seconds and start it up in safe mode. Revert your settings back to the last safe settings and restart again. This can happen if your values were not ideal and your system failed its power-on self-test. If the safe mode startup doesn’t work either, again, don’t panic. Clear your CMOS by removing your motherboard’s connected battery and resetting it.
These steps above are what you’ll need to repeat to push your values further after you check your system’s stability and ensure that you aren’t running into the blue screen of death or any other fatal error.
Checking Stability
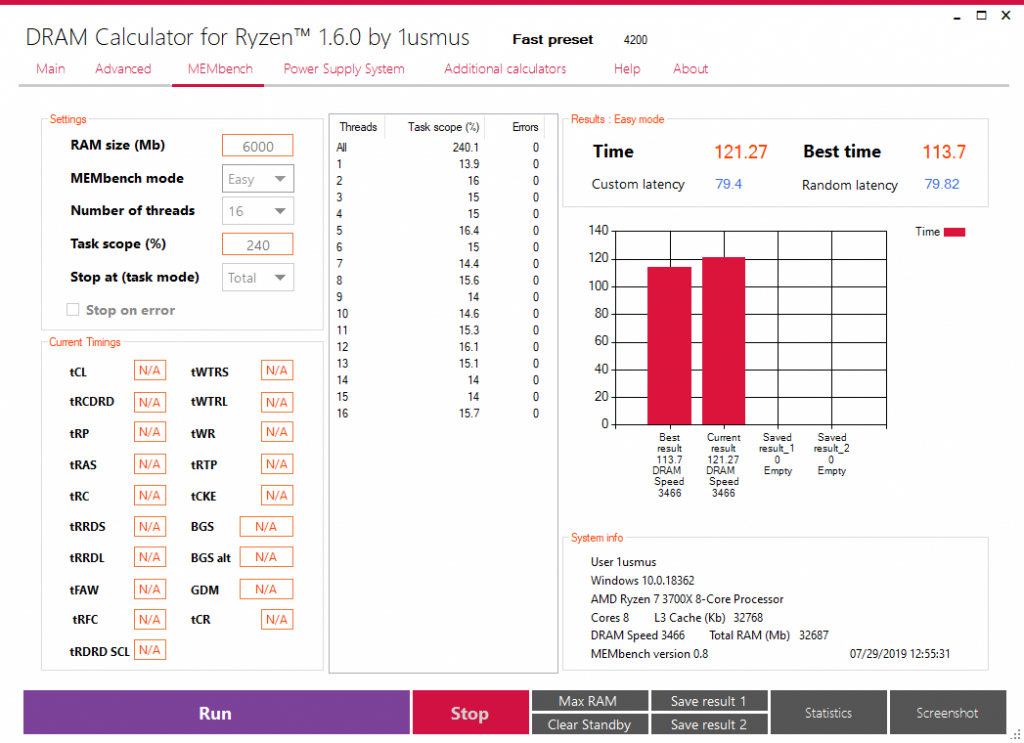
After restarting your computer, head back into the DRAM calculator and head under the “MEMbench” tab at the top. Here, you will be able to test your RAM to see if there are any errors present. Set the mode in this tab to custom and type in 300 for task scope (to check three times just to be extra certain). Click on “MAX RAM” and then “Run” to perform the test. Depending on how big your memory module is in storage size, your device will take more or less time to test it three times over.
If your system survives the stability test unscathed and without errors, you can head back into your BIOS and try implementing your FAST values calculated by your DRAM calculator. You can repeat the stability test as explained here and go even further if needed. You can also make manual tweaks to the parameter values based on your own understanding of the parameters but this is not recommended. The DRAM calculator application usually gives you quite decent values to work with to overclock your Ryzen memory module.
Final Thoughts
The Ryzen DRAM Calculator makes it significantly easier what would otherwise have taken immense trial and error as well as a deep understanding of the parameter values to accomplish. This application gives you a set of values against your standard values for the XMP, SAFE, FAST, and EXTREME overclocking profiles. You can simply head into your BIOS then to implement the values suggested. The SAFE values are guaranteed to work but if you want to go further at the risk of running into unstable values (which is something you can easily revert back from so don’t panic), you can look onto implementing the FAST or EXTREME values suggested by the DRAM calculator.
The calculator application also has its own built-in memory checker that allows you to run a test across the module to scan for any errors that may cause it to become unstable. This all in one solution is a great tool for AMD Ryzen users to overclock their memory modules without having to get into the intricacies and complexities of memory module parameters. Lastly, if you’re looking for the perfect ram for your Ryzen build head over to our this article.


I will be downloading this Dram calculator, once I find it, (i didn’t see a link.) I hope it will help me to understand what’s really going on when I change settings. Ms. Arford, Thank you.