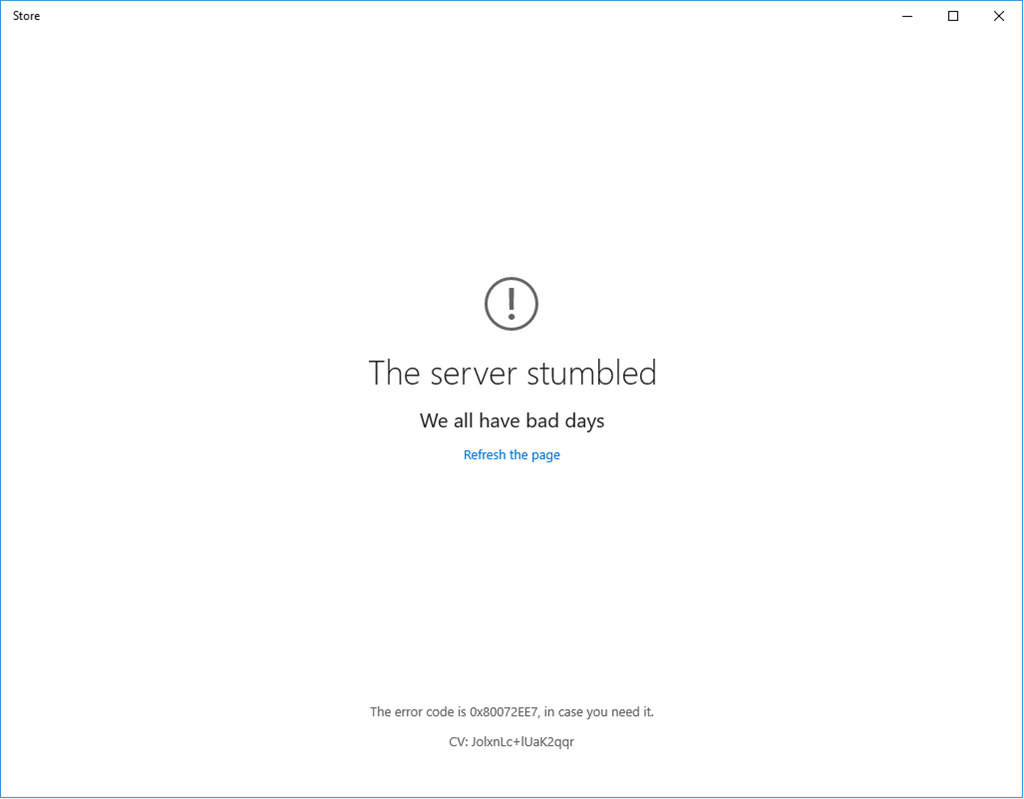
How to Fix Windows Store Error Code 0x80072ee7 “the server has stumbled”?
After upgrading to Windows 10 or 11, some users have encountered issues when trying to access the Microsoft Store (formerly known as the Windows Store). The Microsoft Store may fail to connect, displaying the error code 0x80072EE7 with the message, “the server has stumbled.” In such cases, the Microsoft Store’s search bar might state ‘no Internet available,’ despite other applications, such as web browsers, having no problem connecting to the internet.
Several factors could lead to the error code 0x80072EE7, not just connectivity issues. These might include:
- Server-related issues at Microsoft, such as temporary outages or high traffic volumes preventing users from accessing the store. You should check Microsoft Store’s server status before following any solutions mentioned down below.
- Incorrect network configurations on the user’s device that block the Microsoft Store from connecting to the servers.
- Misconfigured or corrupted DNS cache that interferes with the Microsoft Store’s ability to resolve server addresses.
- Problems with Windows Update components that the Microsoft Store depends on to manage app updates and installations.
- Firewall or antivirus settings that incorrectly block the Microsoft Store’s internet access.
Microsoft Store issues are often related to Windows updates, such as problems with DNS or static DNS entries in the HOSTS file. Some users have resolved the issue by performing a repair installation of Windows 10 or updating Windows.
Others have fixed the problem by re-registering the Microsoft Store package or by removing static IP entries for Windows Update and Microsoft Update from the HOSTS file.
Note: Although this guide primarily addresses Windows 10, similar troubleshooting steps may apply for Windows 11.
1. Repair and Install Windows with an In-Place Upgrade
An in-place upgrade can repair your Windows installation if you’re having Microsoft Store issues. This process allows you to reinstall Windows without losing your personal files and installed applications.
- For Windows 10 users, our step-by-step guide on performing a repair installation through an in-place upgrade can help resolve system issues. Learn how to repair install Windows 10 with an in-place upgrade.
- For those on Windows 11, similar steps can refresh your operating system. Learn more by reading our in-depth tutorial on performing a repair installation for Windows 11: Repair install Windows 11 using an in-place upgrade.
2. Register the Windows Store Package
By re-registering the Microsoft Store application package, you are essentially reinstalling the app and resetting any misconfigurations or issues that may have caused the connection problem. This can often resolve connectivity issues and restore the Microsoft Store to proper functionality.
- Open an elevated Command Prompt as an administrator.
- Execute the following PowerShell command.
PowerShell -ExecutionPolicy Unrestricted -Command "& {$manifest = (Get-AppxPackage Microsoft.WindowsStore).InstallLocation + '\AppxManifest.xml' ; Add-AppxPackage -DisableDevelopmentMode -Register $manifest}"
- After completion, close the command prompt and restart your computer.
Check the Microsoft Store to see if your issue is resolved.
3. Delete Static IP Entries from the Hosts File
Changes made to the hosts file by programs such as DNS accelerators or caching utilities can cause conflicts with the Microsoft Store. By removing static IP entries related to Windows Update or Microsoft Update, any potential blockages can be removed, allowing the Microsoft Store to connect to the servers properly.
So, deleting static IP entries from the hosts file enables a clear pathway for the Microsoft Store to establish a successful connection, resolving the issue.
- Navigate to:
C:\Windows\system32\drivers\etc
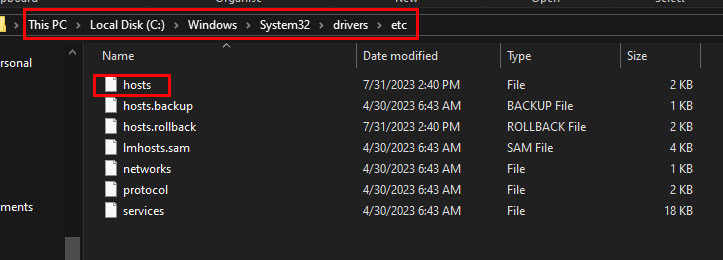
- Edit the HOSTS file with Notepad.
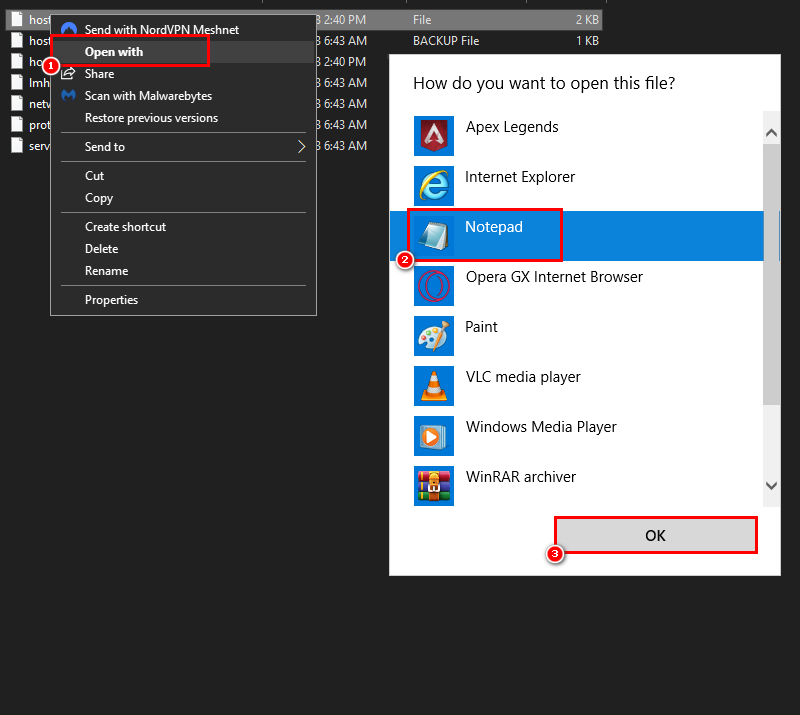
- Remove or comment out any static IP addresses associated with Windows Update or Microsoft Update by adding # at the start of the line, and then save the changes to the HOSTS file.
For more details, review the official Microsoft support page on how to reset your host file to default.
4. Changing DNS Configurations
Network adapters usually obtain DNS configurations automatically, but sometimes they may not do so correctly, causing this error. By manually changing the DNS configurations, users can resolve the Microsoft Store issue by making sure that the network adapter obtains DNS configurations correctly.
This step involves specifying specific DNS server addresses, such as 8.8.8.8 and 8.8.4.4, to ensure proper connectivity and allow the Microsoft Store to connect to the servers and function as intended.
- Simultaneously press the “Windows” and “R” keys, followed by “Enter“.
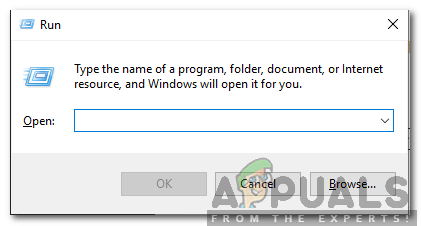
Opening Run Prompt - Type “ncpa.cpl” and press “Enter“.
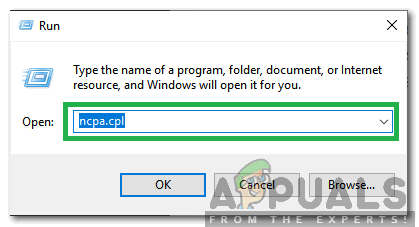
Typing in “ncpa.cpl” and pressing “Enter” - Double-click on the network connection you are using.
- Select “Properties,” then double-click on the “Internet Protocol Version 4 (TCP/IPv4)” option.

Double-clicking on the “IPv4” option - Choose “Use the Following DNS Server Addresses” option.
- Enter “8.8.8.8” in the “Preferred DNS Server” field, and “8.8.4.4” in the “Alternate DNS Server” field.
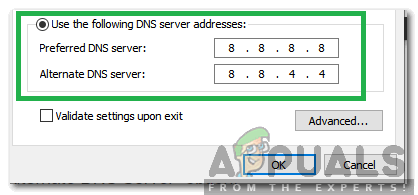
Manually entering the correct DNS server addresses - Click “OK” to apply the settings and close the window.
- Test to confirm if the Microsoft Store issue has been resolved.
it worked excellently!!! thanks for guiding us.