FIX: Defender Service couldn’t be started Error: 0x80070422
Windows Defender is the built-in computer protection application for all versions of the Windows Operating System starting with Windows 7. If, for whatever reason, Windows Defender is disabled on your computer and is not actively protecting it, all you need to do in order to enable Windows Defender and get it to start protecting your computer again is to launch Windows Defender and click on Start now in the Home tab. However, unfortunately, many Windows 10 users have recently started reporting that when they do so, Windows Defender does not start and they instead see an error message containing error code 0x80070422. The complete error message reads:
“The service couldn’t be started. The service cannot be started, either because it is disabled or because it has no enabled devices associated with it.”
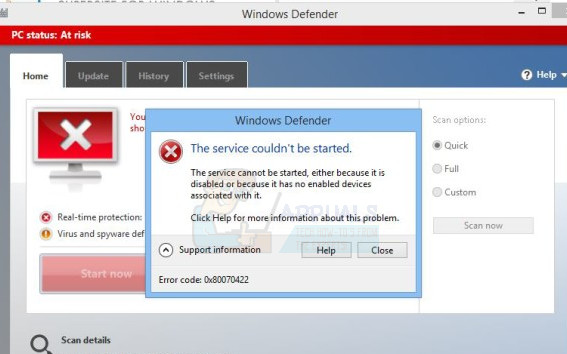
When an affected user sees this error message and clicks on Support information within the dialog, the error code for the issue is revealed to be error code 0x80070422. If you do not use any third-party computer security programs and Windows Defender – your last line of defense against threats – refuses to start up, your computer is left completely vulnerable, and that is a truly terrible thing.
This issue can be caused by anything from a corrupted Windows Defender registry key or the Windows Defender service being disabled to a third-party computer security program clashing with Windows Defender or corrupted Windows elements. Thankfully, though, there are just as many possible solutions to this problem as there are causes, and the following are some of the most effective ones:
Solution 1: Run an SFC scan
This issue can be caused by Windows components being corrupted, and the best way to scan for and attempt to fix system corruptions is to run an SFC scan. An SFC scan analyzes all integral system files for corruptions and attempts to either repair the corrupted files that it finds or replace them with cached copies. To run an SFC scan on a Windows 10 computer, use this guide.
Solution 2: Uninstall any and all third-party security programs
Third-party security programs, such as antivirus, anti-malware, and firewall applications, often conflict with Windows Defender and may inadvertently cause more harm than good, leading to issues like this one, for instance. If you have installed any third-party security programs on your Windows 10 computer, it would be beneficial to uninstall them immediately.
In addition, simply uninstalling the applications isn’t enough; you also need to download and run related removal tools to get rid of any residual files and/or other elements they leave behind. That being the case, even if you don’t have any third-party security programs installed on your computer right now but have had any installed in the past, you are going to have to run removal tools for each of them as the traces they left behind may be causing this problem.
You can use this guide to learn how to completely uninstall third-party security programs and also get rid of whatever files, settings or other elements they leave behind.
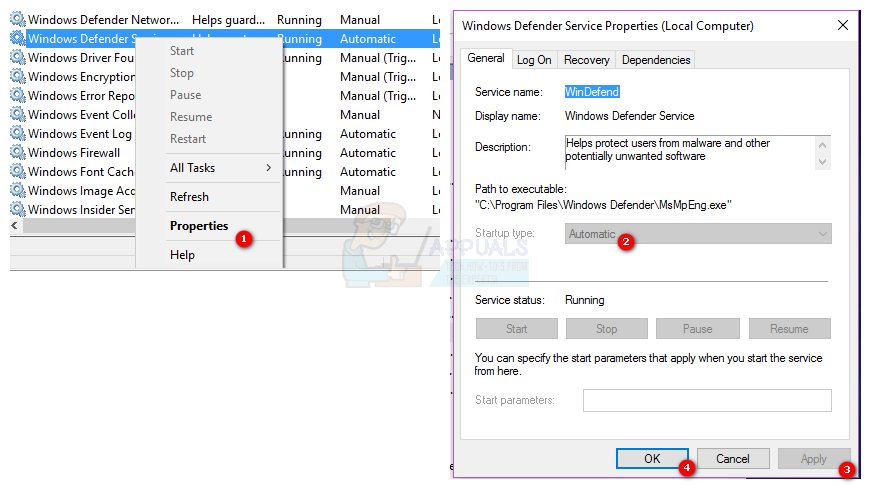
Solution 3: Configure the Windows Defender service to start automatically
Another rampant cause of this problem is the Windows Defender service not running when you try to enable Windows Defender. In such cases, the solution is pretty simple – configure the Windows Defender service to start automatically.
- Press the Windows Logo key + R to open a Run.
- Type services.msc into the Run dialog and press Enter to launch the Services Manager.
- Scroll down the list of services, locate the Windows Defender service and double-click on it to open its Properties.
- Open the dropdown menu in front of ‘Startup type:’ and click on ‘Automatic‘ to select it.
- Click on Apply.
- Click on OK.
- Close the Services Manager.
- Restart the computer.
Once the computer boots up, launch Windows Defender and click on ‘Start now‘ in the Home tab to see whether the problem persists.
Solution 4: Fix the problem using the Registry Editor
If a corrupt Windows Defender registry key is the cause of this issue in your instance, all you need to do is use the Registry Editor to fix the problematic registry key. To do this, you need to:
- Press the Windows Logo key + R to open a Run.
- Type regedit into the Run dialog and press Enter to launch the Registry Editor.
- In the left pane of the Registry Editor, navigate to the following directory:
HKEY_LOCAL_MACHINE > SYSTEM > CurrentControlSet > Services
- In the left pane of the Registry Editor, right-click on the registry key named WinDefend under Services, and click on Permissions….
- Click on Advanced and navigate to the Owner.
- Click on the name of your account under ‘Change owner to:’ to highlight it, then click ‘Apply‘ followed by ‘OK‘.
- Back in the Permissions dialog, click on Administrators under Group or user names: to highlight it, click on the Allow checkbox in front of Full Control under Permissions for Administrators, click on Apply and then on OK.
- In the left pane of the Registry Editor, click on the WinDefend registry key to have its contents displayed in the right pane.
- In the right pane of the Registry Editor, locate and double-click on the registry value titled ‘Start.’ Replace whatever is in its ‘Value data:’ field with ‘2‘ and click ‘OK.’
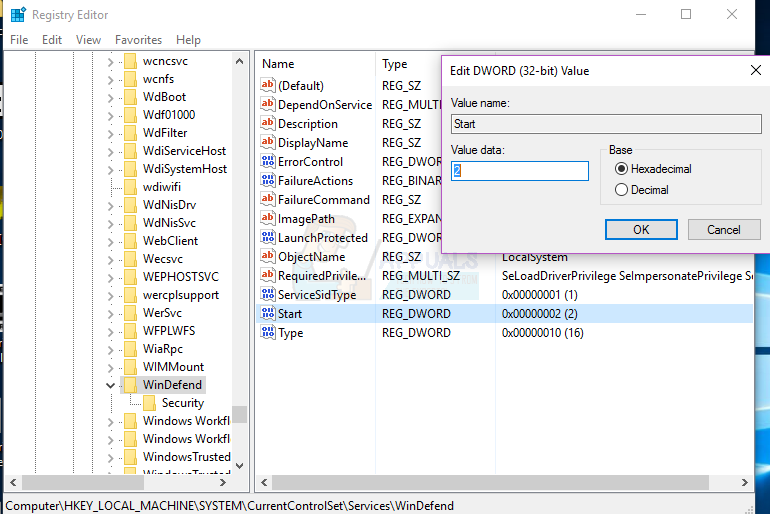
Once done, you may close the Registry Editor and try to start Windows Defender to check whether or not the problem has been resolved.
Solution 5: Clean install Windows from scratch
If none of the solutions listed and described above have worked for you, the only viable option you have left, if you want to get rid of this issue, is to clean install Windows from scratch. Clean installing Windows may seem like a pretty drastic measure, but that is the price for guaranteed success, as clean installing Windows can, in almost all cases, resolve this problem. You may want to back up any valuable data you have on your computer before proceeding with the clean install, as the process will result in the loss of everything currently on your computer – from data and files to applications and settings. To clean install Windows 10 on your computer from scratch, you can use this guide.
Not sure what the difference is between Defender and Malicious Software Removal programs?
After SOLUTION 3, I was able to run Defender but Windows tells me it “Started and Stopped. Some services stop automatically if they are not in use by other services or programs”
Meanwhile all the time — Windows launches MsMpEng.exe at startup (the Antimalware Service). So what more does Defender do? Or are they the same thing?
And even after changing Defender to AUTOMATIC startup — Windows changes it back to manual after I run it ?
(error-code-0x80070422)