How to Fix Windows 10 Store Error Code 0x80072EFD
The Windows Store certainly does a great job of providing Windows applications to your desktop. However, you might encounter an error while accessing the Windows Store. The error message will most likely read:

An error code will be mentioned at the bottom of the error screen. Although a wide range of error messages may appear, the most common ones are likely to be 0x80072EE7, 0x80072EFD, 0x801901F7, and 0x80072EFF. These errors will, unsurprisingly, prevent you from accessing the Windows Store.
There can be several things causing this issue, depending on the error code. However, the most common cause of these types of issues is related to connection problems. In fact, a message related to a Windows Store connection might appear on the error screen. These errors can also occur if you are using a proxy server or proxy app, like Zenmate. Lastly, this problem could also be caused by improper permissions in the registry editor. Consequently, there are many possible solutions to this problem. Thus, start with Method 1 and follow the steps provided. If that doesn’t resolve the issue, simply move on to the next method.
Solution 1: Clear the Windows Store cache
To start with, you should simply clear the Windows Store cache as doing so is the solution to a wide variety of different Windows Store-related issues and may just be able to get the job done in this case as well. In order to clear the Windows Store cache, you need to:
- Press the Windows Logo key + R to launch a Run
- Type WSReset.exe into the Run dialog and press Enter.
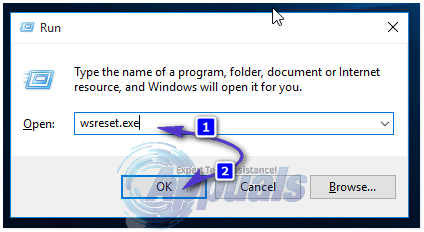
- Restart the computer and, once it boots up, check to see whether or not the Windows Store is up and functioning again.
Solution 2: Re-register the Windows Store
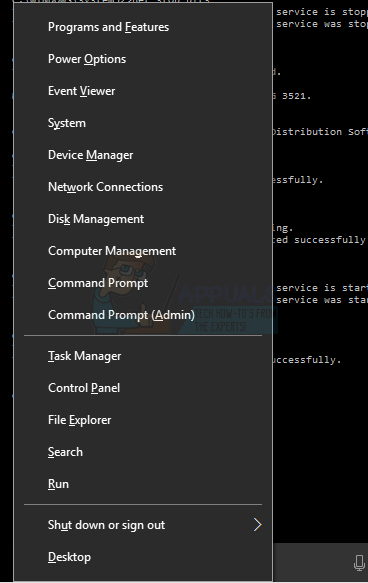
When it comes to Windows 10 issues involving the Windows Store, it is always a good idea to re-register the Windows Store and see if that fixes the problem. Many Windows 10 users who have been affected by this specific issue have had success with getting rid of it by simply re-registering the Windows Store. In order to use this solution, you need to:
- Press the Windows Logo key + X to open the WinX Menu.
- In the WinX Menu, locate and click on Command Prompt (Admin) to launch an elevated Command Prompt with administrative privileges.
- Type the following into the elevated Command Prompt and press Enter:
PowerShell -ExecutionPolicy Unrestricted -Command “& {$manifest = (Get-AppxPackage Microsoft.WindowsStore).InstallLocation + ‘\AppxManifest.xml’ ; Add-AppxPackage -DisableDevelopmentMode -Register $manifest}
- Once the command has been fully executed, close the elevated Command Prompt.
- Restart the computer and wait for it to boot up. When the computer boots up, try launching the Windows Store and see whether or not it successfully loads up.

Solution 3: Rename the Software Distribution folder
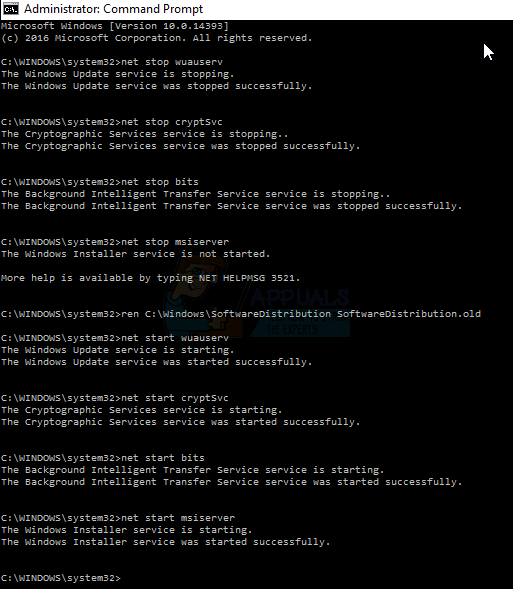
Located in the root folder of your computer’s HDD/SSD is a folder named Software Distribution, and there is a pretty decent chance that you’ll be able to fix this issue by simply renaming this folder, like many affected users before you have, and forcing Windows to automatically create a new one. In order to do so, you need to:
- Press the Windows Logo key + X to open the WinX Menu.
- In the WinX Menu, locate and click on Command Prompt (Admin) to launch an elevated Command Prompt with administrative privileges.
- One by one, type the following commands into the elevated Command Prompt and press Enter after typing in each one:
net stop wuauserv
net stop cryptSvc
net stop bits
net stop msiserver
- Type the following command into the elevated Command Prompt and press Enter:
ren X:\Windows\SoftwareDistribution SoftwareDistribution.old
Note: Replace the X in this command with the letter corresponding to the partition of your computer’s HDD/SSD that Windows is installed on. Usually, it is C:\
- One by one, type the following commands into the elevated Command Prompt and press Enter after typing in each one:
net start wuauserv
net start cryptSvc
net start bits
net start msiserver
- Type exit into the elevated Command Prompt and press Enter to close it.
- Restart the computer.
- Wait for the computer to boot up.
- When the computer boots up, check to see whether or not the problem has been resolved.
Solution 4: Enable TLS
If none of the solutions listed and described above have worked for you, then it’s possible you are suffering from this issue because TLS is disabled on your computer. If that’s the case, enabling TLS should resolve the problem. To enable TLS on a Windows 10 computer, you will need to follow these steps:
- Open the Start Menu.
- Click on Settings.
- Click on Network & Internet.
- Click on Wi-Fi in the left pane and, in the right pane, scroll down and click on Internet Options.
- Navigate to the Advanced
- Under Settings, scroll down to the Security
- Make sure that there is a check mark next to the Use TLS 1.2 option, meaning that the option is enabled.
- Click on Apply and then on OK.
- Restart your computer. Once the computer boots up, try launching the Windows Store and see if it loads up successfully.
Solution 5: Disable Proxy
Having a proxy enabled can prevent you from accessing the Windows 10 Store.
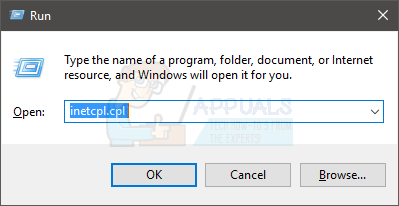
- Press the Windows + R keys to open the command prompt, then type ‘inetcpl.cpl‘, and finally, click ‘OK‘. This will open the Internet Properties settings.
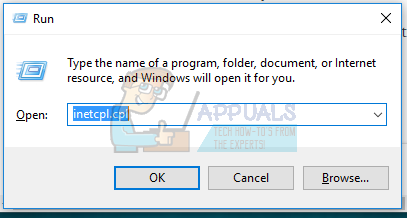
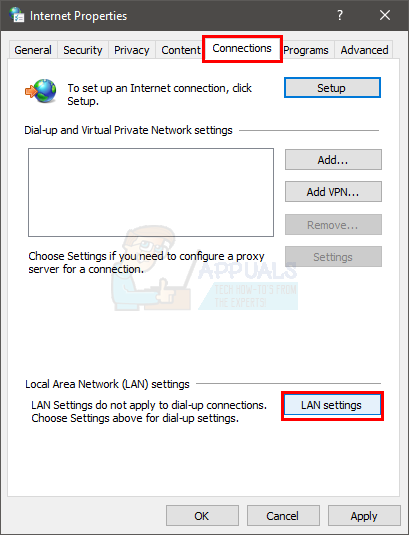
- Go to the Connections tab and click on LAN Settings.
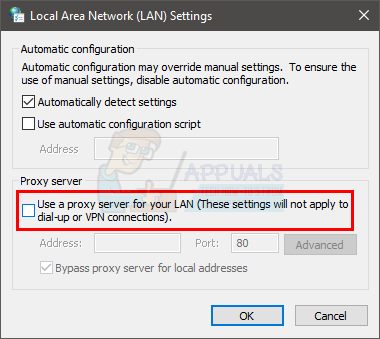
- Check the box next to Automatically Detect Settings and uncheck the box under Proxy Server.
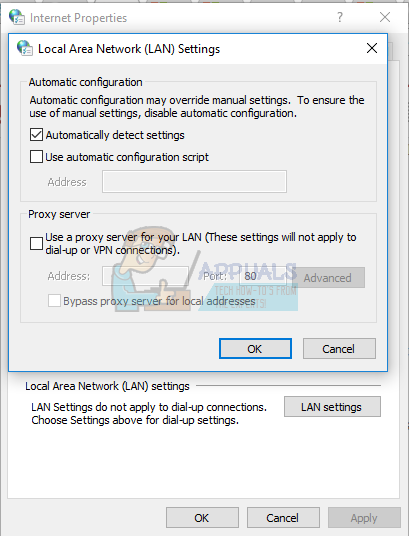
- Click OK and try to open the Windows 10 Store.
Alternatively, you can follow these steps.
- Open an elevated command prompt by pressing the Start button, typing ‘cmd‘, and then opening it as an administrator.
- In the elevated command prompt type the following command:
netsh winhttp reset proxy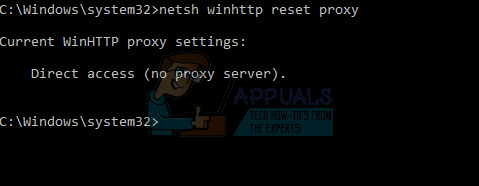
This will reset the proxy settings and give you a direct internet access.
- Try to browse the Windows 10 store and verify if the issue persists.
Solution 6: Enable TLS
Enabling TLS from the Internet Options has worked for plenty of people. So, follow the steps given below to enable TLS.
- Hold Windows key and press R
- Type inetcpl.cpl and press Enter

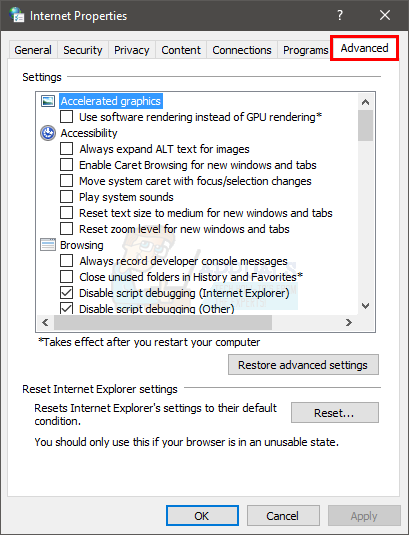
- Click Advanced tab
- Locate the options TLS 1.0, TLS 1.2, and TLS 1.3 from the Settings. These options should be under the Security heading.
- Check the TLS 1.0, TLS 1.2, and TLS 1.3 options
- Click Ok
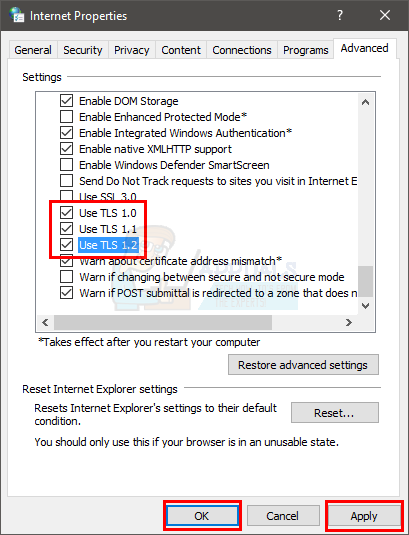
Once done, check if the Windows Store works or not.
Solution 7: Turn of Proxy Server
Turning off the option for using proxy server has also worked for the majority of users. This makes sense because using a proxy server might cause connectivity issue.
The steps for turning off proxy server are given below
- Hold Windows key and press R
- Type inetcpl.cpl and press Enter
- Click the ‘Connections‘ tab.
- Click LAN settings
- Uncheck the option Use a proxy server for your LAN (These settings will not apply to dial-up connections or VPN)
- Click Ok and click Ok again
Check whether the Windows Store has started working or not.
Solution 8: Update Windows
Even though this solution hasn’t worked for many users, it is still worth a try. Some users have resolved this issue by simply updating their system. This solution will definitely work if the problem was caused by a Windows Update. Microsoft will assuredly release a fix in the next Windows Update, so installing the newest update should help.
Note: In some instances, users were not able to download the Windows Update. This difficulty might have been caused by the same problem affecting the Windows Store. Thus, if you are unable to update your system, do not be concerned. Attempt to follow the steps provided in alternative methods.
Solution 9: Set Time & Date
Setting the correct time and date is another solution that has worked for plenty of people. This will solve the issue if the Windows Store was having troubles with the connection. Having a wrong time and date can cause connectivity issues.
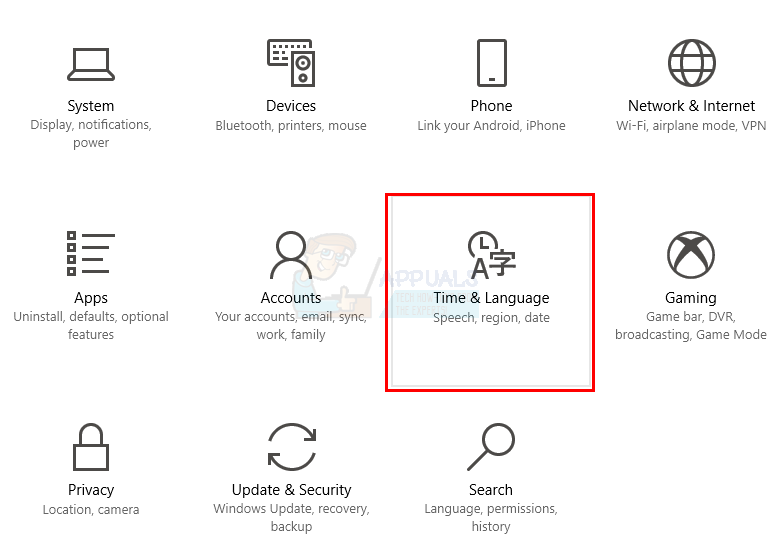
- Hold Windows key and press I
- Select Time & Language
- Toggle off Set time automatically
- Click Change under Change date and time
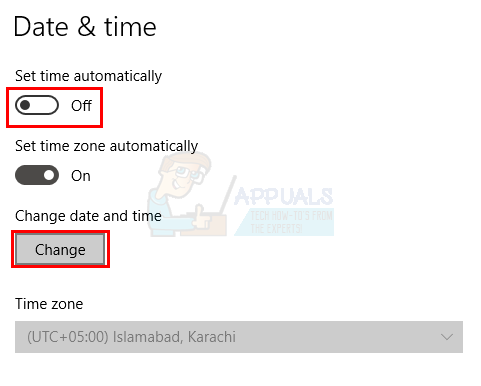
- Select the correct time and date then click Change to confirm
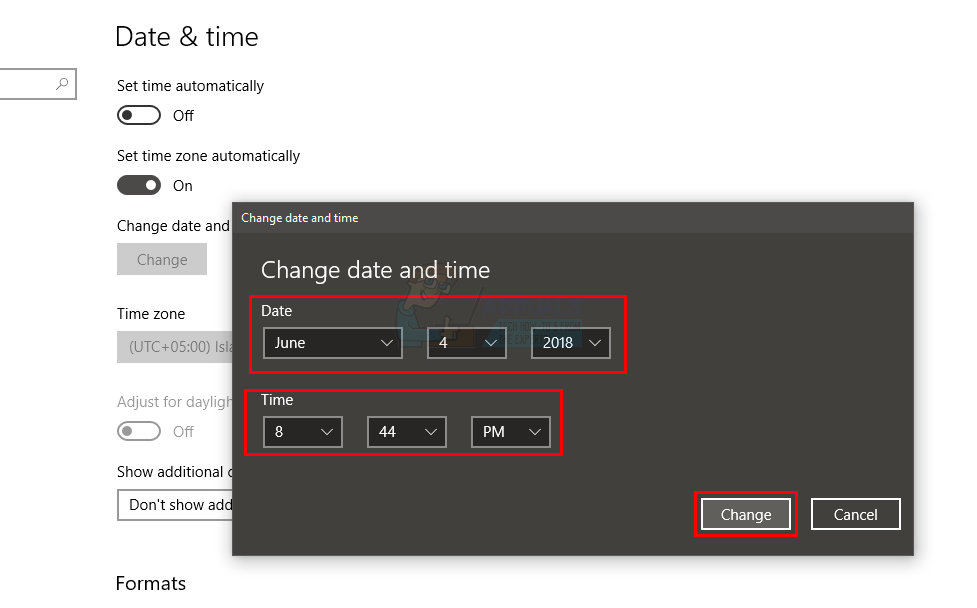
This should solve the issue if the Windows Store was misbehaving because of wrong time and date.
Solution 10: Turn on Windows Update Service
Although we already told you to update Windows in method 3, this method is a bit different. Many people have resolved the issue by setting the Windows Update Service to Automatic. It appears that there is a correlation between Windows Store and Windows Update, and activating the Windows Update Service resolves the Windows Store issue.
Follow the steps given below to turn on Windows Update Service
- Hold Windows key and press R
- Type services.msc and press Enter
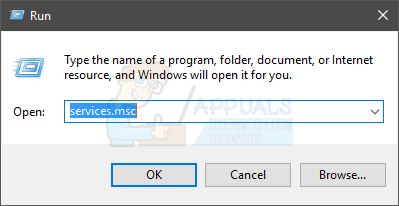
- Locate Windows Update service from the list and double click it
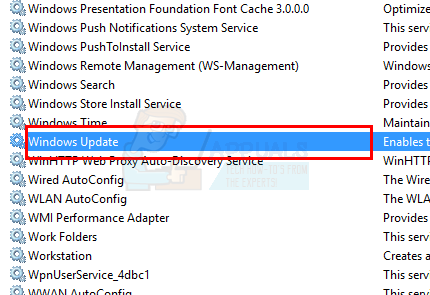
- Make sure the service’s Startup Type is set to automatic. Select Automatic or Automatic (Delayed Start) from the drop down menu in Startup Type
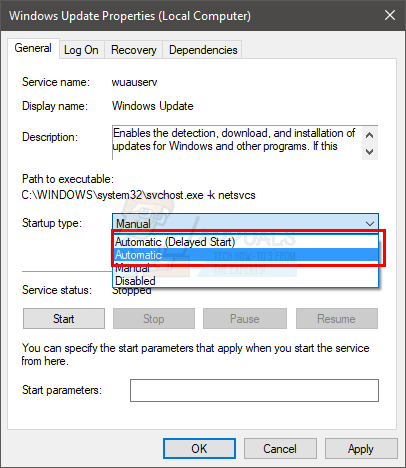
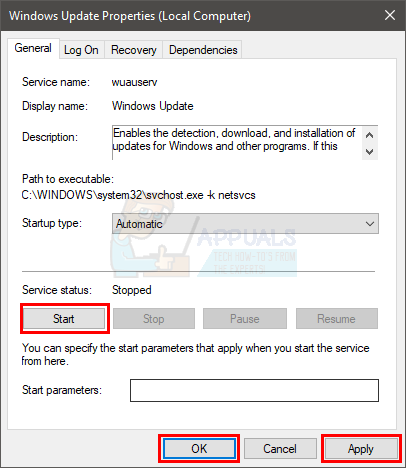
- First, verify if the service is running by checking its status in the ‘Service Status’ section. If the service is stopped, click the ‘Start‘ button to initiate it. If you are unable to start the service, select ‘Manual’ from the ‘Startup Type’ drop-down menu, then click ‘Start’. Once the service is running, revert the ‘Startup Type’ back to ‘Automatic’.
- Click Apply then click Ok
- Reboot
Your Windows Store should work after the reboot.
Solution 11: Enable DNS Client Service
Enabling the DNS client service is another solution that has been fruitful for a bunch of users. Follow the steps given below to turn on the DNS Client Service
- Hold Windows key and press R
- Type services.msc and press Enter

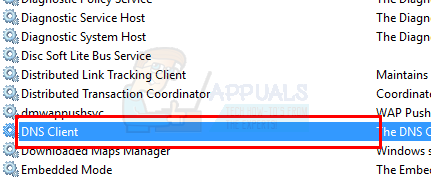
- Locate DNS Client service from the list and double click it
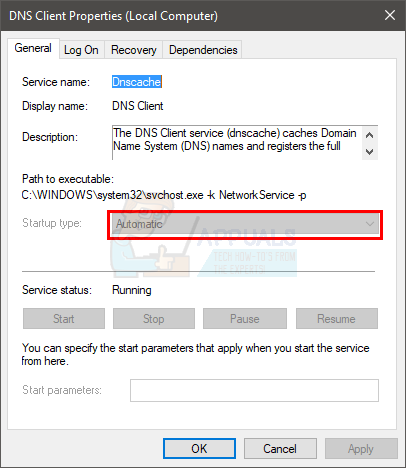
- Make sure the service’s Startup Type is set to automatic. Select Automatic or Automatic (Delayed Start) from the drop down menu in Startup Type
- Click Apply then click Ok
- Reboot
Check if this resolves the Windows Store issue or not. If this doesn’t solve the Windows Store problem then move to the next method.
Solution 12: Fix Permission Issues
As mentioned in the beginning, the problem can also be caused by a permission issue in the registries. So, allowing the proper permissions to the registry key solves the issue as well. The steps for changing the permissions of a registry key are given below
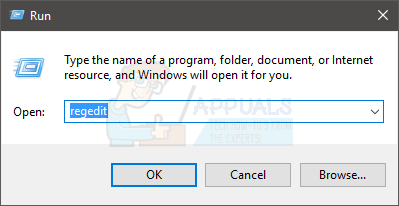
- Hold Windows key and press R
- Type regedit and press Enter
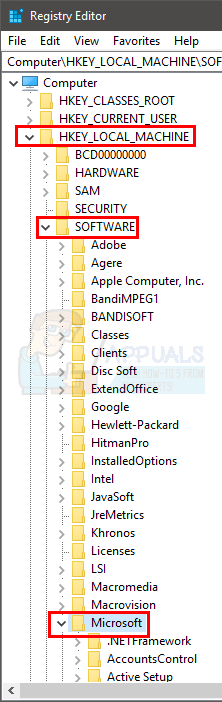
- Now, navigate to this address HKEY_LOCAL_MACHINE\SOFTWARE\Microsoft\Windows NT\CurrentVersion\NetworkList\Profiles. If you don’t know how to navigate there, then follow the steps given below
- Locate and double click HKEY_LOCAL_MACHINE from the left pane
- Locate and double click SOFTWARE from the left pane
- Locate and double click Microsoft from the left pane
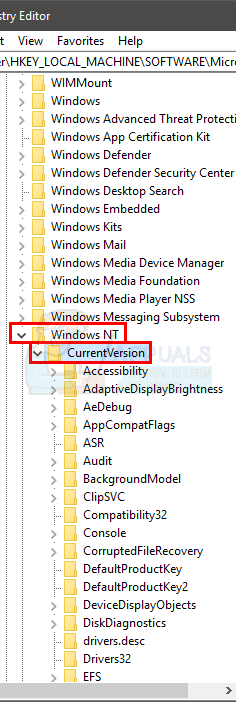
- Locate and double click Windows NT from the left pane
- Locate and double click CurrentVersion from the left pane
- Locate and double click NetworkList from the left pane
- Locate and right click Profiles from the left pane. Select Permissions…

- Click Advanced from the newly created window
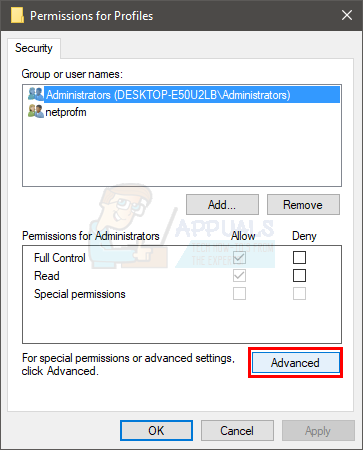
- Check the option Replace all child object permission entries with inheritable permission entries from this object
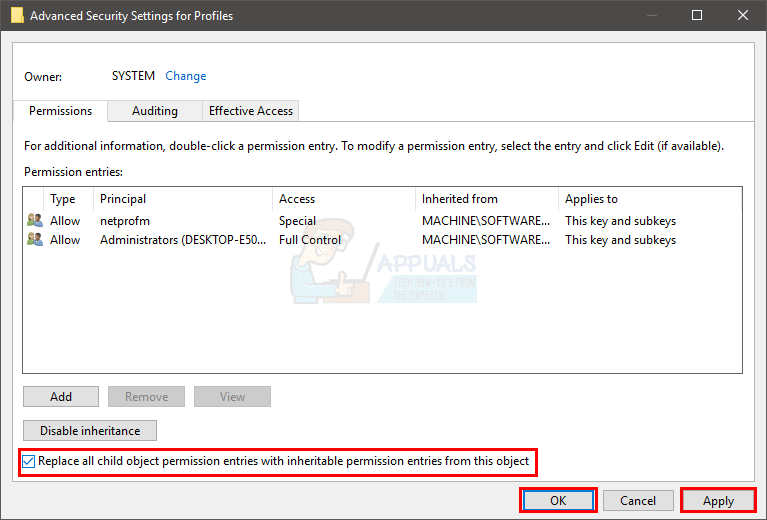
- Click Apply then click Ok. Confirm any additional prompts
- Click Ok again
- Close the registry editor
Now check if the problem is resolved or not.
nothing of those helped me 🙁