How to Fix Windows 10 Not Waking Up from Sleep Mode
People recently started reporting that their computers were not waking up after sleep mode. The light turns on that the computer is turned on but the screen remains black. We have listed a series of steps on how you can troubleshoot what is causing the problem and fix it accordingly. As you already know, this can really be a big issue for some users especially if they were working on something important they will have to lose all the work and restart the computer to even apply the fixes provided.
But before moving on, try checking out these handy tips before moving on to more technical solutions:
- Use the power button on your system to wake it up from sleep, not from a keyboard or mouse. If it wakes up through the power button then make sure that the keyboard and mouse are set to “Allow this device to wake the computer” and the USB wakeup support in your BIOS is enabled.
- Unplug any external graphics card and then startup the system to check if the Graphics Card is faulty.
- Try Clean boot Windows to check if any other program or driver is creating the issue
- Check RAM settings/components and make sure they are working as expected.
1. Replace Sleep with Hibernate
It seems the case for many users that their computer couldn’t function the operation of sleep properly. One workaround is to replace the function of sleep with hibernate functionality so whenever you close the lid or press the power button, the computer hibernates instead of sleeping. This solution solved the problem in the majority of cases.
- Press and hold the Windows key then press the I key to open the Settings app.
- Once in the Settings, select the menu of System present as the first entry at the top left side of the screen.
Open System - Choose the menu of Power and Sleep from the list of options at the left pane on the screen.

Open Power & Sleep Options - Now at the top right side, you will find an option as Advanced power settings. Click it.

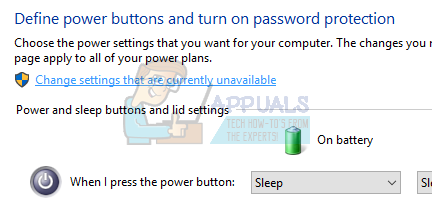
Open Additional Power Settings - Choose the option “Choose what the power buttons do” from the list of options available on the left side of the screen.

Choose what the power buttons do - Now you will be seeing a menu like this. Make sure that you apply these changes to both the options (On battery and Plugged in).
When I press the power button: Hibernate

When I press the sleep button: Turn off the display

When I close the lid: Sleep
Click on “Save Changes” at the bottom of the screen and navigate back to the previous page.
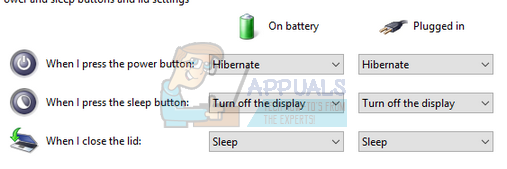
Change Power Options - Now click the option “Choose what closing the lid does“.

Choose what closing the lid does - Make sure that you apply these changes to both the options (On battery and Plugged in)
When I press the power button: Hibernate

When I press the sleep button: Turn off the display

When I close the lid: Sleep
Click on “Save Changes” at the bottom of the screen and navigate back to the previous page.
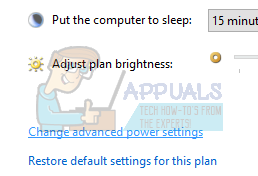
- Now navigate to the main Power Options menu. Here you will see different plans available on your computer (Balanced, High Performance and Power saver, etc.). Select the one you are using and click on “Change plan settings” present in front of it.
- A new window will appear. Navigate to the near bottom and click on “Change advanced power settings”.
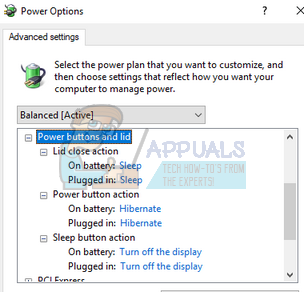
Change advanced power settings - A small new window will appear in front of you. Navigate to the near bottom and select “Power buttons and lid”. Apply these changes to both the conditions (On battery and Plugged in).
Lid close action: Sleep

Power button action: Hibernate

Sleep button action: Turn off the display
Press Ok to save changes and exit. Restart your computer for the changes to take place and check if the problem has been solved.
2. Downgrade the Version of Intel Management Engine Components Driver
We will download the Intel Management Engine Interface Driver (version 9 or 10) and exploit the show or hide the updates package to stop the system from installing version 11 again. We will have to pause the update service of your computer using the services menu to ensure that Windows doesn’t automatically install the version 11 itself.
- Type “services.msc” to launch the services window where all the services present in your machine are listed.
- Once in services, navigate to the near bottom of the screen and locate Windows Update. Right-click it and select Properties.

Windows Update Service - After stopping the process, click on the Startup Type option and select Manual from the list of options available.

Set Service Startup Type as Manual - Press OK to save changes and exit. Restart your computer for the changes to take place.
- Navigate to HP’s official drivers’ download site and enter the model of your machine.
- Once you have selected your machine and are redirected to the drivers’ page, expand the option of “Driver-Chipset” and download “Intel Management Engine Components Driver”.
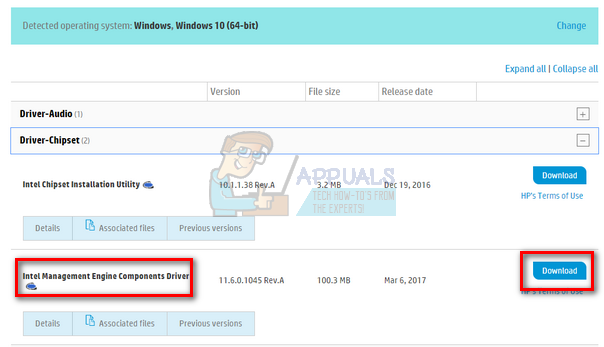
Intel Management Engine Components Driver - Now install the downloaded software.
- Once you have installed it, download the Windows 10 Show or Hide updates package from Microsoft.
- Now run the downloaded package. After Windows scans your computer, you will be given two options. Select the one which says “Hide updates”.
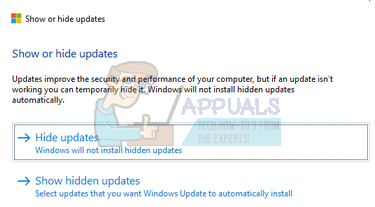
Hide Updates - In the next window select Intel Management Engine Components Driver and hide it. This will ensure that you don’t update the 11th edition.
- Type “services.msc” to launch the services window where all the services present in your machine are listed.
- Once in services, navigate to the near bottom of the screen and locate Windows Update. Right-click it and select Properties.
Open Properties of Windows Update Service - Click on the Startup Type option and select Automatic from the list of options available.

Change Service Startup Type to Automatic - Restart your computer and check if your computer goes to sleep correctly.
Note: You don’t need to uninstall version 11 before installing version 9 or 10. The presence of some version of the driver is required to downgrade it.
3. Check Compatibility of Attached Devices
If you are experiencing this problem after upgrading to Windows 10, it can be because of non-compatible devices connected to your computer. Many manufacturers take time before rolling out the required updates for their equipment to be completely compatible with the newer version of Windows.
The devices can include your printer, or gaming consoles, etc. Head over to the manufacturer’s website and confirm the compatibility of the device. If it isn’t, disconnect the device from your computer and check if the sleep problem persists.
4. Change Sleep settings
We can try changing the wake-up timer settings from your power settings and check if this does the trick. This setting will ensure that your computer wakes up whenever it goes into sleep mode and the option is enabled.
- Right-click on the Windows icon present at the bottom left side of the screen and select Settings.
- Once in the Settings, select the menu of System present as the first entry at the top left side of the screen.
- Choose the menu of Power and Sleep from the list of options at the left pane on the screen.
- Now at the top right side, you will find an option as Additional power settings. Click it.
Open Additional Power Settings - Here you will see different plans available on your computer (Balanced, High Performance and Power saver, etc.). Select the one you are using and click on “Change plan settings” present in front of it.
- A new window will appear. Navigate to the near bottom and click on “Change advanced power settings”.
Change advanced power settings - A small new window will appear in front of you. Navigate to the near bottom and select “Sleep”. Now expand the category of “Allow wake timers”. Set it to enabled for both the options (On battery and Plugged in).
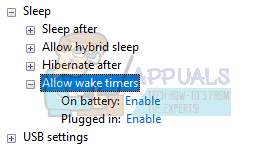
Allow wake timers - Save changes and exit. After restarting your computer, check if the problem got solved.
5. Change Deep Sleep Function
Windows 10 has a feature of deep sleep. The computer saves all the data before sleeping so when it starts up, it can directly load it and start much faster. The CPU will also be not running in the process hence increasing your battery life and performance.
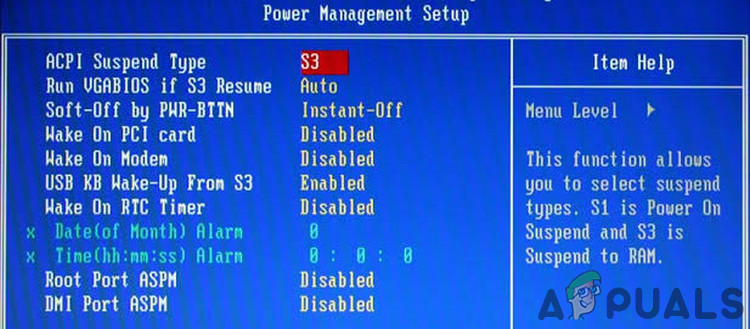
May be your machine doesn’t support the deep sleep function. You can check the compatibility using your computer manufacturer website. If it doesn’t, you can disable it using your BIOS settings. Enter your BIOS settings upon the start of the computer and navigate to Setup > Config > Power > Intel Rapid Start Technology. Change this setting to Disabled and save changes before exiting. You may use S3 power settings to solve this issue. Also, make sure that hybrid sleep is set to disabled in the BIOS.
We can also change the Fast startup option from the power management settings available on your computer.
- Navigate to the Power Plans settings (like we did in the earlier steps).
- Once in the Power Plans window, select “Choose what the power buttons do” present at the left side of the screen.
- Click the option which says “Change settings that are currently unavailable”.
Change settings that are currently unavailable - After clicking, you will notice that the shutdown settings will become available to you present at the bottom of the screen. Uncheck the “Turn on fast startup” option and click save changes at the bottom of the screen.
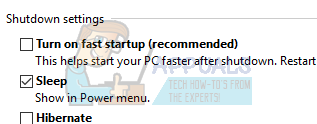
Uncheck the “Turn on fast startup” - Navigate back to the power options menu and select “Choose what closing the lid does”. Repeat steps 3 and 4 and save changes.
- A restart might be required so all the changes can be implemented.
6. Update Your Display Drivers
When Windows loads from sleep mode, it uses the graphics hardware to load the computer and provide the required GUI. If the graphics drivers are not installed correctly or are corrupt, this can cause a problem. We will start your computer in Safe Mode and delete the currently installed drivers of your display card. Upon the restart, the default display drivers would automatically be installed upon the detection of your display hardware.
- Follow the instructions on our article on how to boot your computer in safe mode.
- Once booted in the safe mode, right-click on Windows key and select Device Manager from the list of options available.

Open Device Manager Another way to launch the device manager is by pressing Windows + R to launch the Run application and typing “devmgmt.msc”.
- Once in the device manager, expand the Display adapters section and right-click on your display hardware. Select the option of Uninstall device. Windows will pop a dialogue box to confirm your actions, press Ok and proceed.

Uninstall Device in Device Manager - Restart your PC. Press the Windows + S button to launch your start menu’s search bar. In the dialogue box type “Windows update”. Click the first search result which comes forward.
- Once in the update settings, click on the button which says “Check for updates”. Now Windows will automatically check for updates available and install them. It may even prompt you for a restart.

Check For Updates - After updating, check if your issue got fixed.
Windows Update always tries its best to deliver the latest drivers available for your hardware. But it also doesn’t mean that they are the latest ones available. Alternatively to the Windows Update, you can also head over to your graphics card’s manufacturer website and download the latest drivers manually.
If the latest drivers also don’t solve the problem in question, you can try downloading and installing an older driver for your hardware. Manufacturers have all the drivers listed according to date and you can try installing them manually. Follow the instructions below to install the drivers manually.
- Open your Device Manager as explained above in the solution and right-click on your driver and select “Update Driver”.

Update Driver of the Device in Device Manager - Now a new window will pop up asking you whether to update the driver manually or automatically. Select “Browse my computer for driver software”.
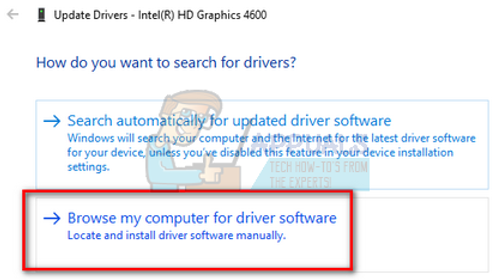
Browse my computer for driver software - Now browse through the folders to where you downloaded the drivers. Select it and Windows will install the required drivers. Restart your computer and check if the problem got solved.

Note: You should also update all your other drivers (mouse, keyboard, sound, etc.)
7. Use CMD to Disable Windows Sleep
As a last resort, we can try disabling your Windows sleep function using the command prompt. If this method doesn’t work for you, you can easily revert the changes by changing “off” with “on”.
- Press Windows + S to launch the search bar of your start menu. Type “command prompt” in the dialogue box. Right-click on the first result which comes forth and select “Run as administrator”.
- Once in the command prompt type the following command and press enter:
Powercfg –h off
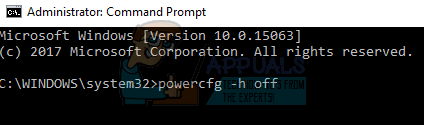
Run Powercfg –h off in Command Prompt - Restart your computer and check if the problem got solved.
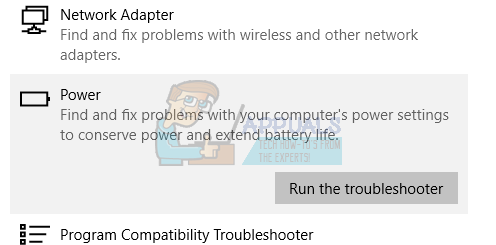
8. Run the Power-Troubleshooter
We can try running the power troubleshooter on your Windows. It is a utility developed by Microsoft to check the power settings and locate discrepancies. If the troubleshooter finds some settings which are causing the issue, it will automatically fix them and inform you.
- Press Windows + S to launch the start menu’s search bar. Type “troubleshoot” in the dialogue box and click on the first result which comes forth.

- Once in the troubleshoot menu, select “Power” and click the button “Run the troubleshooter”.
- Now Windows will scan your computer and detect problems (if any). Wait for the process to complete as this can consume some time.

- Restart your computer for the changes to take place.
9. Run the Power Troubleshooter
To troubleshoot, Windows has many built-in troubleshooters. As we are having issues with the power settings of the system, we can try running the Power troubleshooter and see if this does the trick for us. When you run the power troubleshooter, it will automatically check the registry, the hardware, and the interacting software components and make sure everything is in place. If any discrepancy is found, it will be restarted/reset automatically and fixed.
- Click on the Windows button and in the search bar type Troubleshoot. Now in the results, click on Troubleshoot Settings.

Open Troubleshoot Settings - In the right pane of the Settings window, scroll down to find Power (in the Find and fix other problems section). Now click on Power and then click on Run this Troubleshooter.
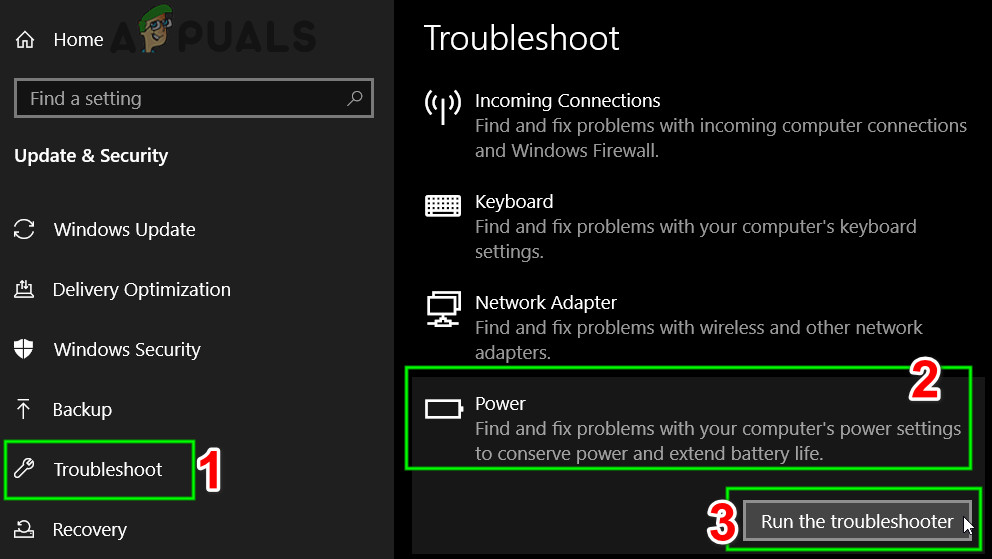
Run the Power Troubleshooter - Now follow the instructions displayed on the screen to complete the troubleshooter.
- After completion of the troubleshooting process, check if the system is waking up from sleep without any issue.
10. Update BIOS
There is a misconception that sleep functionality is just an OS feature; BIOS plays a critical role in the sleep functionality of your system. An outdated BIOS can become incompatible with the OS and thus cause the non-waking of the system from sleep. In that case, updating the BIOS to the latest version may solve the problem.
Warning: Proceed at your own risk, as updating your BIOS is a more technical step and if done wrong, you may brick your system and cause everlasting damage to your system. Here are some tutorials on how to update the BIOS of different manufacturers:
- Update Lenovo BIOS.
- Update HP BIOS.
- Update Dell BIOS.
11. Try Registry Fix
In some cases, certain registry settings need to be altered to get this feature to work properly. Therefore, in this step, we will be reconfiguring the “Connected Standby” settings. In order to do so:
- Press “Windows” + “R” to open the Run prompt.
- Type in “Regedit” and press “Enter”.

Running the Registry Editor - Navigate to the following address.
HKEY_LOCAL_MACHINE\SYSTEM\CurrentControlSet\Control\Power
- Double click on the “CsEnabled” option and change the “Value Data” to “0”.
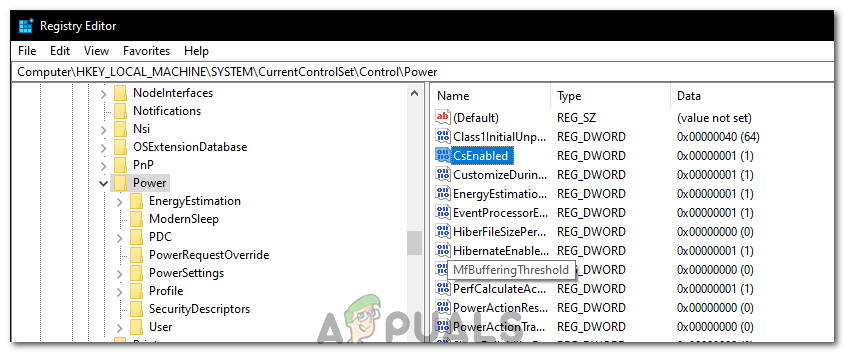
Selecting “CsEnabled” - Check to see if the issue persists.
Sometimes I see sites like this and think they’re just trying to get me to download some b.s. tools that are going to install spyware but, in my case, the advice here was solid. I have a 5 year old Lenovo desktop and rolling back the Intel Management Engine did the trick. Thanks to the maintainer of this site and this page.