Fix: ‘Windows Can’t Find the Microsoft Software License Terms
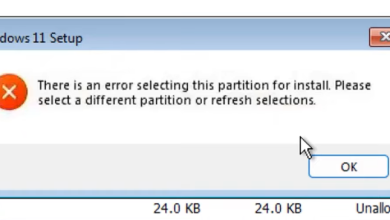
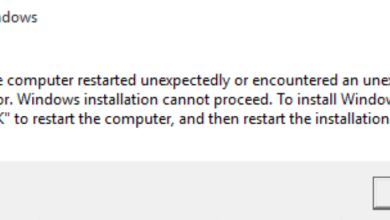
The “Windows cannot find the Microsoft Software License Terms” error usually appears when trying to install Windows or Windows Server on your computer. It appears during the installation process and it prevents the installation of Windows completely.

The error is sometimes difficult to deal with because the targeted computer often doesn’t have an operating system installed and you have to resolve the problem in other ways. Luckily, many users found great methods of resolving the problem on their own and we decided to gather these methods in a single article. Check it out below!
What Causes the “Windows Cannot Find the Microsoft Software License Terms” Error on Windows?
There are several possible causes to this issue and troubleshooting them can be more difficult because the computer probably can’t boot into Windows as it hasn’t been installed yet. Still, these causes can be crucial and we recommend you check them out below!
- Broken or missing files in the installation – If the ISO file hasn’t been created properly, some crucial files might be missing or corrupt which causes the installation to stop. Recreating the ISO file using Media Creation Tool or Rufus can resolve this problem.
- The drive hasn’t been prepared properly – Any drive where you want to install Windows needs to be prepared properly. The preparation includes creating a primary partition, cleaning the drive, and formatting it in the NTFS file system. Make sure you perform these steps.
- Dynamic memory – If dynamic memory is enabled when installing Windows on a Virtual Machine, it can cause this error and the recommendation is to disable it and simply provide enough memory from the start.
Solution 1: Recreate the Windows 10 Image
In most cases, the problem can be blamed on the image file you used to install Windows. Some files might not have been copied properly and some of them may be missing or corrupt. Either way, recreating the image using the Media Creation Tool is an easy and efficient way of resolving the problem.
- Download the Media Creation Tool software from Microsoft’s website. Open the downloaded file called exe to open the start the installation. Tap Accept to agree on terms and conditions set by Microsoft.
- Select the Create installation media (USB flash drive, DVD, or ISO file) for another PC option from the initial screen.

- The language, architecture, and edition of the bootable drive will be chosen based on your computer’s settings, but you should uncheck the Use the recommended options for this PC in order to select the correct settings for your PC which is encountering the error (if you are creating this on a different PC, of course).
- Click Next and click on the USB drive or DVD option when prompted to choose between USB or DVD, depending on which device you want to use to store this image on.

- Click Next and choose the required drivers from the list which will show the storage devices connected to your computer at the moment.
- Click Next and the Media Creation Tool will proceed to download the files necessary to install create the installation device. Wait for the process to finish. Insert the drive in the target computer and check to see if the installation finishes without problems!
Solution 2: Use Rufus to Create a Bootable Drive
Users have reported that, after failing to create a USB bootable device using any other method, they have tried using a simple tool called Rufus. It can perform the same process easily and you won’t have to prolong the process. The only thing it lacks is a beautiful design but that is probably not the point while troubleshooting this problem.
- You can download Rufus from this website. Scroll down towards the Download button and download the latest version. Open the file you downloaded and you can simply open it without installation.
- Under the Device section, click on the drop-down menu and choose your USB device from the list. This time, you shouldn’t have problems regarding the USB device.

- Under Partition scheme and target system type, make sure you choose the GPT partition scheme for UEFI and leave the File system option as FAT32. Leave the Cluster size to default.
- Check the Create a bootable disk option and leave the radio button next to Standard Windows installation. At the right part of this option, click on the disk icon and choose your .iso file containing the Windows 10 installation.

- After that, click on Start, and wait for the process to finish. After it’s done, you will now have your USB device ready for use with Windows 10 on it! Try inserting it and see whether the “Windows cannot find the Microsoft Software License Terms” error appears again!
Solution 3: Prepare Your Drive Properly
It’s quite possible that the drive where you want to install Windows hasn’t been prepared properly. It’s something you can usually do in the Disk Management utility but you will have to use Command Prompt since you are probably unable to boot into anything. Follow the steps below to fully prepare your drive for the Windows installation.
- If your computer’s system is not installed, you will have to use the installation media used to install windows for this process (the same one causing the problem). Insert the installation drive and boot your computer.
- You will see a Choose your keyboard layout screen so choose the one you want to use. After that, make sure you navigate to Troubleshoot >> Advanced Options >> Command Prompt.

- At the command prompt window, type in simply “diskpart” in a new line and click the Enter key to run this command.
- This will change the Command Prompt window to enable you to run various Diskpart The first one you will run is the one which will enable you to see the complete list of all available drives. Type this in and make sure you click Enter afterward:
DISKPART> list disk
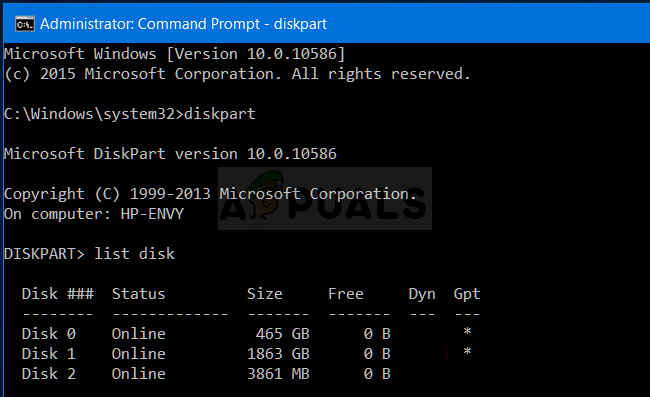
- Make sure you choose your drive carefully, depending on which number is assigned to it in the list of volumes. This is the drive where you want to install Windows. Let’s say that its number is 1. Now run the following command to select your required drive:
DISKPART> select disk 1
- A message should appear saying something like “Disk 1 is the selected disk”.
Note: If you are unsure about which drive number belongs to your drive, the easiest way to do so is to check its size at the right pane.
- To clean this volume, all you need to do is to type in the command displayed below, click the Enter key afterward, and stay patient for the process to complete. The process should now be successful for a change. This set of commands will also create a Primary Partition and make it active so that you can format it without problems.
Clean
Create Partition Primary
Active
- Finally, this last command will format the drive in the file system you choose. When considering the file system, you need to choose NTFS for the Windows installation. Type in the following command and tap Enter afterward:
format fs=ntfs quick
- Exit Command Prompt and check to see if you are now able to run the installation without problems!
Solution 4: Disable Dynamic RAM (VM users only)
If you are trying to install Windows or Windows Server on a Virtual Machine using Hyper-V, it’s recommended you disable dynamic memory from the Hyper-V Manager. Many users were able to resolve the problem this way so make sure you follow the steps below carefully.
- Open up the Hyper-V manager by double-clicking its icon on the Desktop or by searching for it in the Start Menu and clicking the first option which appears.
- From the left-side navigation menu, choose your node and the list of virtual machines should appear to the right. Right-click the one where the problem occurs and choose Settings from the context menu which will appear.

- Navigate to the Memory tab from the right-side navigation menu. From the right side, uncheck the box next to the Enable Dynamic Memory option. Make sure you assign enough static RAM for the Virtual Machine.
- Apply the changes you have made and try installing Windows to the Virtual Machine once again. Check to see if the problem still appears.
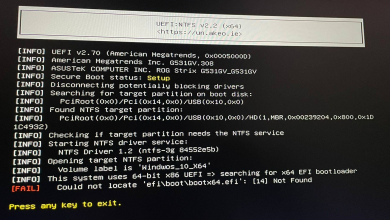

Hi, thank you for the article. I just want to add that I got this error setting up MS Server 2022 on a VM using VMWare Workstation Pro. I fixed this error by turning off the Floppy Disk drive option by
Right clicking the VM tab on the workstation -> clicking “Settings” -> Under the Hardware tab clicking “Floppy” -> Unchecking the boxes that say “Connected” and “Connected at power on”. I had to leave the “Use floppy image file:” alone.
Once I did this my VM installed and booted right up. I guess it didn’t like floppy disks. It was a weird fix, but it worked! Thanks again!
https://uploads.disquscdn.com/images/70fd7b079d915ebac7d553c496c1d53b8a969e6d3b656f58381566fde7eec68d.png