How to Fix ‘The L2TP Connection Attempt Failed’ Processing Error
The error “The L2TP connection attempt failed” occurs when a VPN can’t establish its security protocol, often due to mismatched security settings between the client and server. A common cause of this error is recent Windows updates affecting VPN communication.

Other potential causes include incorrect VPN settings, like wrong pre-shared keys, or network issues blocking the UDP ports needed for VPN traffic.
Now that you understand the problem, let us move on to the solutions. Follow these steps in order to avoid conflicts.
1. Enable MS-CHAP v2
Switching to MS-CHAP v2 is important because it updates the VPN’s login process. MS-CHAP v2 is a safer version of an older security method. It makes the connection more secure by letting both the client and server confirm each other’s identity. This helps prevent security issues that could stop the connection.
- Ensure the VPN connection is set up with the correct credentials for the VPN server, and add the connection.
- The connection will appear in the network adapter list once added.
- Press Windows + R to open the Run dialog.
- Type ncpa.cpl and press Enter to open Network Adapter Settings.

Typing in ncpa.cpl and pressing Enter - Right-click the VPN connection and select Properties.

Right-clicking on the VPN and selecting Properties - Click the Security tab and check the Allow These Protocols option.
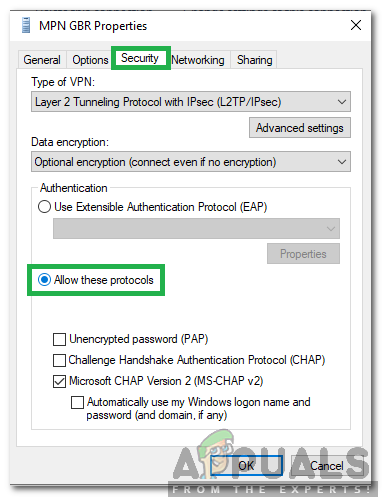
Selecting the Allow these Protocols option - Check Microsoft-CHAP Version 2 and click OK.
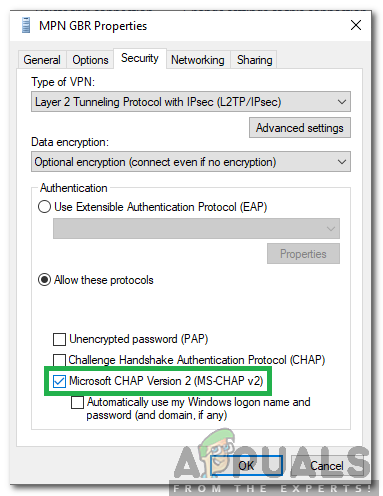
Checking the Microsoft-CHAP Version 2 option - Try connecting to the VPN to see if the issue persists.
2. Enabling LCP Extensions
Changing the Link Control Protocol (LCP) settings, especially turning on LCP extensions, can help fix VPN connection problems like the L2TP error. These extensions make the connection setup between your computer and the VPN server more advanced and flexible. They offer better error detection and network setup options, which help the VPN connect more reliably. Enabling these extensions can solve the connection issues that stop the L2TP tunnel from working properly.
- Press Windows + R to open the Run dialog.

Opening Run Prompt - Type ncpa.cpl and press Enter to open Network Adapter Settings.
- Right-click the VPN connection and select Properties.

Right-clicking on the VPN and selecting Properties - Click the Options tab and choose PPP Settings.
- Check Enable LCP Extensions and click OK.
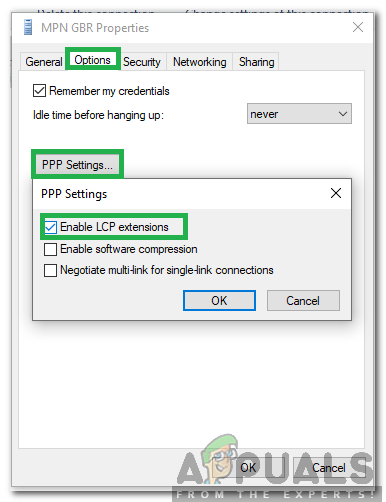
Checking the Enable LCP Extensions option and selecting OK - Click OK again to save your settings.
- Try connecting to the VPN to see if the issue continues.


