How to Fix the Computer Keeps Waking up from Sleep Problem?
Putting your computer to sleep is a great way to save battery and still be able to access your computer within a couple of seconds. However, several users have reported that their computer simply started waking up from sleep randomly in the meantime.

This is usually quite unexpected and it annoys users since waking up from sleep starts consuming more battery. Luckily, there are quite a few different things you can do to prevent this if you simply check out the methods we have prepared below!
What Causes Your Computer to Wake up from Sleep Randomly?
This is quite a strange issue and it happens at random times. However, quite a few different causes can be recognized which, in turn, lead to a new solution that can be used. Check out the shortlist of causes we have prepared below!
- Wake timers – Wake timers do exactly as their name suggest! They are triggers which cause your computer to wake up from sleep to accomplish an action. Disabling them should resolve this problem immediately!
- Networking devices – Being connected in a network can cause some of the devices to be able to contact your computer even if it’s sleeping. Preventing your networking device from being able to wake up your computer should resolve the problem!
- Spotify – A certain version of Spotify can deploy wake timers which can cause your PC to wake up from sleep. Make sure you reinstall and update to the latest version.
- Wake-on-Lan – This option can be useful to enable communication among devices connected to the same LAN. However, it can your PC to wake up from sleep randomly so make sure you disable it in BIOS.
- Scheduled tasks – If there is a task scheduled to run while your PC is sleeping, it might awake it if it has the permissions to do so. The usual tasks with such permissions are Windows Update tasks so make sure you remove that permission from them!
Solution 1: Disable Wake Timers
Wake timers are used to wake your computer up from sleep to do something on your computer. They are usually run either by Windows Update to see if a new update has been released or by some automated maintenance tools. Either way, your computer will be fine without wake timers so check out how to disable them.
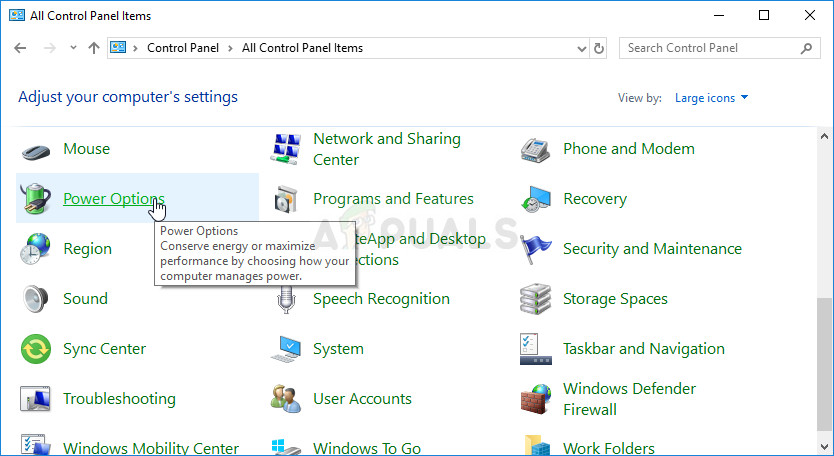
- Right-click on the battery icon located in the system tray and click on Power Options. If you are not using Windows 10, click on the Start menu and search for Control Panel. Change the View by option to Large icons and click on the Power Options.
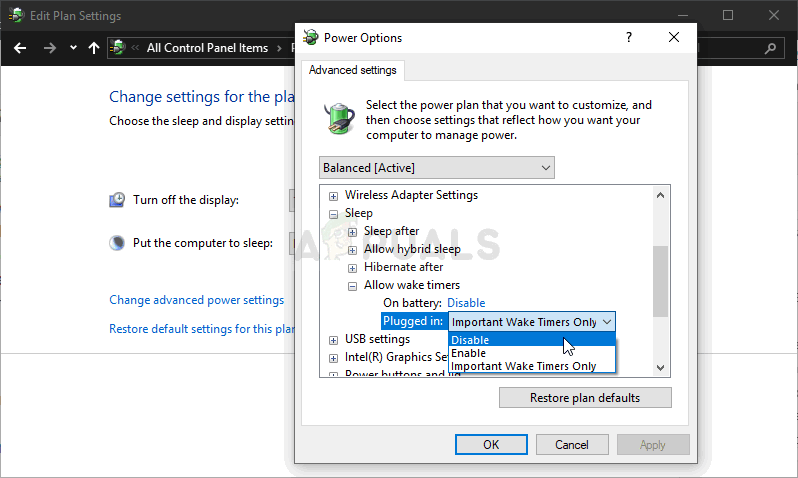
- Choose the power plan you are currently using (usually Balanced or Power saver) and click on the Change plan settings In the new window which opens, click on Change advanced power settings.
- In this window, click the small plus button next to the Sleep entry on the list to expand it. Inside, click to expand the Allow wake timers Click to choose the Disable option for both On battery and Plugged in scenarios before clicking the OK button to apply the changes.
- Put your computer to sleep again and check to see if it still wakes up from sleep randomly!
Solution 2: Disable Wake on Magic Packet
This is a feature which can be used to wake up a remote computer by producing a wake-up pattern. If someone is pinging your computer, it might turn on. However, this feature has been known to turn on people’s computers for many different reasons so it’s probably for the best to simply turn it off!
- Type “Device Manager” into the search field next to the Start menu button to open the device manager window. You can also use the Windows Key + R key combination to open the Run dialog box. Type devmgmt.msc in the box and click OK or Enter key.

- Expand the “Network Adapters” section. This will display all network adapters that the machine has installed at the moment.
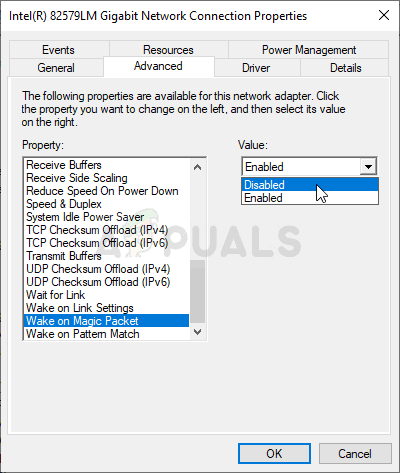
- Right-click on the network adapter you use to connect to the Internet and select “Properties” from the dropdown menu which will appear. Navigate to the Advanced tab once inside. In the Property box, locate the Wake on Magic Packet Click the box under Value and set it to Disabled.
- Furthermore, Use the Windows + R key combo which should immediately open the Run dialog box where you should type ‘ncpa.cpl’ in the bar and click OK to open the Internet Connection settings item in Control Panel.
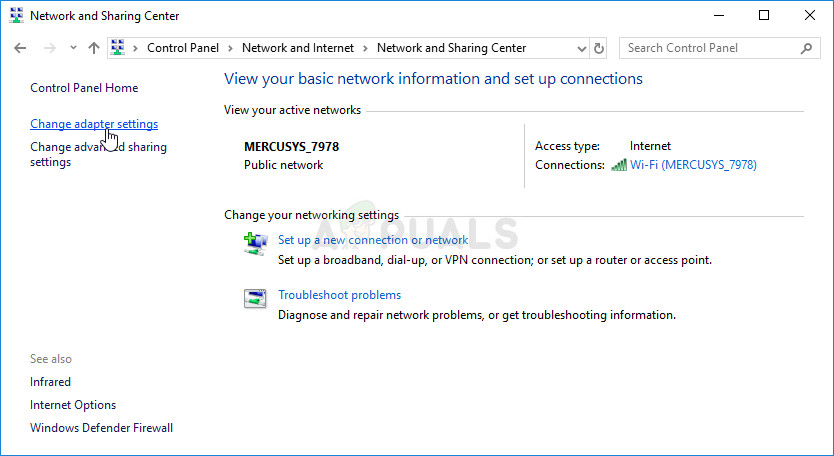
- The same process can also be done by manually opening the Control Panel. Switch the View by setting at the top right section of the window to Category and click on Network and Internet at the top. Click the Network and Sharing center button to open it. Try to locate the Change adapter settings button at the left menu and click on it.
- When the Internet Connection window opens, double-click on your active Network Adapter.
- Then click Properties and click the Configure button at the top of the window. Navigate to the Power Management tab in the new window which will open and locate the Allow this device to wake the computer option in the list.

- Make sure the box next to this option is unchecked. Click the OK button to confirm your changes. After your computer goes to sleep, check to see if it wakes up at all!
Solution 3: Reinstall Spotify
Users have reported that a certain version of Spotify for your PC uses timers which can wake up your computer from sleep. Weirdly, a music-streaming app uses such timers but you can reinstall Spotify on your computer to get the latest version and get rid of this annoying issue at the same time! Follow the instructions below to do so!
- First of all, make sure you have logged in with an admin account as you won’t be able to uninstall programs using any other account privileges.
- You might lose all the music you have downloaded for offline use along with playlists you have created in the app.
- Click on the Start menu and open Control Panel by searching for it. Alternatively, you can click on the gear icon to open Settings if you are using Windows 10.
- In Control Panel, select to View as: Category at the top right corner and click on Uninstall a Program under the Programs section.

Uninstall a program in Control Panel - If you are using the Settings app, clicking on Apps should immediately open a list of all installed programs on your PC.
- Locate the Spotify entry on the list and click on it once. Click on the Uninstall button above the list and confirm any dialog boxes which may appear. Follow the instructions on-screen to uninstall Spotify and restart your computer afterward.
After this, you will need to delete Spotify’s data left behind on your computer by following the set of steps below:
- Navigate to the following location on your computer by opening the Windows Explorer and clicking on This PC:
C:\Users\YOURUSERNAME\AppData\Roaming\Spotify
- If you are unable to see the AppData folder, you may need to turn on the option which enables you to view hidden files and folders. Click on the “View” tab on File Explorer’s menu and click on the “Hidden items” checkbox in the Show/hide section. File Explorer will show the hidden files and will remember this option until you change it again.
 Revealing the AppData folder
 - Delete the Spotify folder in the Roaming folder. If you receive a message saying that some files couldn’t have been deleted because they were in use, try exiting Spotify and ending its process in Task Manager.
- Reinstall Spotify by downloading the installer from their website, running it from your Downloads folder and following the instructions on-screen. The problem should be gone by now.
Solution 4: Disable Wake on LAN
Wake-on-LAN (WoL) is a protocol used to wake up computers from the sleep mode remotely. It can be awakened by devices connected to the same Local Area Network (LAN) and it can be useful to some users. However, if the computer is waking up from sleep without your approval, you should pay a visit to BIOS settings and disable this option!
- Turn your PC on and try to enter BIOS settings by pressing the BIOS key as the system is about to start. The BIOS key is typically displayed on the boot screen, saying “Press ___ to enter Setup.” or something similar. There are other keys as well. The usual BIOS keys are F1, F2, Del, etc.

Press __ to run Setup - Now it’s time to enable the onboard sound. The option which you will need to change is located under different tabs on BIOS firmware tools made by different manufacturers and there is no unique way to find it. It’s usually located under the Advanced tab but there are many names for the same option.
- Use the arrow keys to navigate to the Power, Power Management, Advanced, Advanced Options tab or a similar sounding tab inside BIOS. Inside, select an option named WoL, Wake-on-LAN or something similar inside.

Disabling Wake-on-LAN in BIOS - After selecting the option, you will be able to disable it by clicking the Enter key with Wake-on-LAN selected and using the arrow keys to select the Disable option.
- Navigate to the Exit section and choose to Exit Saving Changes. This will proceed with the computer’s boot. Check to see if the problem persists.
Solution 5: Disable Scheduled Tasks
Scheduled tasks can be great to automatically fulfill a task which needs to be done on your computer. However, if this task prevents your computer from going to sleep, you are probably better off disabling the task completely. These tasks are often created by Windows Update and they are used to check for new updates. This is not something you want to awake the computer for!
- Open Control Panel by locating it in the Start menu. You can also search for it using the Start menu’s search button.
- After the Control Panel window opens, change the “View by” option at the top right part of the window to “Large Icons” and scroll down until you locate the Administrative Tools entry. Click on it and locate the Task Scheduler shortcut. Click on it to open it as well.
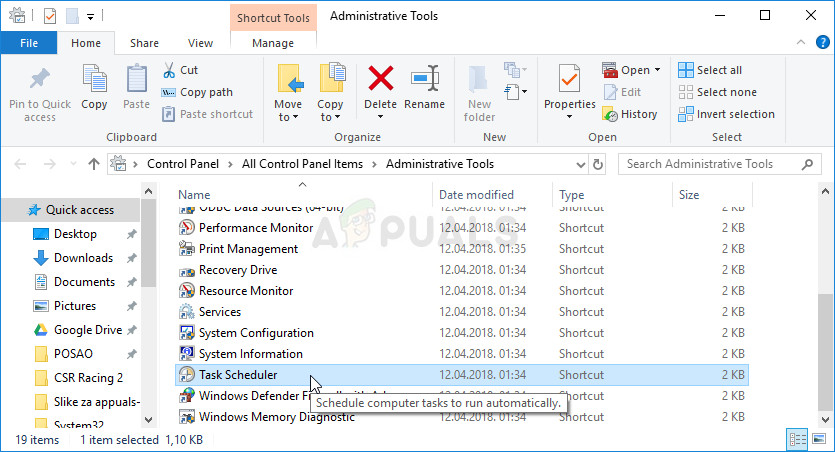
Task Scheduler in Control Panel - The folder is located under Task Scheduler Library >> Microsoft >> Windows >> rempl >> shell. Left-click the ‘shell’ folder. Repeat the same process for all the tasks you find inside this folder. Left-click a task and check the Actions window at the right side of the screen. Locate the Properties option and click on it.
- In the properties window, navigate to the Conditions Check under the Power section for the Wake the computer to run this task entry. Make sure the checkbox next to this option is unchecked!
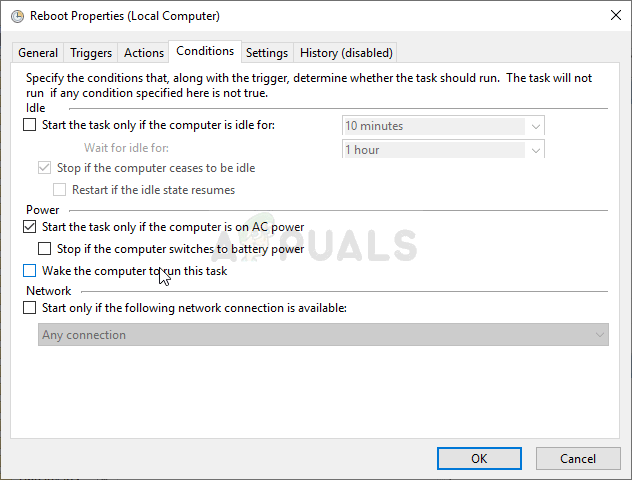
Make sure this task can’t wake up the computer - Check to see if your computer still randomly wakes up from sleep!
Note: In Task Scheduler, navigate to Task Scheduler Library >> Microsoft >> Windows >> UpdateOrchestrator, locate the Reboot task, and perform the same steps as explained above! This was suggested by a second user and it worked wonders for Windows 10 users!
Solution 6: Edit a Registry Entry
Editing the following registry key will enable you to resolve this problem. This setting prevents the computer from fully going to sleep mode if it’s set to zero. This is a method which has helped plenty of users deal with this problem and we suggest you check it out below!
- Since you are going to edit a registry key, we recommend you check out this article we have published for you to safely backup your registry to prevent other problems. Still, nothing wrong will occur if you follow the steps carefully and correctly.
- Open the Registry Editor window by typing “regedit” in the search bar, the Start menu, or the Run dialog box which can be accessed with the Windows Key + R key combination. Navigate to the following key in your registry by navigating at the left pane:
HKEY_LOCAL_MACHINE\SOFTWARE\Microsoft\Windows NT\CurrentVersion\WinLogon
- Click on this key and try to locate an entry named PowerdownAfterShutdown. If it’s not there, create a new DWORD Value entry called PowerdownAfterShutdownby right-clicking at the right side of the window and choosing New >> DWORD (32-bit) Value. Right-click on it, and choose the Modify option from the context menu.
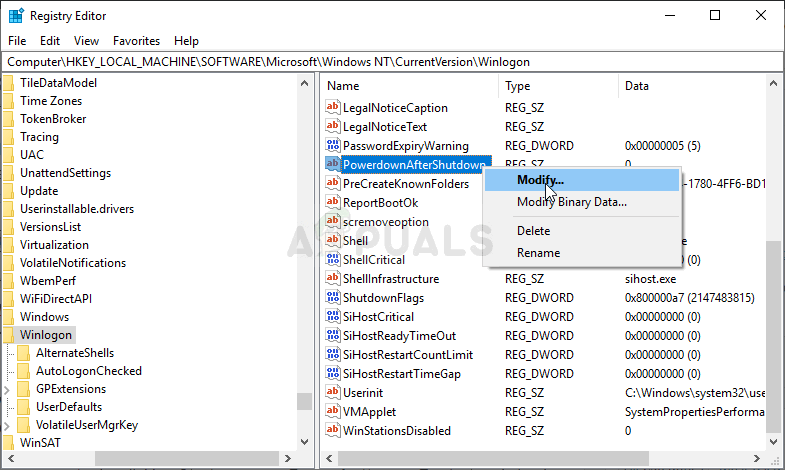
Modifying this registry entry - In the Edit window, under the Value data section change the value to 1 and apply the changes you have made. Make sure the Base is set to Decimal. Confirm any security dialogs which may appear during this process.
- You can now manually restart your computer by clicking Start menu >> Power button >> Restart and check to see if the problem is gone. This will probably resolve the problem immediately.
Solution 7: Run the Following Command
This method is quite popular for its simplicity and plenty of people use it to fix most things related to the issue at hand. The funny thing is that it works and users have commented saying that this is the only step it took to resolve the problem. Try it out now!
- Search for “Command Prompt” by typing it either right in the Start menu or by pressing the search button right next to it. Right-click the first entry which will pop up as a search result and select the “Run as administrator” context menu entry.
- Additionally, you can also use the Windows Logo Key + R key combination to bring up the Run dialog box. Type in “cmd” in the dialog box which appears and use the Ctrl + Shift + Enter key combination for administrator Command Prompt.

Running Command Prompt - Type in the following command in the window and make sure you press Enter after typing it out. Wait for the “Operation completed successfully” message or something similar to know that the method worked.
powercfg -devicequery wake_armed
- Try to open put your computer to sleep and check to see it randomly wakes up!


