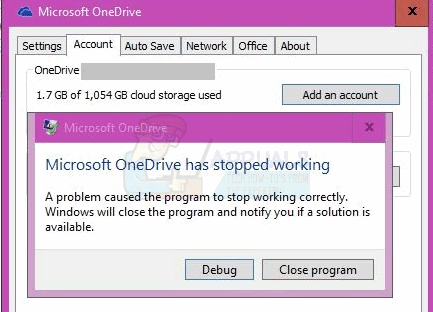
How to Fix OneDrive Crashing On Windows 10
If you just installed Windows Anniversary Update then there’s a chance that it might causes problems with OneDrive. OneDrive crashing with no error message is a known issue with Anniversary Update.
The cause of this issue with OneDrive is, of course, the Windows Anniversary Update. Windows Anniversary Update is known to cause multiple issues and OneDrive issue is one of them.
Method 1: Deleting OneDrive
Deleting the OneDrive folder and its configuration folder sometimes solve the problem
- Press Windows Key and press E to open File Explorer.
- Click the OneDrive folder
- Hold CTRL and press A then right click on the selected files and select Delete
Now follow the given steps
- Press Windows Key once and R
- Type
 in the run dialog, and click OK.
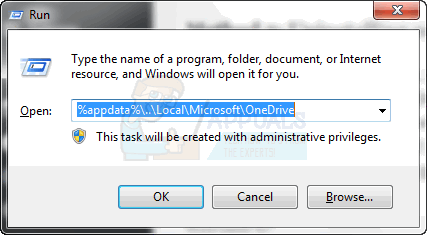
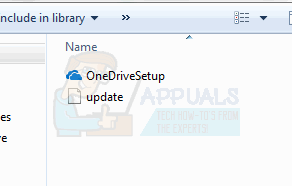
- Double click Update folder
- Double click OneDriveSetup file and follow the screen instructions
Method 2: Uninstalling and Reinstalling OneDrive
- Hold Windows Key and press X. Click Command Prompt (Admin)
- Type taskkill /f /im OneDrive.exe and press Enter
- Type %SystemRoot%\SysWOW64\OneDriveSetup.exe /uninstall and press Enter if you are running 64 bits Windows Version. If you are running a 32 bit Windows version then type %SystemRoot%\System32\OneDriveSetup.exe /uninstall and press Enter
Now your OneDrive is uninstalled. Now delete all the files related to OneDrive
- Press Windows Key once and click File Explorer
- Type %UserProfile%\OneDrive in the address bar located in the middle top of File Explorer and press Enter
- Hold CTRL and press A then right click on the selected files and select Delete
- Type %LocalAppData%\Microsoft\OneDrive in the address bar located in the middle top of File Explorer and press Enter
- Right click on logs folder and select Delete
- Repeat step 5 for all files in this this but DO NOT delete the Update folder
- Type %ProgramData%\Microsoft OneDrive in the address bar located in the middle top of File Explorer and press Enter
- Hold CTRL and press A then right click on the selected files and select Delete
- Type C:\OneDriveTemp in the address bar located in the middle top of File Explorer and press Enter
- Hold CTRL and press A then right click on the selected files and select Delete
- Now restart your computer
Once the restart is complete follow these steps
- Press Windows Key once and click File Explorer
- Type C:\Users\YourComputerName\AppData\Local\Microsoft\OneDrive in the address bar located in the middle top of File Explorer and press Enter
- Double click Update folder
- Double click OneDriveSetup file and follow the screen instructions
Note: If you cannot see an update folder after uninstalling the OneDrive then type %SystemRoot%\SysWOW64\OneDriveSetup.exe in the address bar of File Explorer and press Enter. OneDrive will start preparing for the first use.
Method 2 also helps with notification about failed attempt to update OneDrive app. Thank you!