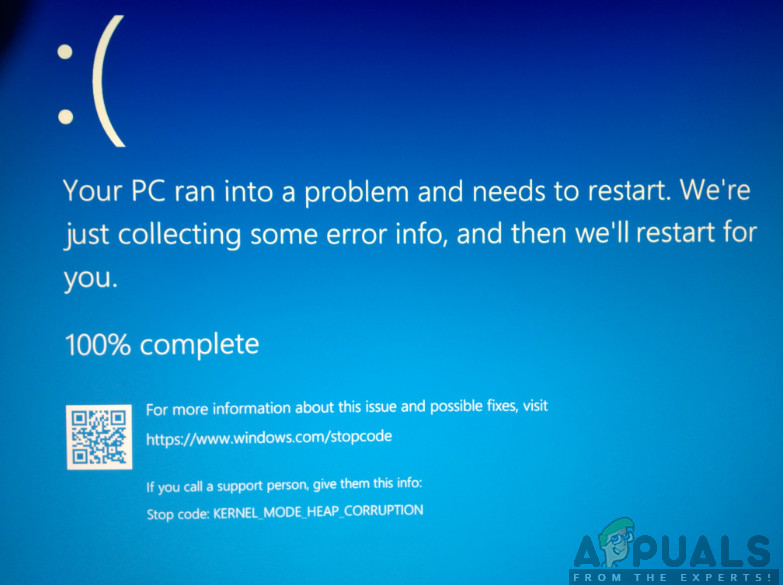
How to Fix Kernel Mode Heap Corruption Error
Users experience the error message “Kernel Mode Heap Corruption Error” when they are using their computers normally or performing some CPU intensive activity. This Blue Screen of Death is a very common one and ‘usually’ doesn’t signify any serious issue with your operating system.
However, recently, we came across several instances where this BSOD kept occurring again and again whenever users launched or performed the same action which initially causes the error. In this article, we will go through all the possible causes as to why this error message occurs and also what are the workarounds which you can perform to resolve the issue.
What causes the BSOD ‘Kernel Mode Heap Corruption Error’?
After receiving several reports from users and conducting our own investigation, we came to the conclusion that the BSOD is caused by several different issues. Some of the reasons as to why you might experience this issue are but not limited to:
- Outdated graphics drivers: This error message was mostly caused by outdated or corrupt graphics drivers. Whenever the users started the game or any graphic intensive application, the blue screen occurred.
- Corrupt system files: Another issue which was quietly noticeable was where the Windows files were corrupt and were causing issues in the computer. Usually, running the system file checker solves the problem instantly.
- Conflicts with unstable Software: Another reason why users might face the BSOD is when specific software is conflicting with the computer and if a race condition gets induced or the software changes some important parameters, the computer might face the BSOD.
- Hardware issues: The possibility of corrupt hardware cannot be ignored. If there is a faulty RAM or there are any malfunctioning modules, the system will not be able to handle them and hence cause the BSOD.
Before we start with the solutions, make sure that you are logged in as an administrator. Also, make sure that you have an active internet connection and have saved all your work.
Solution 1: Checking for incompatible/conflicting software
The first thing which you should check is whether you are experiencing the BSOD because of problematic programs installed on your computer. This problematic software usually clashes or changes critical parameters of the system which in turn crash the computer.
In this solution, you have to identify which software is causing the problem. This software can be either the most recent one which you installed or the software which was running when you experienced the BSOD.
- Press Windows + R, type “appwiz.cpl” in the dialogue box and press Enter.
- Here all the applications installed on your computer will be listed. Right-click on the problematic application and uninstall it accordingly.
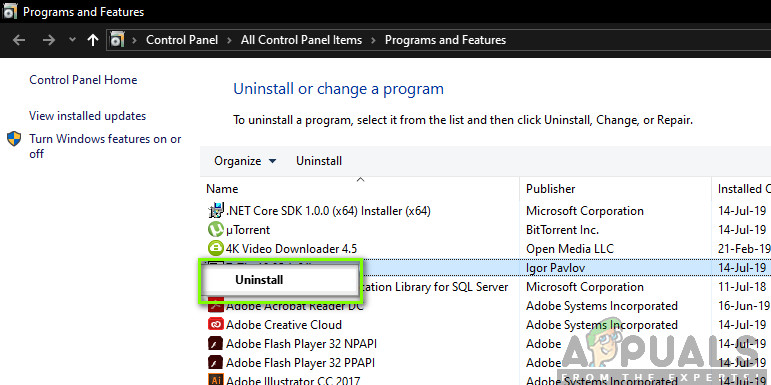
Uninstalling Problematic Software - Restart your computer after the uninstallation process and check if the problem at hand got solved.
Solution 2: Checking Drivers for Errors
Drivers are the main components which communicate between the operating system and the hardware. If these are in error configurations or are corrupt, you will experience numerous errors and issues like the one under discussion. Here, we will try running the driver verifier in safe mode and see if it detects any errors. If it does, you can easily fix them by updating the drivers to the latest build.
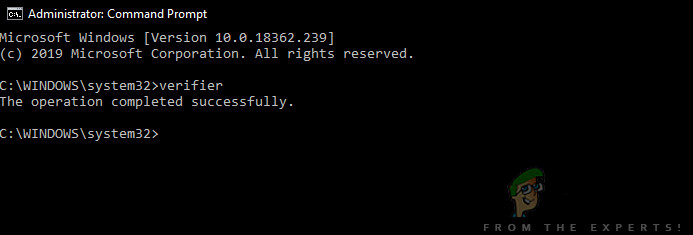
- Press Windows + S, type “command prompt” in the dialogue box, right-click on the application and select Run as administrator.
- Once in an elevated command prompt, execute the following command:
verifier
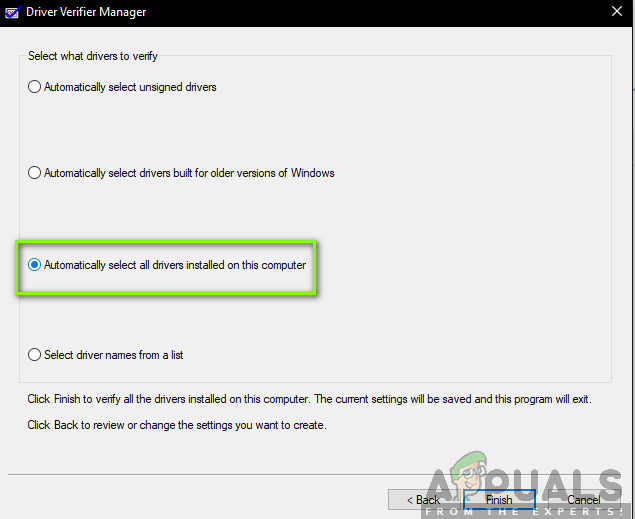
- Select “Create standard settings” and press “Next” to proceed.
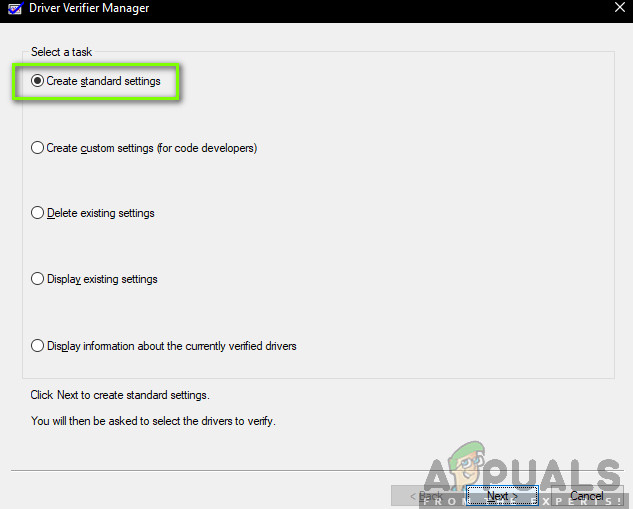
Standard settings – Driver Verifier - Select “Automatically select all drivers installed on this computer” and click “Finish”. Now Windows will scan for errors. A good tip would be to backup your data before proceeding. After you are prompted to restart your computer, do so.
Selecting all Drivers – Driver Verifier - When Windows restarts the next time, it will analyze all the drivers installed on your computer for issues. If it finds some issues, it will notify you accordingly. This may take time so be patient and let the process finish.
If any broken drivers are found, you can update them using the steps below.
Solution 3: Updating Drivers
If the drivers installed are found to be bad using the previous solution, we can try updating them to the latest build available on the internet. If any of the core drivers are in error states and the system tries to use them, you will experience issues like the one under discussion. Here, we will navigate to the device manager and update the drivers manually.
If the drivers are not able to get updated, we can manually install the drivers after downloading them from the manufacturer’s site.
- Press Windows + R to launch the Run Type “devmgmt.msc” in the dialogue box and hit Enter. This will launch your computer’s device manager.
- Here all the installed devices against your computer will be listed. Navigate through all the drivers and identify which one is causing the problem. Here, we will be demonstrating how to update Display adapters.
- Click on the Display adapters dropdown to see your installed display card. Right-click on it and select “Update driver”.

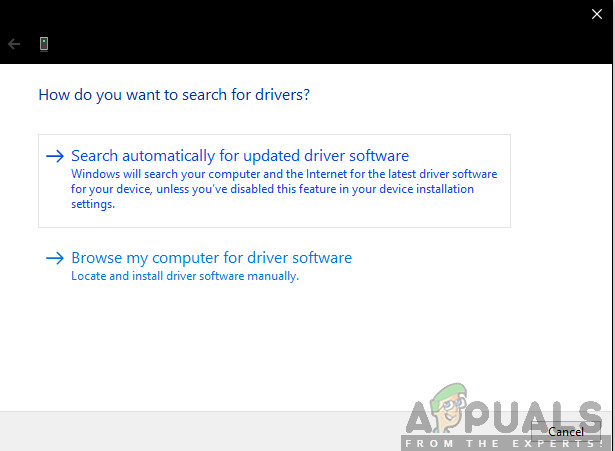
Updating Drivers - Now Windows will pop a dialogue box asking you which way do you want to update your driver. Select the first option (Search automatically for updated driver software) and proceed. If you are unable to update the drivers, you can head over to your manufacturer’s site, download the drivers manually and select the second option.
Updating drivers automatically - Update all your drivers before restarting your computer. After restarting, check if the problem is solved.
Solution 4: Checking RAM for Bad Sectors using Memtest86
According to our survey, a number of users who experienced this error message has issues in their RAM components. Before you run the RAM test, you should make sure that it is properly inserted inside the slot. Also, make sure that the correct slot is being used (for example, in some systems, you have to use slot 1 and 3 if you have 2 RAM modules).
Also, when you load memtest86, you run memory diagnostics to check the performance of your RAM’s read and write. The RAM modules will be tested for several rounds on your computer.
- Navigate to the memtest86 official website and download the module.

Downloading memtest86 - Once the module is downloaded, run it and select a bootable USB drive inserted in your computer.
Note: When you create a bootable drive for memtest, all its contents will be erased. - After creating the bootable drive, restart your computer and let your computer load this bootable drive. After the program loads up, proceed with the memory test.
Solution 5: Performing a System Restore
If you are still encountering the Blue Screen of Death even after performing all the solutions, we can try performing a system restore. In system restore, the last good known configuration of Windows will be loaded provided that a screenshot of the system is made in the computer.
Note: Performing a system restore is only valid if this error started to come after a windows update. If this isn’t the case, you can go ahead and perform a new install of Windows after backing your data.
Here is the method on how to restore Windows from the last restore point.
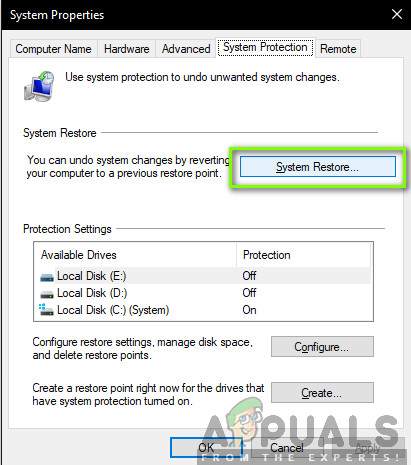
- Press Windows + S to launch the start menu’s search bar. Type “restore” in the dialogue box and select the first program which comes in the result.
- One in the restore settings, press System Restore present at the beginning of the window under the tab of System Protection.
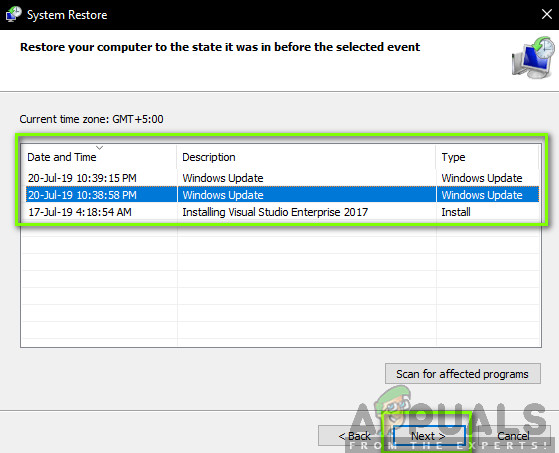
System Restore - A wizard will come forward guiding you through the process. There are usually recommended restore points or custom ones which are created in time.
- If you want to select a custom restore point, click on the option and select the restore point from the list of options available. If you have more than one system restore points, they will be listed here.
Selecting Restore Point - Now windows will confirm your actions for the last time before it starts the system restore process. Save all your work and backup important files just in case and proceed with the process.
- Once you have restored successfully, log into the system and see if you still get the blue screen of death.
Solution 6: Clean installing Windows
If all the above method fails to eradicate the BSOD, there is no choice left but to install a fresh copy of Windows on your computer. Here, you should make sure that you create a backup of your files by opening your computer in Sade Mode.
You check out our article on how to install Windows 10 on your computer. You can easily make a Windows bootable by either Rufus or by Windows media creation tool. Do note that when you install a new version of Windows on your hard drive, all the existing data will get erased.


