How to Fix Google Chrome High CPU Usage on Windows?
If you noticed any PC freezes while browsing the Internet using Google Chrome on your Windows, you should open Task Manager and check to see if there is abnormally high CPU usage by Google Chrome. Many users reported seeing this while using Google Chrome for normal functions. This prevents them from browsing the web normally.

There aren’t many official solutions to the problem as it can be caused by plenty of different reasons but there are many different things users tried out which worked out for them. We have gathered those methods in a single article for you to try out!
What Causes Google Chrome’s High CPU Usage on Windows?
Several distinct causes can cause Google Chrome to start acting up and take up all CPU power for itself. Check out the list below to get one step closer to finding out your scenario and resolving the issue!
- Lacking administrator permissions – Users have reported that running Google Chrome as an administrator can resolve the problem easily.
- Suspicious extensions – If you have installed any new plugins or extensions recently, make sure to check if they are to blame for high CPU usage.
- Old Flash Player Plugin – Flash Player needs to be updated constantly for both stability and security reasons so make sure you install the latest version as soon as possible!
But before moving on with solutions, make sure your system drive has at least 3 GB of free disk space. Do note that if you have opened a lot of YouTube videos in Chrome with 4K/1080HD resolution then it can also cause high CPU usage.
Solution 1: Run Google Chrome as An Administrator
The first method is probably the easiest one to try out. It’s at the number one spot as it’s simple and effective since many users have reported that running Google Chrome with administrator permissions can resolve the problem immediately. Check it out below!
- Locate the Google Chrome shortcut or executable on your computer and open its properties by right-clicking its entry either on the Desktop or the Start menu or the Search results window and choose Properties from the pop-up context menu.
- Navigate to the Compatibility tab in the Properties window and check the box next to the Run this program as an administrator option before saving the changes by clicking OK or Apply.
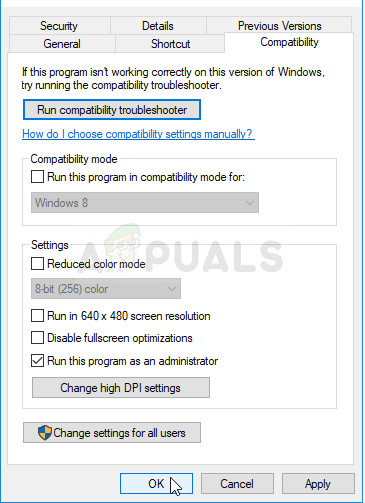
Run Google Chrome as an administrator - Make sure you confirm any dialogs which may appear which should prompt you to confirm the choice with admin privileges and Google Chrome should launch with admin privileges from the next startup. Open it by double-clicking its icon and open Task Manager to see if the CPU usage is still high.
Solution 2: Check for Suspicious Extensions
If the problem started to occur recently, it might be due to a newly added extension which is causing high CPU usage. You can check that easily by opening Google Chrome and using the Shift + Esc key combination to open Google Chrome’s Task Manager. Scroll down towards extensions and check to see if one of them is using too much CPU resources. Delete it afterward!
- Open Google Chrome by double-clicking its icon from the Desktop or by searching for it in the Start menu. Type in the address below in the address bar to open Extensions:
chrome://extensions
- Try to locate the extension which is using too much CPU power or an extension that was added recently and click the trash icon or the Remove button next to it to remove it from Google Chrome permanently.
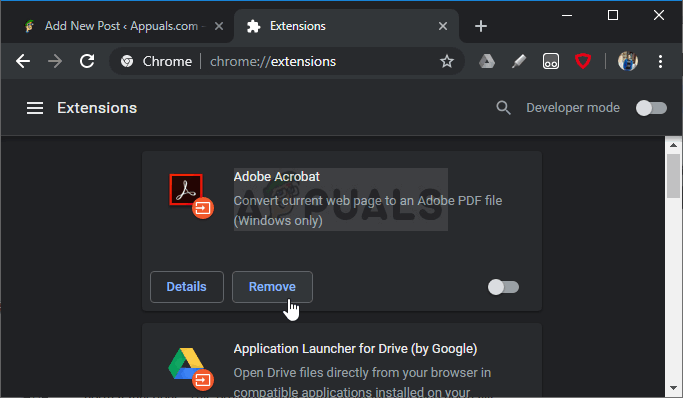
Removing the problematic Chrome extension - Restart Google Chrome and check to see if you still notice high CPU usage while browsing the Web using Google Chrome.
Solution 3: Delete Browsing Data
An over-accumulation of browsing data in the form of cookies, browser cache, and history files can slow down a browser and cause it to use more CPU resources than necessary. This can be observed in Task Manager. Users have reported that deleting their browsing data was able to help them get rid of the problem!
- Open Google Chrome by double-clicking its icon from the Desktop or by searching for it in the Start menu. Clear your browsing data in Google Chrome by clicking on the three vertical dots in the top right corner of its window.
- After that, click on the More tools option and then Clear browsing data.
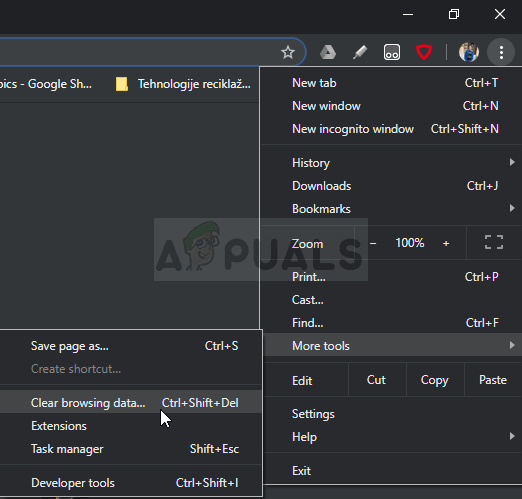
Clear browsing data in Google Chrome - To clear everything, choose the “the beginning of time” option as the time-period and select which type of data you wish to delete. We recommend you at least clear out the cache and cookies.
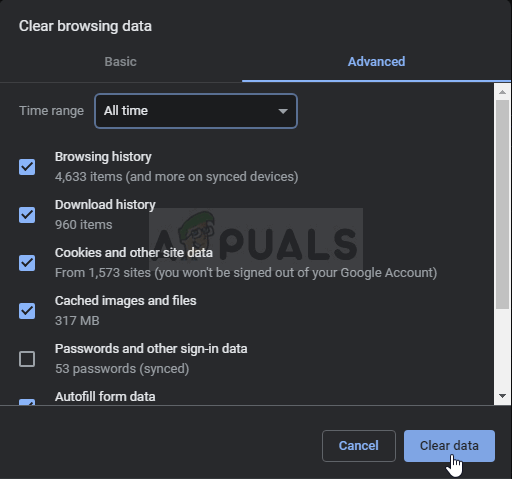
Clear data from the beginning of time - To get rid of ALL cookies, again click on the three dots and select Settings. Scroll down to the bottom and expand the Advanced settings.
- Open Content settings and scroll down to the list of all cookies that remained after you have already deleted them in Step 1. Delete either all cookies you find there.
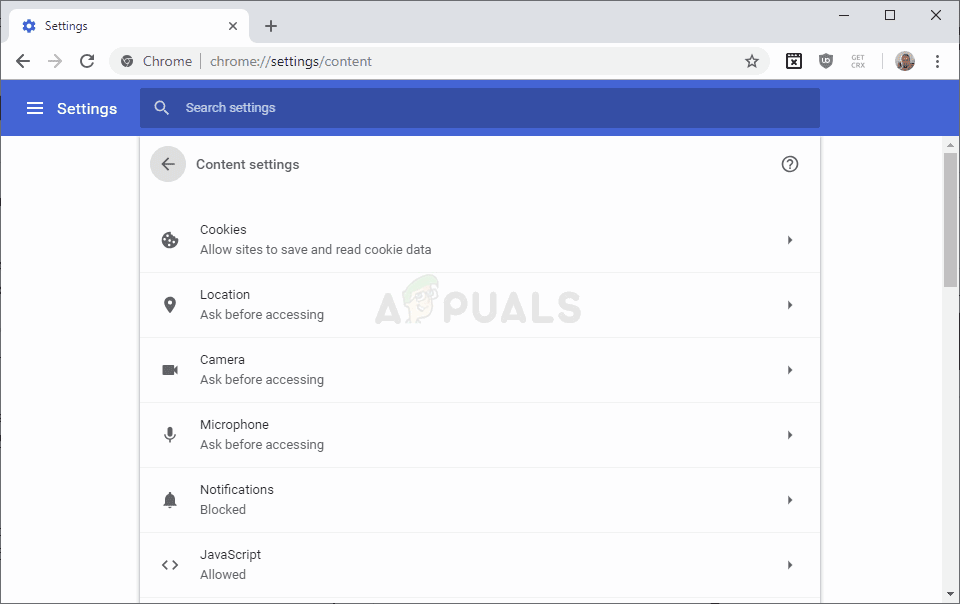
Content settings in Google Chrome - Restart your computer again and check if Chrome’s CPU usage is still high!
Solution 4: Change Advanced Settings
The problem is mostly related to some of the latest versions of Google Chrome. Certain developers have discovered that the problem can be resolved easily simply by editing certain advanced Chrome settings. Follow the instructions below to try this method out!
- Open Google Chrome by double-clicking its icon from the Desktop or by searching for it in the Start menu. Type in the address below in the address bar to open Experiments:
chrome://flags
- Locate the options listed below inside the Experiments window, under the Available You can use the search bar at the top of the window to locate them as the list is very long. Use the buttons next to each option to set its state according to the settings below:
Simple Cache for HTTP - "Enabled"
Throttle Expensive Background Timers - "Enabled"
No-State Prefetch - "Enabled No-State Prefetch"
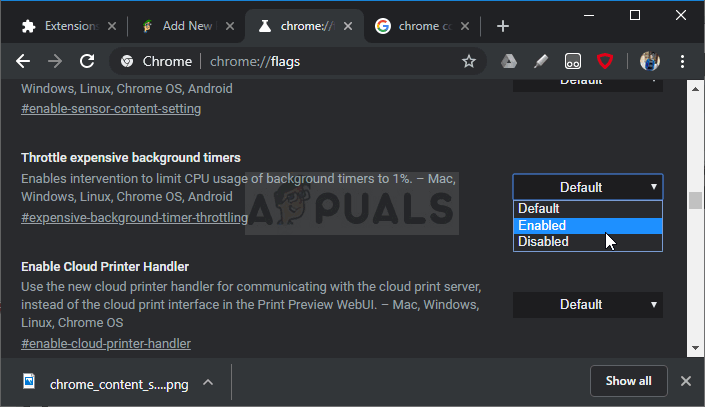
Enable certain Chrome experiments - Restart Google Chrome and check to see if high CPU usage is still a problem!
Solution 5: Update Your Flash Player
Adobe Flash Player is always a troublesome plugin yet you can’t browse the web normally without it. The real problem with it is that new versions keep coming out but users are not so keen on updating it every once in a while.
This can lead to various problems such as this one on their computers. However, more problems can occur if old versions of Shockwave run on suspicious sites as malicious users can use the security flaws of old versions to damage your computer. Here is how to update this plugin on your Google Chrome browser.
- Go to the official adobe page. On the left side of the screen, you should see certain settings such as your Windows architecture (32bit or 64bit), the preferred language, and the browser you are downloading the Flash player for.
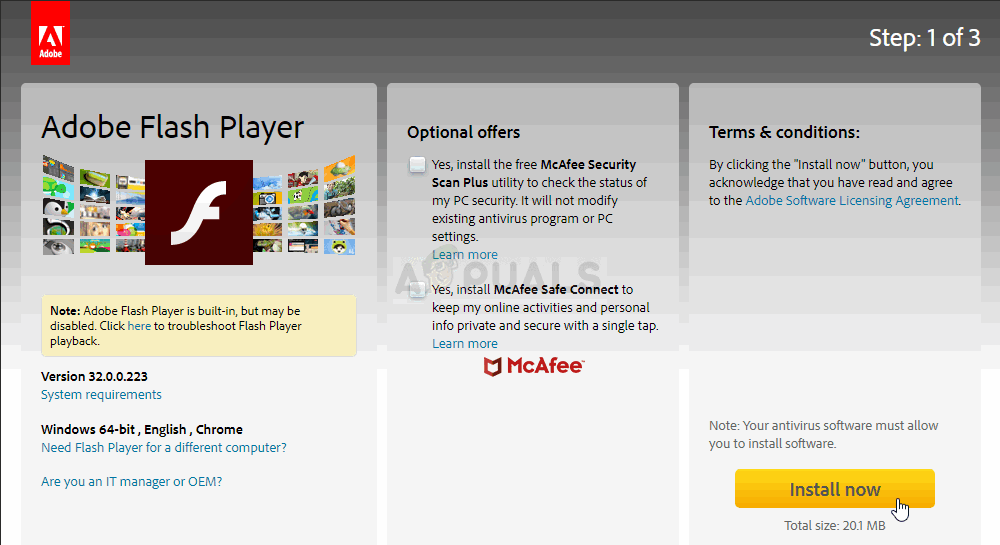
Downloading Adobe Flash - If you are downloading the player from a different browser or a different computer (which might be possible if Firefox is being unresponsive), click on the “Need Flash Player for a different computer?” option and choose your operating system in step 1 and the browser you are using at step 2 (Google Chrome).
- Make sure you disable the optional offers in the middle of the browser window which would install McAfee tools on your PC and click the Install now button.
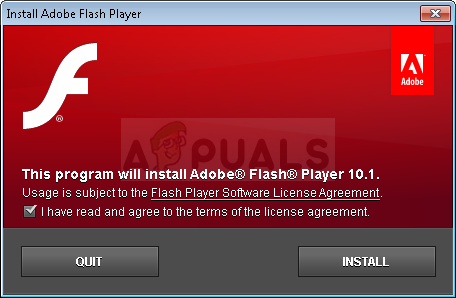
Installing Adobe Flash Playe - Run the file you have just downloaded from the Downloads folder on your computer, wait for installation files to download completely, and follow the instructions on-screen to proceed and install the Flash Player. Restart your computer afterward and check to see if the high CPU usage persists.
Solution 6: Disable Chrome Hardware Acceleration
Hardware acceleration reduces the load on the processor and the memory by redirecting the load to the dedicated graphics card of your system. But poorly written driver or a system glitch can cause Chrome to use high CPU when using hardware acceleration. In that case, disabling hardware acceleration usage by Chrome may solve the problem.
- Launch Chrome and click on Action Menu (3-dots near the top right corner) and select Settings.
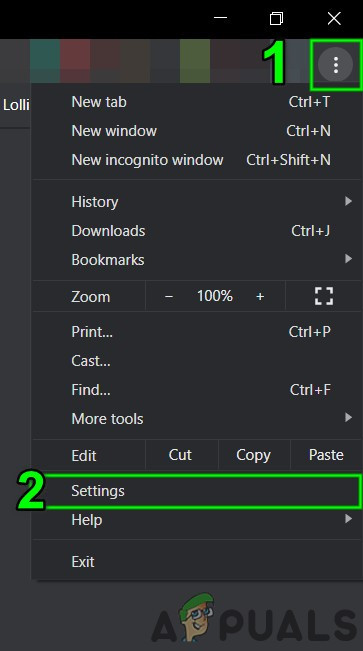
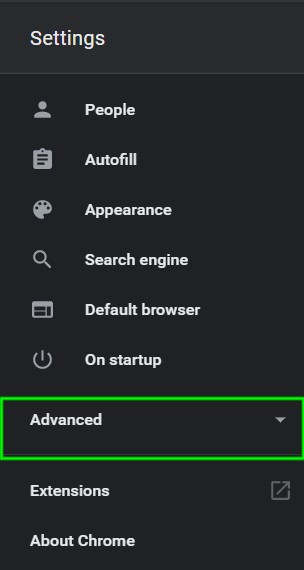
Open Chrome Settings - Then click on Advanced (located in the left pane of the window).
Open Advanced Chrome Settings - Now click on System and then in the right pane of windows toggle the switch of “Use Hardware Acceleration When Available” to off.
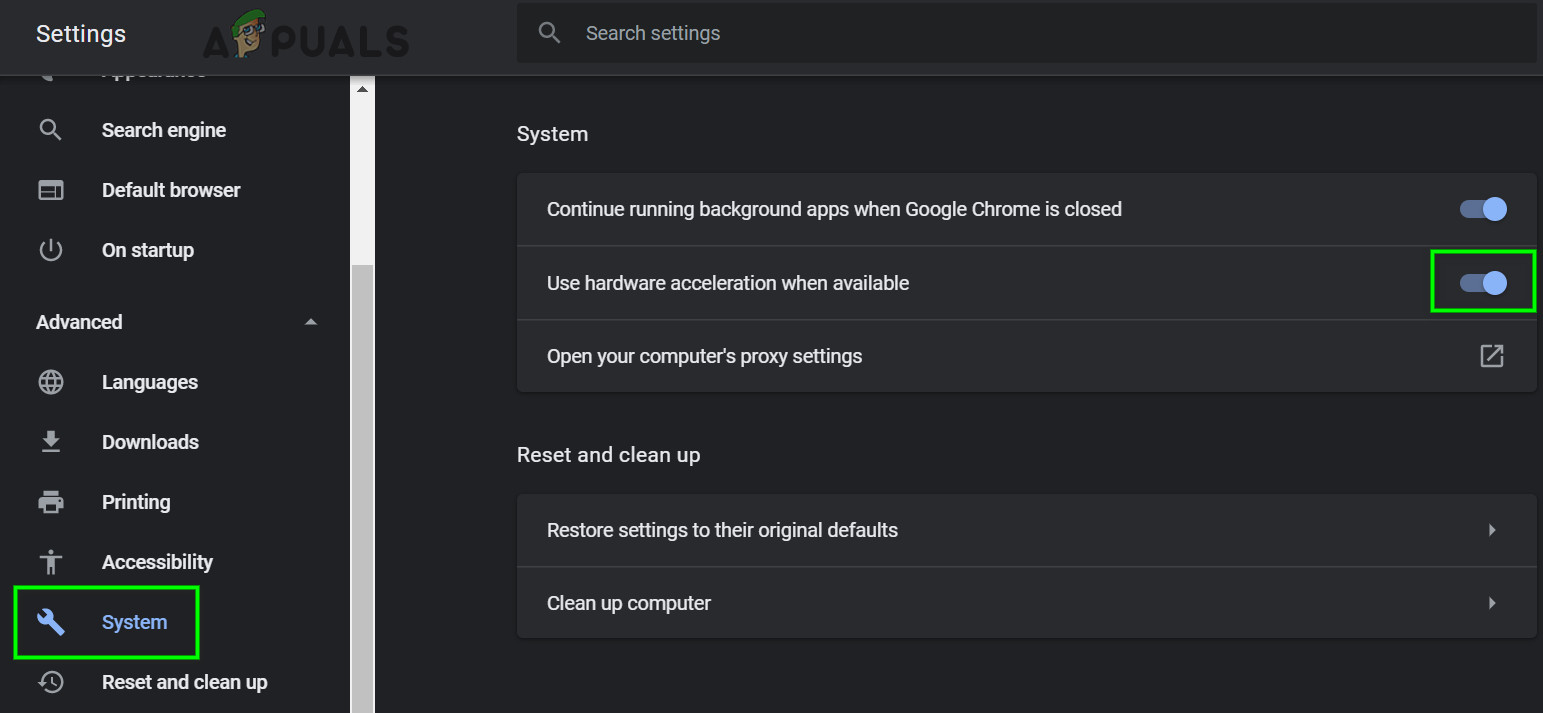
Disable Hardware Acceleration - Now re-launch Chrome and check if the problem is solved.
Solution 7: Reset Chrome
Chrome makes use of several components and temporary files to run properly. If any of these components are either corrupt or there is some bad configuration present, these modules might cause the high CPU usage in Chrome. In that case, resetting Chrome may solve the problem. Do note that this process will log you out of the browser and you will need to input your Google Account credentials again.
- Open Google Chrome and click on 3-dots (Action Menu), near the top right corner and select Settings.

Open Chrome Settings - In the left pane, click on Advanced.

Open Advanced Chrome Settings - Then click on Reset and clean up.
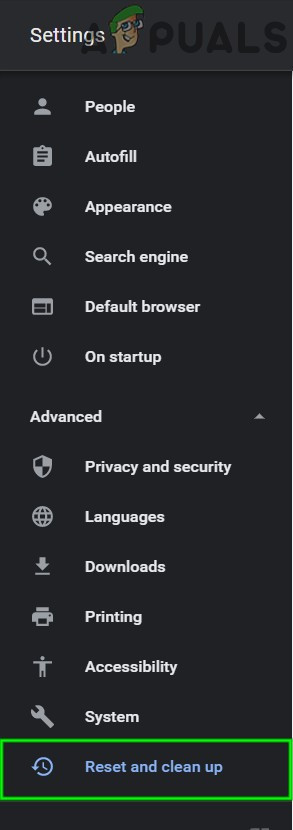
Reset and Clean Up - Now Click on the “Reset settings to their original defaults”.
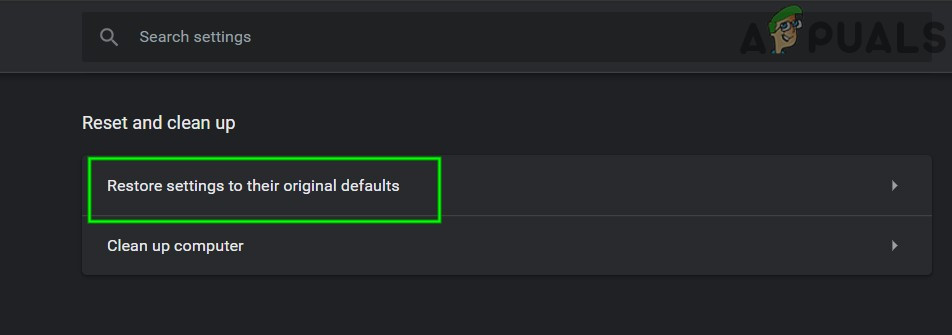
Restore Settings to Their Original Defaults - Now, confirm reset Chrome, click on Reset Settings.
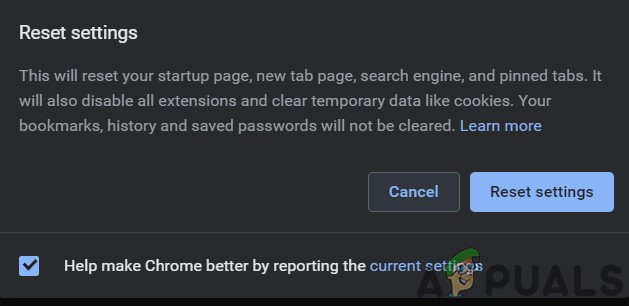
Confirm to Restore Settings - Google Chrome will relaunch after completion of the reset process.
If nothing has worked for you, then either try to downgrade your Chrome version or reinstall Chrome.


