How to Fix “Error: 1053: Service didn’t respond in a timely fashion” on Windows?
The error message “Error: 1053: Service didn’t respond in a timely fashion” results from a timeout that occurs after a request to start a service is initiated but does not get a response within the appropriate time frame. There are various forms of this error message, ranging from issues with Windows services to difficulties in launching custom services, including games and other third-party software.

In this article, we will explore all the variations of the error message and discuss potential solutions. Before proceeding, make sure that you are logged in as an administrator on your computer and have an active internet connection.
1. Check for System File Corruptions
If system files are corrupted or missing, Windows services may not start properly, leading to the error. Running the SFC and DISM tools replaces damaged files with correct versions, making sure that all services, including the one causing the error, can start and run as intended.
This step can resolve issues resulting from system file corruption that might be preventing the service from responding in a timely fashion.
- Press Windows + S, type command prompt in the dialogue box, right-click on the application, and select Run as administrator.
- In an elevated command prompt, execute the following commands one by one, making sure they are completed successfully:
sfc /scannow
DISM /Online /Cleanup-Image /RestoreHealth

- Check if the issue has been resolved.
2. Reinstall the Application (if Applicable)
Reinstalling the application can resolve the problem by replacing any corrupt or missing files, ensuring you have the latest updates, and resetting the app configuration to its default state.
The solution is to navigate to the official website, download the latest version of the application, and install it after uninstalling the current one.
- Press Windows + R, type appwiz.cpl in the dialogue box, and press Enter.
- In the application manager, find the application, right-click it, and select Uninstall.
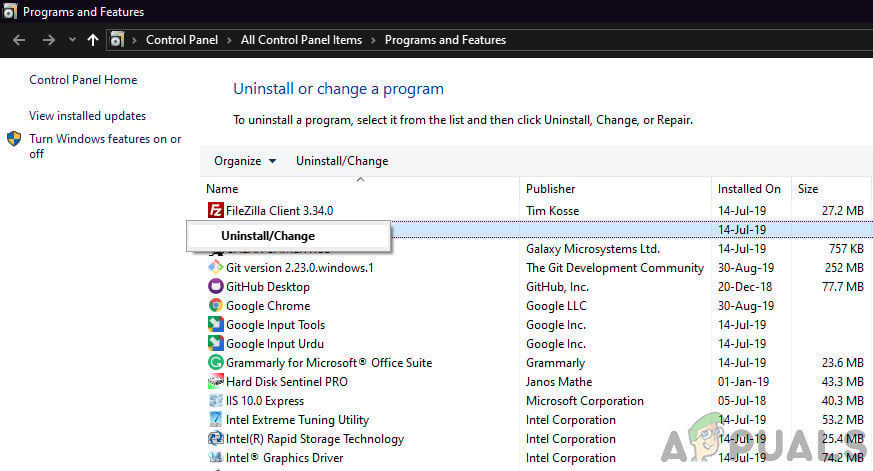
- Proceed with the installation of the new version.
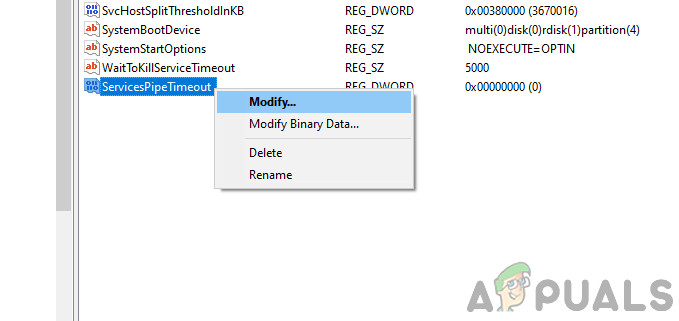
3. Change Timeout Settings through Registry
Increasing the timeout through a registry setting gives services that require more time to initialize a longer window to start properly before Windows assumes they’ve failed. This can resolve issues where services are incorrectly reported as unresponsive due to timing out too early during system boot or service start.
Note: Please make sure you create a backup of your registry so that you can restore your registry configuration if anything goes wrong. Follow our dedicated guides to learn how to backup and restore registry settings.
- Press Windows + R, type regedit in the dialogue box, and press Enter.
- Navigate to the following file path:
HKEY_LOCAL_MACHINE\SYSTEM\CurrentControlSet\Control\
- Search for the ‘ServicesPipeTimeout’ key. If it exists, proceed to edit it. If not, select Control, right-click on an empty space on the right side of the screen, and select New > DWORD (32-bit) Value.
- Name the key ‘ServicesPipeTimeout’ and set its value to 180000. If you cannot set the value immediately, right-click it and click Modify.
- Save the changes and exit.

4. Reset Network Cache and Configurations
Resetting network cache and configurations can resolve issues causing the error by clearing any corrupt or outdated network settings that might be preventing the service from establishing a proper connection to the network or the internet.
This process refreshes your network environment, which includes resetting the TCP/IP stack and renewing your IP configuration.
Note: This will erase all custom network settings you have configured manually.
- Press Windows + R, type cmd in the dialogue box, right-click on the Command Prompt application, and select Run as administrator.
- In the elevated command prompt, execute the following commands one by one:
netsh winsock reset
ipconfig /renew

- Once you’ve reset the network, verify that you have internet access through your browser, and then check if the error message has been resolved.
5. Get Ownership of the Application
Obtaining ownership of an application grants your user profile the necessary rights to fully control the program’s files, possibly resolving issues where restricted permissions prevent the service from initiating correctly. This action makes sure that any access denials related to file and service operations are resolved, which can fix the service response error.
- Locate the application’s file or folder, right-click it, and select Properties.
- Go to the Security tab and click on Advanced at the bottom of the window, as shown in the image below.
- Click on the Change button next to the owner’s value. Change the owner of the folder from the default value to your computer account.
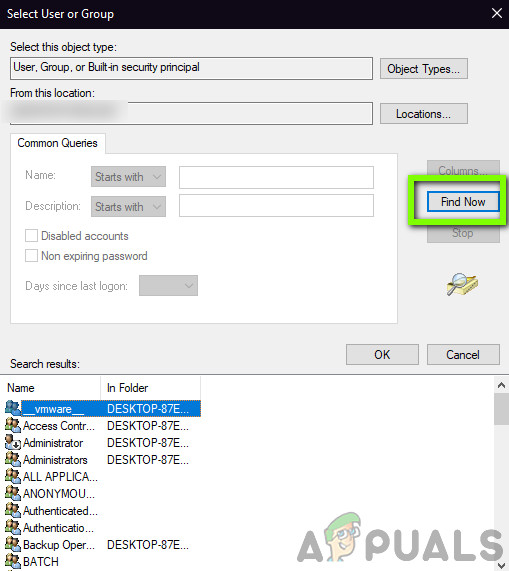
- Enter your username in the space provided and click on Check Names. Windows will list all accounts that match this name.
If you can’t find your username this way, you can select it manually from the list of user groups available: Click Advanced and when the new window comes up, click Find Now. A list will populate at the bottom of the screen with all the available user groups on your computer.
- Select your account and press OK. Return to the small window by pressing OK again.
- Tick the option Replace owner on sub-containers and objects to change the ownership for all files and sub-directories within the folder. Also, we recommend selecting Replace all child object permission entries with inheritable permission entries from this object.
- Apply the changes, close the Properties window, reopen it, and navigate to the Security tab. Then, click the Advanced button.
- On the permissions window, click Add at the bottom of the screen.

- Click Select a principal, and a similar window will appear as in step 4. Repeat the operations of step 4, now granting all permissions (full control) and clicking OK.
- Select Replace all child object permission entries with inheritable permission entries from this object and apply the settings.
- Close the properties window, restart your computer, and try launching the application to see if the issue has been resolved.


Apart from these fixes, I found 2 more reasons of this error 1053. So calling UseWindowsService() in hostbuilder and adding a nuget packageMicrosoft.Extensions.Hosting.WindowsServices can fix this issue too.