How To Fix Error 0xc00000e9 on Windows 7, 8 and 10

Error 0xc00000e9 is usually caused by a failing or a bad hard drive. That will be the final verdict on this if none of the possible solutions provided below work.

If, in case the hard drive has failed, you can send it to a recovery company to recover your data. It’s a hassling process, but if you have never backed up, then this is the time to start backing up, with a lesson learned.

Method 1: Disconnect All Peripherals and External Devices.

Power off your laptop or desktop and remove all the external peripherals connected to it, such as an external hard disk, USB disk, printer, wireless mouse, and keyboard. You just need the monitor plugged in so you can see the status on the screen. With all the peripherals disconnected, power on the system and see if that resolves the issue.

If it does, then repeat the process by connecting your external devices one by one until you find the one that causes the error. It may be possible that after disconnecting all external devices and reconnecting them all, the system will work without any issues.

Method 2: Use Hiren’s BootCD to Check and Fix Disk Errors.

This method is a little complicated for newbies, but I will try to write it down in the simplest terms. If you are unable to follow it or have questions, you can ask me by posting a comment below.

We need to create a bootable CD or a USB to boot our PC with Hiren’s BootCD. To do this, we require access to a second computer where we will download HBCD and then burn it to a USB or CD. Once done, we will change our BIOS to boot from this CD/USB. That is the general summary. Now let’s begin.

Download Hiren’s BootCD Click Here to Download Hiren’s Boot CD.

Once downloaded, open the file and extract it to your hard disk, making sure to remember where you’ve extracted it. If you can’t open the file, then obtain WinZIP from https://www.winzip.com/en/. Download and install it. After it is installed, the HirensBootCD icon will become clickable, allowing you to open and extract it.

Once completed, you will need an ISO Burner, such as MagicISO, which works well. You can download it by clicking here.

Burn it to a CD or a USB using MagicISO. Once done, insert the media into your computer or connect it to the computer, and then boot from it. Make sure you have changed the boot order in the BIOS.

After it has booted up, select the option “DOS Programs.

hiren boot dos menu

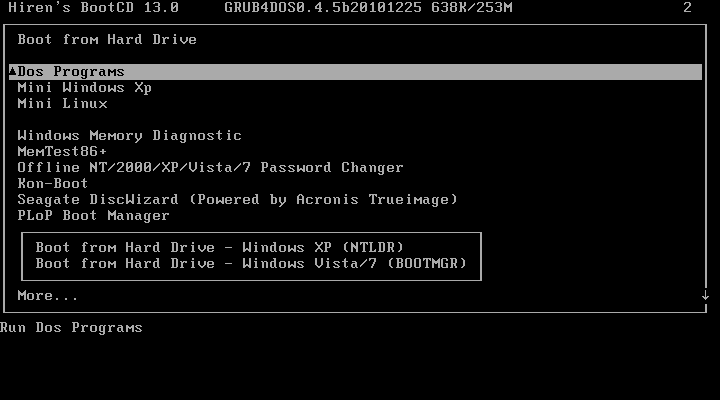
Next, select Option 6, which is the Hard Disk Tools.

hard disk tools

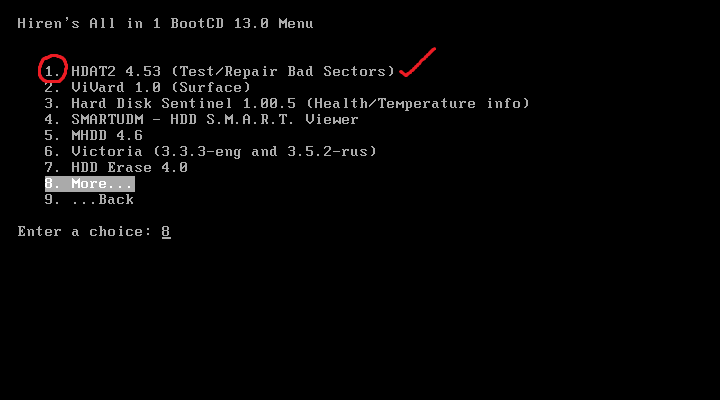
Now, choose option 1, which is HDAT2 4.53 (Test/Repair of Bad Sectors).

repair bad sectors1

Now, the disk menu will appear. Choose your DISK from this menu. If you don’t know which device is yours, then the easiest way is to look at the last column that says Capacity. If your hard disk was 20.02 GB, then that would tell you which option is for your disk.

hdat1

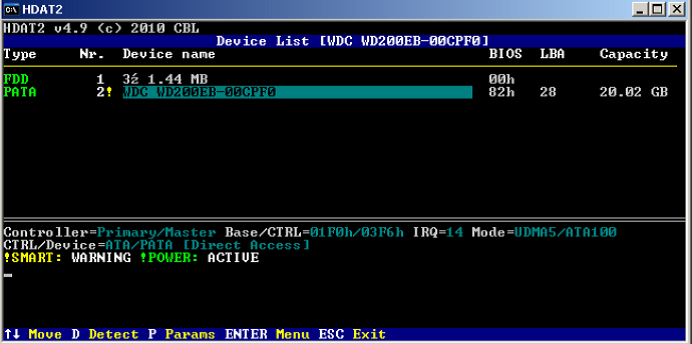
Now, from the Device Test Menu, choose ‘Check and Repair Bad Sectors.’

device test menu

Now, the repair process will begin. It can take several minutes to hours. You must wait until it finishes. After it has finished, set your disk back to its original setting in the BIOS (boot order) and remove the Hiren’s BootCD media. If you are still experiencing the 0xc00000e9 error, then unfortunately, the disk has failed and needs to be replaced.

However, if you had any data on this disk, it can be recovered – so no worries. You have two choices here: attempt to recover it yourself with no guarantees of success, or send it to a recovery company.

Method 3: Check Your SATA Cables

If this is happening on a desktop PC, some users have found that using an older SATA cable, such as a SATA II cable with a SATA III port and hard drive, can sometimes provide an insufficient data transfer rate. In this situation, the operating system is unable to communicate with the hard drive, resulting in this error.

  1. Power off your PC.
  2. Open your case, locate the hard drive, and identify the SATA port to which it’s connected.
  3. Replace your cable with a newer one. If you have a SATA II cable, see if you can borrow a SATA III from a friend just to see if it works.
  4. If this works, you know that you simply need to obtain a newer version of a SATA cable, which should be fairly inexpensive.

Method 4: Set your hard drive as the first boot device

Setting your hard drive to be the primary boot device in the BIOS/UEFI can also sometimes fix the issue.

  1. Enter your BIOS by pressing a manufacturer predefined button during the POST screen. That button could be ESC, F2, F12, Backspace, etc., and it will be visible on the POST screen before Windows boots. Press it quickly to enter the BIOS/UEFI utility.
  2. Once inside, look for the Boot options. Most, if not all, BIOS/UEFI utilities have instructions for navigation at the bottom or right side of the screen – use them to navigate to the menu.
  3. Once in the Boot options, take a look at the boot priority. You need to make sure that the first boot device is your hard drive. Use the navigation instructions to achieve this and place the hard drive at the top of the boot devices list.
  4. Exit after saving your changes and reboot your device. This should fix your problem.

If none of these methods work for you at all, it is possible that the ISO from which you are trying to install Windows is corrupted or incompletely downloaded. In that case, you can download a fresh ISO and try installing Windows again. We highly recommend downloading the ISO file from the official Microsoft website or using their Media Creation Tool.

ABOUT THE AUTHOR

Kevin Arrows


Kevin Arrows is a highly experienced and knowledgeable technology specialist with over a decade of industry experience. He holds a Microsoft Certified Technology Specialist (MCTS) certification and has a deep passion for staying up-to-date on the latest tech developments. Kevin has written extensively on a wide range of tech-related topics, showcasing his expertise and knowledge in areas such as software development, cybersecurity, and cloud computing. His contributions to the tech field have been widely recognized and respected by his peers, and he is highly regarded for his ability to explain complex technical concepts in a clear and concise manner.

Comments

35
    ST
    step Apr 6, 2015

    Thank you – I was able to fix the issue with method 1

    JA
    JAP Apr 6, 2015

    I am glad to have found this guide. I wasnt able to fix the issue but i guess i am pointed to in the right direction.

    OL
    oldlad Apr 7, 2015

    The old lad is glad to have found your site. Hiren fixed the issue, it appears that our disk had a lot of bad sectors.

    D4
    d4nn Apr 7, 2015

    Yo my laptop did exactly the same thing this morning froze whyle I
    was on you tube I had to turn of by the power button and now I recieve
    the same code

    CR
    crazier Apr 7, 2015

    I needed to use a different image on the new drive and that fixed it.

      KA
      K. Arrows Author Jul 20, 2015

      Cool

    SH
    Shanei Apr 8, 2015

    Tried all methods, nothing works. What do i do? Please help

      KA
      K. Arrows Author Jul 20, 2015

      That’s a very general response. Please be specific.

    JI
    jimmei Apr 8, 2015

    Thanks

    NA
    navjot Jun 22, 2015

    after the choice page its not showing hdta page …showing some error and zip file missing

      KA
      K. Arrows Author Jun 22, 2015

      What’s the error?

    AB
    abhi Oct 5, 2015

    Hi Kevin,

    Thanks for the guidance. I’m having a little problem. When I choose HDAT2 4.53 (Test/Repair of Bad Sectors), it shows as follows:

    HDAT2
    Load error: no DPMI – Get cgdpmi*b.zip

    I googled it but could not find the solution so here I am to trouble you. Please help

    Thanks in advance.

      KE
      Kevin Mar 18, 2016

      Hello,
      I am getting this same error and I have downloaded from the Hiren website. Was a solution ever determined for this?

        KA
        K. Arrows Author Mar 19, 2016

        I would suggest you run a hardware diagnostics check to confirm if hardware is failing

        Reply
    AB
    abhi Oct 5, 2015

    Hi Kevin,

    Thanks for the guidance. I’m having a little problem.
    When I choose HDAT2 4.53 (Test/Repair of Bad Sectors), it shows as
    follows:

    HDAT2
    Load error: no DPMI – Get cgdpmi*b.zip

    I googled it but could not find the solution so here I am to cause you trouble. Please help

    Thanks in advance.

      KA
      K. Arrows Author Oct 5, 2015

      I have never seen this error. Did you download hiren from their site?

        AB
        abhi Oct 6, 2015

        I was having some issues in downloading from their site, so I used torrent. It was of exact same size as that on their website. Should I download it again from their site?

          KA
          K. Arrows Author Oct 8, 2015

          Yes, please.

    NF
    Nae Faust Jan 4, 2016

    I am also receiving error message, “load error no dpmi”? Please help??

      KA
      K. Arrows Author Jan 4, 2016

      Please download Hiren from their site.

    JR
    John Christian Reyes Rivera Feb 28, 2016

    i was able to use poweriso to extract Hiren to my usb but when I insert it on my PC. Bios floppy 1st then HardDisk 2nd. its not reading the usb. its just showing that error 0xc000009 again. please help. please email me at jannok3@gmail.com

      KA
      K. Arrows Author Mar 1, 2016

      Have you tried booting from a disc? The USB may be faulty.

    ЗХ
    Золбоо Хосбаяр Mar 13, 2016

    when i choose Dos programs i got this problem please help

      KA
      K. Arrows Author Mar 14, 2016

      Which programs? Try reinstalling them.

    ЗХ
    Золбоо Хосбаяр Mar 13, 2016

    error

    TG
    The Average gamer May 18, 2016

    i have a error, it says
    Load error: no DPMI – Get csdpmi*b.zip

      KA
      K. Arrows Author May 18, 2016

      put it in the same directory as the FB generated EXE. There are ways to make the exe fully stand alone though, read the docs that came in the zip file.

      Reply
    PA
    Pascal Jun 2, 2016

    Thank you for this thorough explanation. Quick question though; how long should it approximately take to launch the Dos Programs? My screen just says ‘Booting Dos Programs’ with a blinking underscore on the left side. Thanks.

      KA
      K. Arrows Author Jun 2, 2016

      It should be less then 5 minutes.

    EA
    Emmanuel Adams Feb 14, 2017

    is there any free application i can use to burn or to put hiren in my usb?

      KA
      K. Arrows Author Mar 3, 2017

      rufus

      Reply
    EA
    Emmanuel Adams Feb 14, 2017

    how can i burn hiren into my usb please help 🙁 i’m having difficulties in magic iso. i cant find the word that it will burn it into my usb. 🙁

      KA
      K. Arrows Author Mar 8, 2017

      download hiren and burn using rufus.

    DW
    Douglas Winston Apr 17, 2017

    Great app! At least I can see the HDD on the PC that got knocked down while running, instead of getting that oh-so-descriptive MS error message. One suggestion – tell users to use the ISO image that comes with the program instead of finding the one on the PC they are constructing the HBCD source on.
    I did it that way using Rufus to create a bootable USB and was wondering why I couldn’t see the HBCD folder… it worked great once I chose the HBCD.OSI as the source image.

    Reply
    GL
    George l Dec 27, 2017

    Thank you guys for this post, Kevin Arrows this post is great,and it helped solve the problem, so all I did was put the windows CD in and chose the CD-ROM from the boot menu and it worked, it started to install windows as new. I tried all sort of methods but none worked, after looking at your article it did help a lot. so thank you very much you guys are geniuses. G.

    Reply
Need Help? From $35
Still stuck? Get expert help