3 Solutions to Fix ‘Camera Error 0xA00F4246 (0x80070005)’
The stock Camera application of Windows 10 is quite proficient in every aspect. However, that does not signify that the Camera app of Windows 10 is flawless, as it certainly has its issues. Windows 10 users have identified a range of different problems related to the Camera app, with one of them being the 0xA00F4246 (0x80070005) error. Users impacted by this issue are unable to utilize the camera of their computer through the stock Camera app. Whenever they attempt to launch the Camera app, an error message containing the error code 0xA00F4246 (0x80070005) is displayed, rather than the camera viewfinder.
Windows 10’s Camera app is a pretty decent camera application all around, and not being able to use it can prove to be a pretty significant problem, especially for users who are fond of using their computer’s camera. Thankfully, though, this issue is completely fixable, and the following are the most effective solutions that you can use to try and fix it:
Solution 1: Make sure that apps are allowed to use your computer’s camera
Windows 10 users have the ability to allow or deny the use of their computer’s camera by applications and programs. Having this option set to block apps’ access to the computer’s camera can often result in the user seeing the 0xA00F4246 (0x80070005) error whenever they launch the Camera app. If lack of access to your computer’s camera is causing the 0xA00F4246 (0x80070005) error in your situation, all you need to do to resolve the issue is:
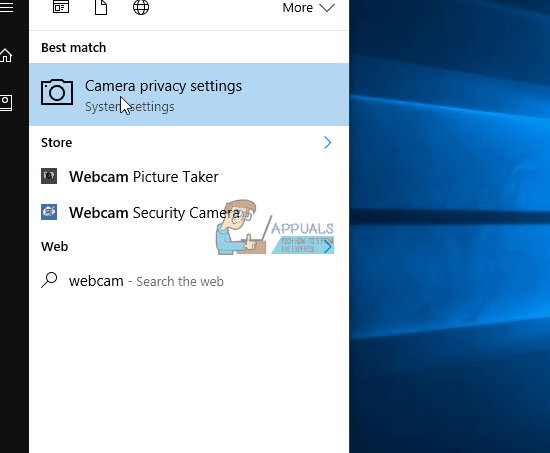
- Open the Start Menu.
- Click on Settings.
- Type “webcam” into the Search box located in the top-right corner of the window.
- Locate and click on Webcam privacy settings in the search results.
- Locate the Let apps use my camera option and make sure that it is enabled, meaning that apps on your computer are allowed to access and use the camera.
- Check to see whether or not the problem has been fixed.
Solution 2: Reset the Camera app
The 0xA00F4246 (0x80070005) error can also be caused by some kind of an issue with the Windows 10 Camera app. If that’s the case, the problem can be resolved by simply resetting the Camera app. In order to reset the Camera app on a Windows 10 computer, you need to:
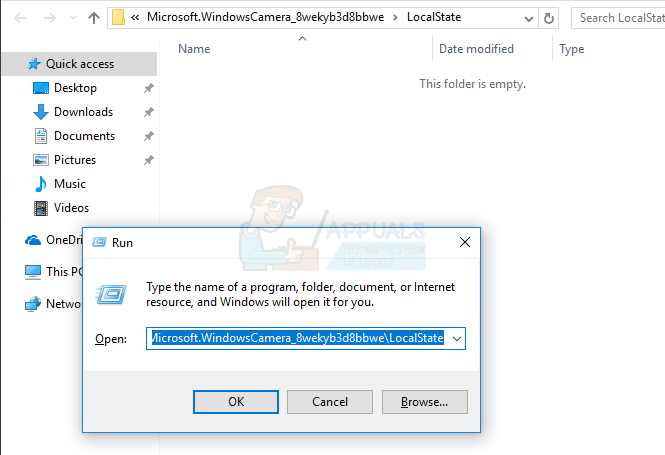
- Press the Windows Logo key + R to launch a Run
- Type the following into the Run dialog and press Enter:

- Press Ctrl + A to select all of the contents of the folder that the Run dialog opens.
- Press Delete.
- Confirm the action in the resulting popup to delete all of the contents of the folder, effectively resetting the Camera app.
- Restart your computer and check to see whether or not the problem persists once it boots up.
Solution 3: Reset your computer
If neither of the solutions listed and described before has worked for you, your only remaining option is to reset your computer. While resetting your computer might seem like a pretty drastic measure, it is not nearly as drastic as reinstalling Windows 10 from scratch. Many other users affected by this issue have had tremendous success with the use of this solution. In order to reset a Windows 10 computer, you need to:
- Open the Start Menu.
- Click on Settings.
- Click on Update & security.
- Click on Recovery in the left pane.
- In the right pane, click on Get Started under Reset this PC.
- Click on either “Keep my files” (if you want the computer to be reset without losing any of the user data stored on it), or “Remove everything” (if you want the computer to be reset and any and all user data stored on it to be deleted). If you plan on using the “Remove everything” option, it is recommended that you back up any data or files that you don’t want to lose beforehand.
- If you selected ‘Remove everything‘ in the last step, then choose between ‘Just remove my files‘ to delete only your files, or ‘Remove my files and clean the drive‘ to delete your files and clean your Hard Disk, which takes more time. However, if you selected ‘Keep my files‘ in the last step, you can ignore this step.
- If presented with a warning, simply click on Next.
- When prompted to do so, click on Reset.
Once you click ‘Reset‘, the computer will restart and subsequently reset itself. If you are prompted with a screen displaying three options and requesting you to make a selection, click ‘Continue‘.
Note: Regardless of whether you choose the ‘Keep my files‘ or ‘Remove everything‘ option, all installed programs and applications will be uninstalled. You will need to reinstall them after your computer has been successfully reset. Also, resetting a Windows 10 computer will restore all settings and preferences to their default values.