How to Fix BSOD Caused by rtwlanu.sys on Windows?
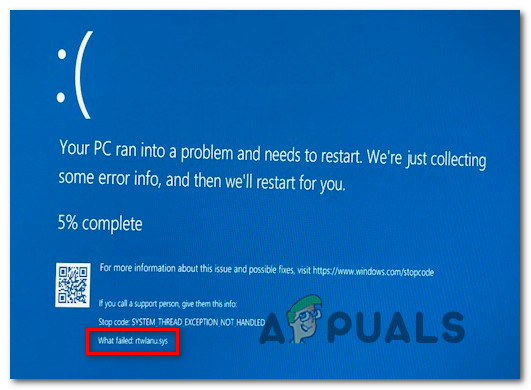
Several Windows users have been struggling to resolve an issue that is causing constant BSOD that point towards the rtwlanu.sys as the file causing the issue. Most users that are encountering this issue are reporting that the crash typically happens when they try to put their machine on Sleep or Hibernation. Aside from the failed object rtwlanu.sys, the Blue Screen also points towards several different Stop codes including “Driver IRQL Not Less or Equal”, “System Thread Exception Not Handled” and “Driver Unloaded Without Canceling Pending Operation”.
The issue is mostly reported to occur on Windows 10, but there are reported cases of the problem happening on Windows 7 and Windows 8.
What’s causing the BSOD triggered by rtwlanu.sys?
We investigated this particular issue by looking at various user reports and analyzing various repair strategies that other users in a similar scenario have successfully implemented to stop the BSODs from occurring.
As it turns out, several different culprits might trigger this behavior. Here’s a list with potential culprits that might be responsible for this BSOD critical crash:
- Corrupted Network WLAN driver – One of the most common scenarios that will spawn this type of BSOD is a corrupted network Driver. Realtek drivers are often reported to cause this behavior on Windows 10. If this scenario is applicable, you should be able to resolve the issue by uninstalling the corrupted network driver using Device Manager and replace it with a dedicated driver or with a generic Windows driver.
- WLAN driver is not permitted to wake the machine – If you’re getting BSODs while trying to put/wake your computer from Sleep or Hibernation, chances are this behavior is occurring because WLAN is not configured to wake the computer. This behavior can be fixed by accessing the Power management settings and permitting the device to wake the computer up.
- System file corruption – Corrupted operating system files can also be responsible for a critical crash of this kind. In this case, you can resolve the issue either by using a System Restore point or by refreshing all Windows components with a clean install or repair install.
If you’re currently struggling to resolve this error message, this article will provide you with several potential repair strategies. Down below, you’ll find a series of troubleshooting strategies that other users in a similar scenario have successfully applied to resolve the issue. Each of the potential fixes mentioned below is confirmed to be effective by at least one affected user.
To remain as efficient as possible, we advise you to follow the methods below in the same order as we arranged them in (by difficulty and efficiently). Eventually, you should stumble upon a fix that should fix the BSOD (or at least help you identify the cause) regardless of the culprit that’s causing the problem.
Method 1: Uninstall the corrupted Network driver
As it turns out, this issue is most commonly linked to a corrupted Network driver. There’s one particular driver (Realtek RTL8723AU Wireless LAN 802.11n USB 2.0 Network Adapter) that is often pinpointed as the culprit by many users that we’re struggling to resolve this type of BSOD.
If this scenario is applicable (You’re using Realtek drivers for your wireless connection), there’s a high chance that you will be able to resolve the issue by uninstalling the driver responsible for the crash and install the dedicated one according to your motherboard manufacturer or let Windows install a generic one.
Here’s a quick guide on uninstalling the driver responsible for the crash to resolve the rtwlanu.sys BSOD:
- Press Windows key + R to open up a Run dialog box. Then, type “devmgmt.msc” and press Enter to open up Device Manager.

Typing “devmgmt.msc” in the run prompt. - Once you’re inside Device Manager, scroll down to Network adapters and expand the drop-down menu. Next, right-click on the Realtek Wireless driver and choose Uninstall Device from the newly appeared context menu.
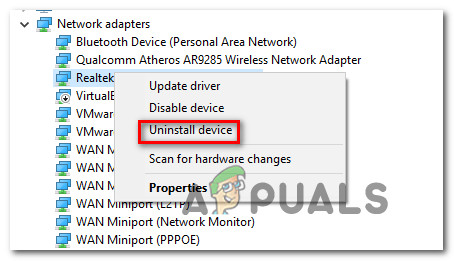
Uninstalling the Realtek network driver - Click Ok at the confirmation prompt, then restart your computer.
- At the next system startup, Windows should have already installed the generic driver for Wireless, so you should no longer be encountering the issue. But if you want, you can also download the dedicated WLAN driver according to your motherboard manufacturer.

Downloading the dedicated WLAN driver - Repeat the action that was previously causing the BSOD and see if the issue has been resolved.
If you’re still facing BSOD crashes pointing towards the rtwlanu.sys file, move down to the next method below.
Method 2: Changing the LAN Settings
Other users that were also struggling to resolve this issue have managed to stop the BSOD crashes from occurring by changing the default LAN behavior to allow the Network adapter to wake the computer up at any given moment.
This fix is especially useful in situations where you’re encountering the problem when you put your computer on Sleep or Hibernate and has been confirmed by dozens of users.
Here’s a quick guide on changing the default LAN behavior for the Network adapter to allow the device to wake the computer up:
- Press Windows key + R to open up a Run dialog box. Then, type “devmgmt.msc” and press Enter to open up the Device Manager utility.
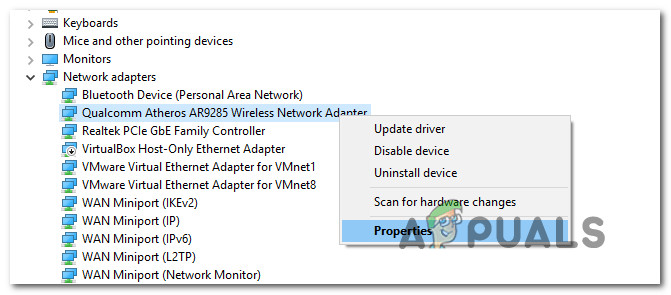
Typing “devmgmt.msc” in the run prompt. - Once you’re inside Device Manager, scroll down through the list of installed devices and expand the drop-down menu associated with Network Adapters. Then, right-click on your network adapter and choose Properties from the newly appeared context menu.
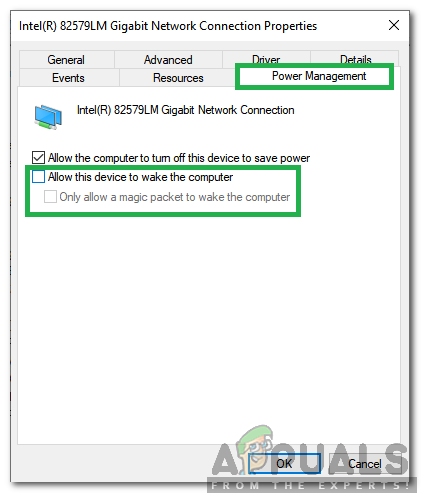
Accessing the Properties screen of the Network Adapter - Inside the Properties screen, select the Power Management tab and then check the box associated with “Allow this device to wake the computer”.
Clicking on the power management tab and unchecking the “Allow this device to wake up the computer” option - After the change is enforced, restart your computer and see if the problem has been addressed.
If you’re still seeing BSOD crashes pointing towards the rtwlanu.sys file when putting your computer to Sleep or Hibernation, move down to the next method below.
Method 3: Perform a System Restore (if applicable)
Given the circumstances, it’s very likely that the issue is being caused by an underlying system file corruption that can’t be resolved conventionally. In these cases, a damage-limiting fix is to use System Restore.
This utility is designed to deal with critical errors by restoring the entire Windows installation to a healthy state in which the problem didn’t occur. But to be able to use this fix, your operating system needs to have previously created a snapshot that can be used to restore the Windows installation to a previous point in time. But if you haven’t modified the default behavior, your WIndows should be configured to save System restore snapshots regularly (after every installed Windows update).
But before you go ahead and try out this fix, keep in mind that this procedure will essentially revert any changes made since the snapshot was created. This means that any app installations, games and user preferences enforced after the snapshot was created will be lost.
If you decide to go forward with the system restore procedure, follow the instructions below:
- Open a Run dialog box by pressing Windows key + R. Next, type “rstrui” inside the newly created text box and press Enter to open up the System Restore window.

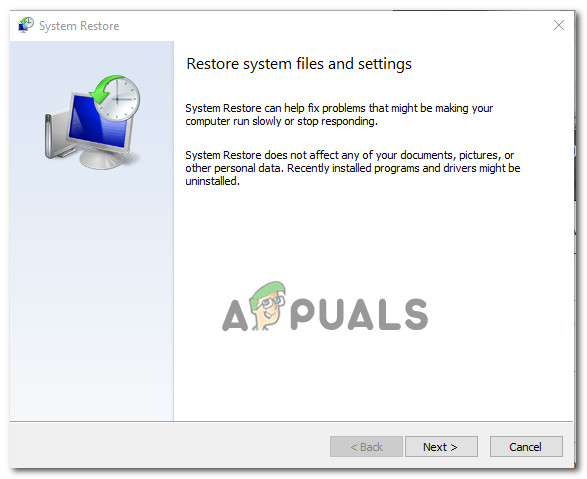
Opening the System Restore wizard via Run box - Once you manage to open the System Restore window, click Next to advance to the next screen.
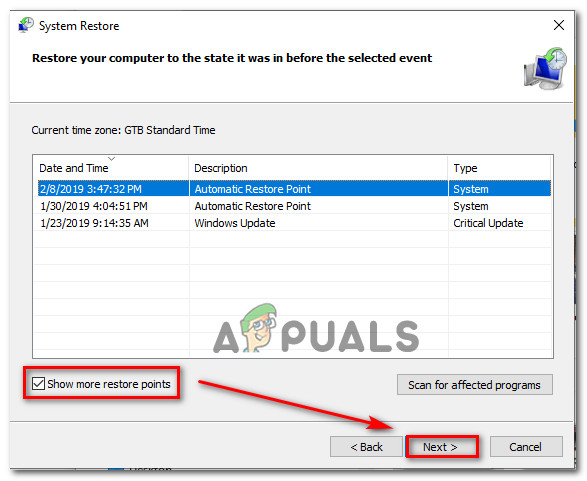
Using System Restore - At the next screen, start by checking the box associated with Show more restore points. After you do this, choose a Restore Point that is older than the apparition of the rtwlanu.sys BSOD and click Next.
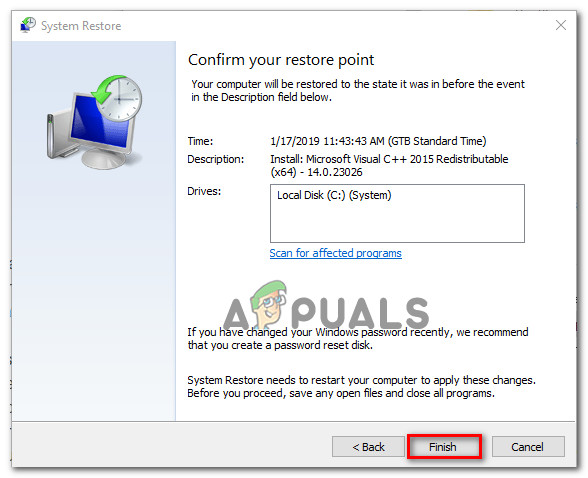
Restoring your system to a previous point in time - Now that everything is set up, click on Finish to initiate the restoring process. This will restart your computer and mount the older machine state at the next system startup.
Starting the System Restore process - Once the next startup sequence is complete, see if you’re still encountering the BDSOD pointing towards the rtwlanu.sys file.
If you’re still encountering the same kind of critical crash, move down to the next method below.
Method 4: Perform a repair install or clean install
If none of the methods above have fixed the issue for you, chances are you’re dealing with a severe corruption issue that cannot be resolved conventionally. If this scenario applies to your current situation, the only chance of resolving the issue is to make sure that you reset all Windows components to remove any instance of corrupted system files.
If you want to go for the radical solution, a clean install does the job well, but it will remove any personal data including documents, media, games and other applications.
A more focused and less destructive approach is to refresh all your Windows components without affecting your data – this can be achieved by going for a repair install (in place repair). On top of allowing you to keep all your data, you can even keep some user preferences.
If you decide to go for a repair install, follow this article (here) for step-by-step instructions on performing this procedure.


