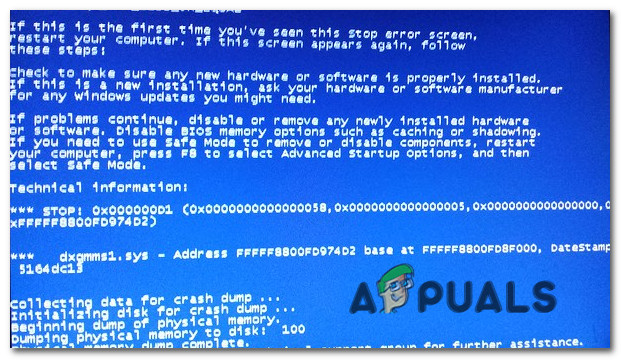
How to Fix Blue Screen BSOD Caused by dxgmms1.sys
Several Windows users have been reaching us seeking help after being increasingly annoyed by constant BSODs (Blue Screen of Death) crashes pointing towards dxgmms1.sys as the file responsible for the critical error. The issue is not exclusive to a certain Windows version since we’ve been able to find verified occurrences on Windows 8.1 Windows 7 and Windows 10.
What is causing the dxgmms1.sys BSODs on Windows?
We analyzed this particular error by looking at various user reports and the troubleshooting strategies that are most commonly used to fix this particular issue. As it turns out, there are several different scenarios that might produce this error. Here’s a list with potential culprits that you should be aware:
- Outdated GPU driver – This is the number one cause why these particular BSODs will occur. In order to fix them, all you need to do is update your GPU drivers to the latest version either using Device Manager or by relying on the proprietary software of your manufacturer.
- The glitch is caused by update KB3163018 – There is one bad update (KB3163018) know to produce this type of BSOD. If this scenario is applicable, you will be able to resolve the issue by installing the two hotfixes that Microsoft released for this issue.
- Integrated GPU is crashing the system – Another possibility is that your Intel integrated GPU is conflicting with the dedicated GPU and ending up crashing the system. In this case, you will be able to resolve the issue by disabling the integrated GPU and relying solely on the dedicated GPU.
- Outdated BIOS version – Based on various user reports, this particular issue can also occur with motherboards that are still on a severely outdated firmware version. In this case, you should fix the crashes entirely by updating your BIOS version to the latest.
- System file corruption – Another possible culprit for this issue is system file corruption. If a broken kernel file is causing the crash, the only way you’ll be able to resolve the issue is by performing a clean install or a repair install.
If you’re currently looking for ways to resolve the same error message, this article will provide you with several verified troubleshooting steps. Each of the potential fixes featured below is confirmed to be effective by at least one affected users struggling to resolve the same issue.
If you want to be as efficient as possible, we advise you to follow the methods in the order that they are presented since we ordered them by efficiency and difficulty. We tried to cover every potential culprit, so you should be able to find a viable fix regardless of the scenario that you’re encountering.
Let’s begin!
Method 1: Update graphics card to the latest version
As it turns out, the most popular fix in cases where the user is getting constant BSOD crashes pointing towards the dxgmms1.sys file as being responsible is to update the GPU drivers to the latest dedicated version.
This procedure has confirmed to be effective by at least a dozen users that were also encountering this exact issue. Users are speculating that the crash happens whenever a resource-demanding application doesn’t have the required dependencies to complete a process.
If this scenario is applicable, then updating the GPU drivers should resolve the issue indefinitely. Here’s a quick guide on doing this:
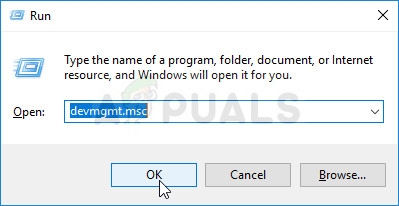
- Open a Run dialog box by pressing Windows key + R. Then, type “devmgmt.msc” inside the text box and hit Enter to open up Device Manager.
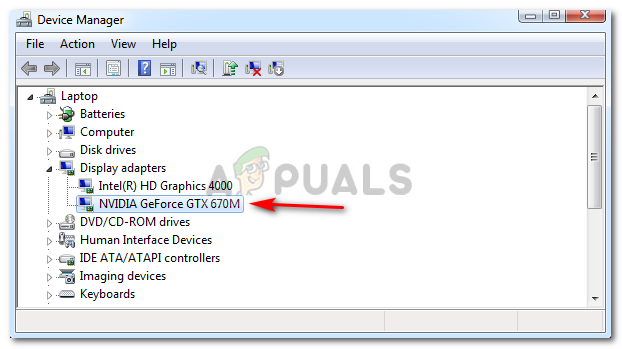
Running Device Manager - Once you’re inside Device Manager, scroll down through the list of installed device and expand the drop-down menu associated with Display Adapters.
- Next, right-click on the GPU that you’re actively using and choose Update Driver from the newly appeared context menu.
Update Graphics Driver by right-clicking it. Note: If you’re encountering the issue on a laptop with both an integrated and a dedicated GPU solution, you’ll need to update both drivers (but prioritize the dedicated GPU since that’s the one that will be used during resource-demanding chores).
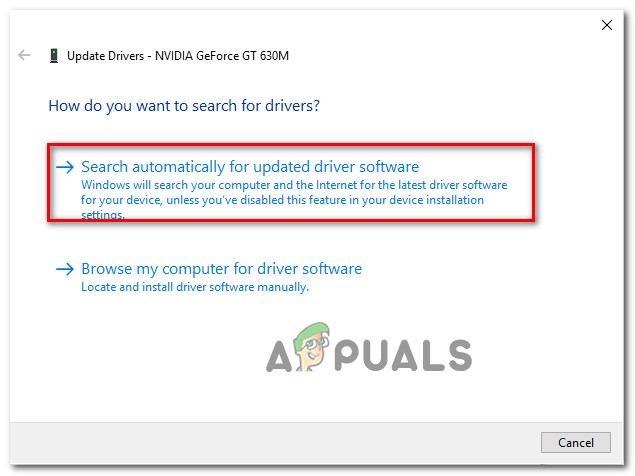
- Once you’re inside the updating screen, click on Search Automatically for updated driver software. Wait until the scan is complete, then follow the on-screen prompts to install the latest GPU version that was identified.
Searching for the newest driver automatically - Once the newest version is installed, restart your machine and see if the BSOD crashes stop occurring at the next system startup.
If you’re still encountering the same critical crashes, you should also try to update your GPU card using the proprietary software. This method is a bit of work, but it ensures that you installing the latest version available.
Nowadays, every major graphics card manufacturer has developed proprietary software that will automatically identify ad install the latest driver GPU version based on your model and OS version. Depending on which manufacturer you’re using, download one of the software before:
GeForce Experience – Nvidia
Adrenalin – AMD
Intel Driver – Intel
After you download one of the tools below and use them to update your GPU driver, restart your computer and see if the issue has been resolved.
If the same BSOD crash (dxgmms1.sys) is still occurring, move down to the next method below.
Method 2: Install every pending Windows Update
As a lot of users have reported, this particular issue can very well be caused by a bad update (KB3163018). Since the issue is quite old, Microsoft has already released a hotfix for this issue, releasing two updates that will resolve the issue (KB3173428 and KB3172985) in instances where the BSOD crashes happen due to a bad update.
These two updates are delivered through WU, so if the issue is occurring due to KB3163018, you should be able to resolve it by simply by installing all pending Windows updates since the updates that will fix the issue are mandatory.
Here’s a quick guide on ensuring that you install every pending Windows Update:
- Open up a Run dialog box by pressing Windows key + R. Then, type ‘ms-settings:windowsupdate’ and press Enter to open up the Windows Update tab of the Settings app
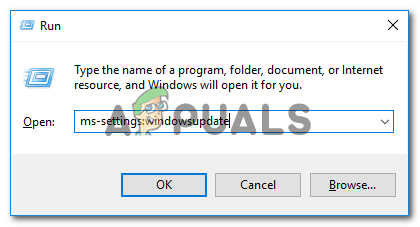
Opening the Windows Update screen Note: If you’re using a Windows version older than Windows 10, move down to the next method below.
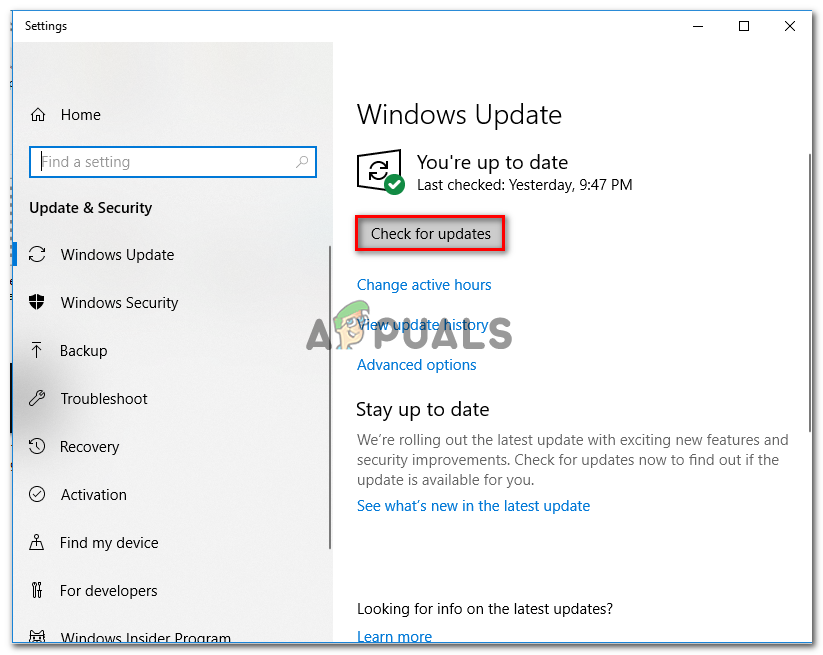
- Once you’re inside the Windows update screen, click on Check for updates and wait for the scan to complete.
- Next, follow the on-screen instructions to install every pending Windows update (including KB3173428 and KB3172985).
Installing every pending Windows update - If you have a lot of pending updates, you might be prompted to restart your computer before the updating wizard installs the two hotfixes for the issue. If this happens, restart as per the recommendations, but make sure to return to this screen at the next system startup and continue installing the updates until your computer is up to date.
- Once every pending update is installed, restart your computer once again and see if the issue is finally resolved.
If you’re still encountering BSOD crashes pointing towards the dxgmms1.sys file, move down to the next method below.
Method 3: Disabling the integrated GPU (if applicable)
As it turns out, if you’re using a laptop that includes both a gaming GPU and an integrated solution, chances are the random BSOD is actually caused by your integrated graphics card. Several affected users have discovered that if they disabled the GPU card, the BSOD crashes will stop occurring. This is specifically reported to be effective in situations where the laptop is using Intel HD 4000 integrated GPU or older.
In most cases, disabling the integrated GPU using Device Manager has resolved the issue indefinitely. Sure, your laptop will end up consuming more power since it will always use the dedicated GPU, but it’s still better to trade battery life for stability.
Here’s a quick guide on disabling the integrated GPU:
- Press Windows key + R to open up a Run dialog box. Then, type “devmgmt.msc” and press Enter to open up Device Manager.
Running Device Manager - Once you’re inside Device Manager, scroll through the list of installed devices and expand the drop-down menu associated with Display Adapters. After you do this, right-click on your integrated GPU solution and choose Disable device from the newly appeared context menu.

Disabling the integrated GPU - Restart your computer and see if the BSOD crashes stop occurring after the next system startup.
If you’re still encountering the same constant BSOD crashes associated with dxgmms1.sys, move down to the next method below.
Method 4: Updating BIOS version
A couple of users that were also affected by this type of BSOD have managed to resolve the issue by updating their BIOS firmware version to the latest.
Instances, where this type of BSOD is caused by a motherboard, are rare; but it’s certainly a possibility you should consider.
Keep in mind that botching the procedure of updating your BIOS version might create other stability problems to your machine. With this in mind, only attempt it if you have done this before and/or you are confident you will be able to pull this through.
The exact steps of updating the BIOS version is widely different from configuration to configuration, so you’ll need to follow the steps appropriate to your motherboard manufacturer. Here are some documentations from the most popular manufacturers that will help you update your BIOS version:
NOTE: If your motherboard manufacturer is not listed here, search online for specific steps.
If this method wasn’t applicable or didn’t allow you to get rid of those nasty BSOD crashes, move down to the final method below.
Method 5: Perform a repair install
If none of the methods above have allowed you to resolve the issue, your last resort is to reset every Windows component and hope that the issue is software related.
One way to reset all Windows components are with a clean install, but this procedure will also remove any personal files & applications that you currently store on your computer. A better way would be to perform a repair install.
This procedure will allow you to reset all Windows components (including booting-related files) while keeping all your personal files (photos, apps, videos and other types of files).
If you decide to go for a repair install, follow the instructions on this article (here).


Thought I didn’t have that file on my computer, because Windows Explorer search didn’t find it. It’s in windowssystem32drivers. Not sure if it’s current or not, so I’ll be searching around to find out. I have an nVidia graphics card, and am on the latest version of the drivers. Hmmmm…
Civilization VI is causing this BSOD and that game isn’t getting more patches; too old.