How to Fix the Black Screen Issue in OBS Studio on Windows?
An issue has been affecting OBS for quite some time, with users often encountering a ‘black screen’ when attempting to share their screens online. This issue predominantly occurs on Windows platforms, particularly on systems with both dedicated and integrated graphics options. In this article, we will explore the possible reasons for this issue and provide step-by-step solutions to resolve it.
We conducted an extensive survey and analyzed user cases where the black screen occurred while streaming with OBS. Our findings suggest several potential causes:
- Dedicated Graphics Interfering: When launching applications or games, the operating system must decide whether to allocate resources from the dedicated graphics card or the integrated graphics on the motherboard. This decision can negatively impact the functionality of OBS, potentially leading to streaming issues.
- Administrator Privileges: As OBS shares the entire screen, there may be instances in which the computer limits its access. In many cases, simply starting the application with administrative privileges can resolve the issue immediately.
- Conflict between 32-bit and 64-bit applications: OBS comes in both 32-bit and 64-bit versions. It’s important to select the correct version based on your operating system’s architecture; otherwise, OBS may not work correctly.
- Compatibility Issues: There have been reports that OBS is sometimes incompatible with the latest version of Windows. Running the application in compatibility mode for an older version of Windows can often remedy this.
- Overclocking: While overclocking can enhance a PC’s performance, it can also affect applications negatively. If you encounter streaming issues, consider disabling any overclocking to see if it resolves the problem.
- Conflicting Software: The presence of other screen capture software running in the background can lead to resource conflicts with OBS, causing it to malfunction.
- Capturing Options: OBS offers various capturing options, such as streaming full-screen mode or a specific window. You’ll need to select the correct one for your content.
- PC in Error State: There’s always the possibility that your PC is in an error state, particularly if it hasn’t been shut down for an extended period. A simple power cycle often addresses this issue.
The solutions are ordered by difficulty and efficiency, so make sure to follow them in sequence for effective troubleshooting. Happy troubleshooting!
1. Power Cycle Your Computer
As a preliminary step, power cycling your computer can sometimes resolve the black screen issue with OBS immediately. Power cycling involves completely shutting down your computer and removing any power sources, which clears all temporary configurations. When you power the machine back on, everything will be reinitialized from scratch.
- Shut down your computer properly.
- Once turned off, disconnect the power cord or, if using a laptop, remove the battery.
- Press and hold the power button for a few seconds to ensure all power is drained.
After waiting for 2-4 minutes, reconnect the power source and check to see if the issue has been resolved.
2. Select the Correct Version of OBS Studio
OBS is available as both 32-bit and 64-bit versions to accommodate different versions of the Windows operating system. It’s crucial to select the version that matches your system’s architecture.
First, let’s determine the operating system version on your computer.
- Right-click on This PC and select Properties.
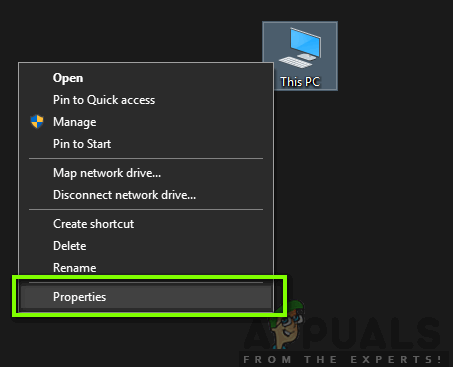
Properties of This PC
- In the computer properties, look under the System section and note the operating system type listed next to System type.
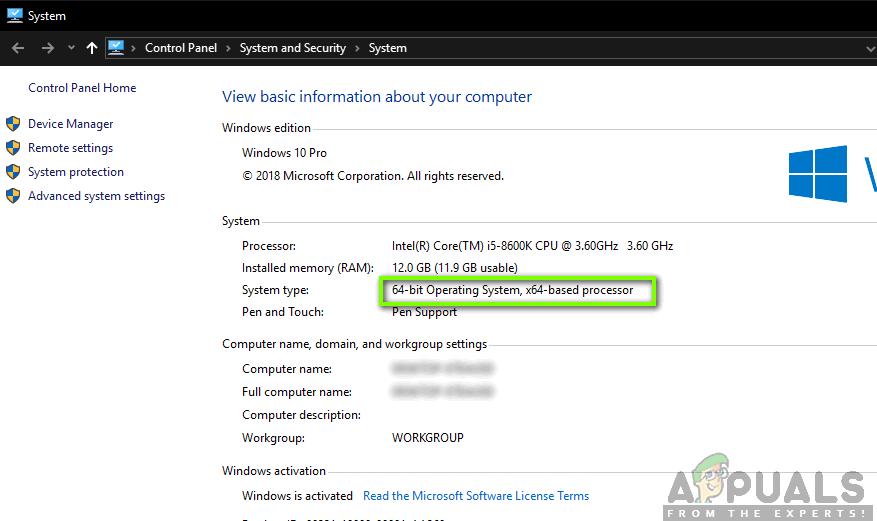
Checking Operating System Type
Next, navigate to the OBS installation folder and launch the version of the application that corresponds to your system’s bit architecture.
- Press Windows + E to launch File Explorer. Search for OBS and open the file location as shown in the image below.
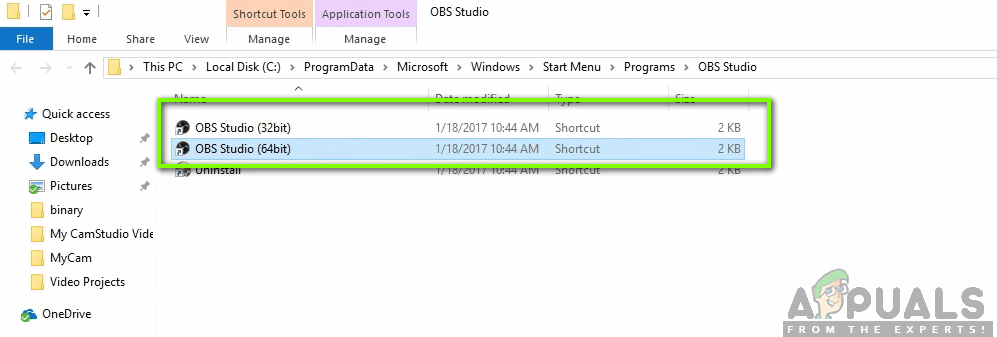
OBS Studio Shortcut – Windows Explorer
- Select and launch the appropriate version of OBS, then verify if the issue has been resolved.
3. Change Compatibility Mode
Compatibility mode settings in OBS have shown mixed results among users. While some found that changing compatibility to Windows 7 resolved their problems, others reported that disabling compatibility mode altogether fixed the issue. You can try both methods to determine which works for you. If neither does, revert the setting to its default and proceed to the next solution.
- Press Windows + S, search for OBS, right-click on the application, and select Open file location.
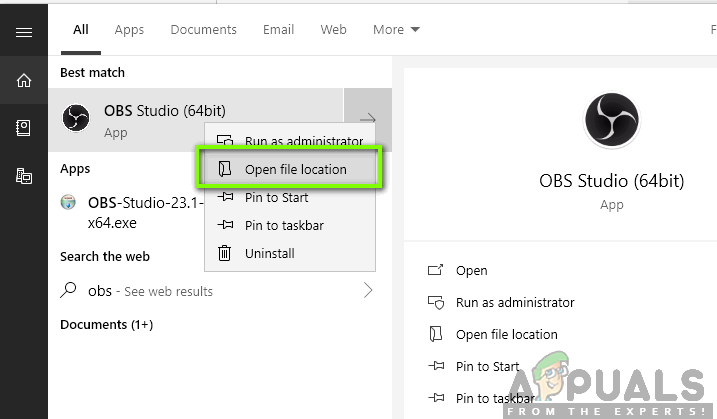
Opening File Location of OBS – Start Menu
- Right-click on the executable and select Properties.
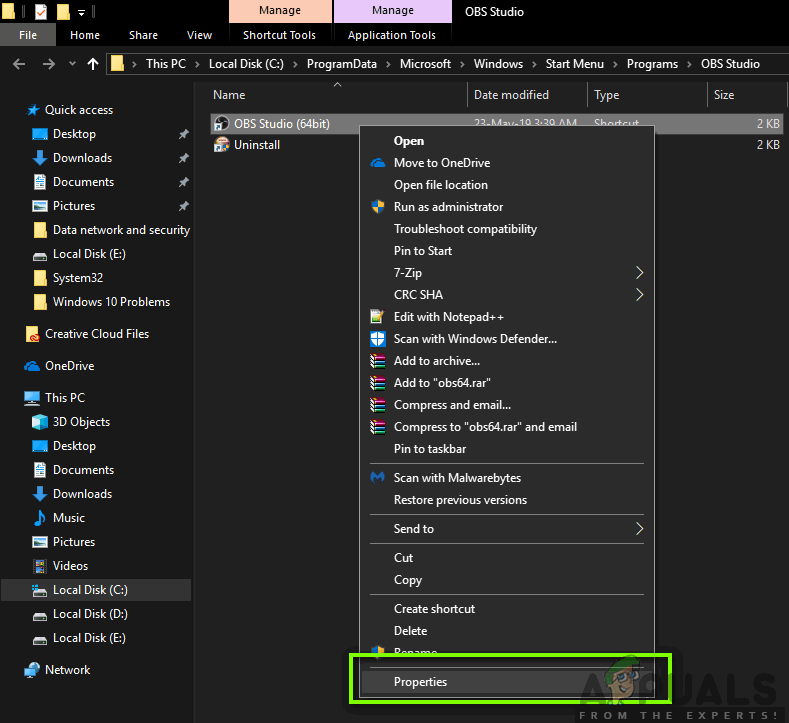
Properties of OBS Studio
- In the properties window, switch to the Compatibility tab and check the box next to Run this program in compatibility mode for. Here you can choose Windows 7 or 8.
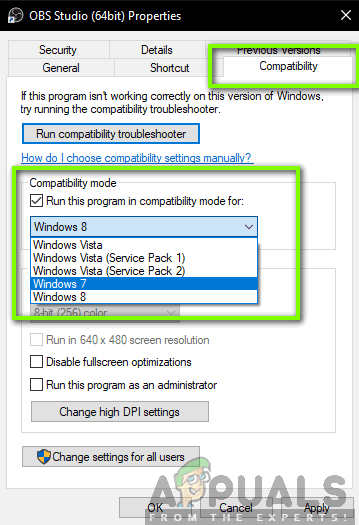
Enabling Compatibility Mode – OBS
- Save the changes and exit. Now, try launching OBS to see if the issue is resolved.
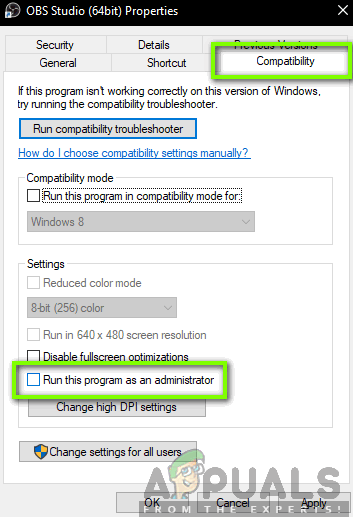
4. Grant Administrator Rights
Lack of proper administrator privileges is another reason why OBS might not stream your screen or game properly. Granting OBS administrative rights can often fix streaming issues instantly. It’s recommended to keep these privileges enabled going forward.
- Navigate to the properties of the OBS executable as done in the previous step.
- Go to the Compatibility tab and check the box labeled Run this program as an administrator.
Granting Administrator Access to OBS
- Apply the changes and exit. Restart your computer and launch OBS again to see if the issue has been resolved.
5. Select the Correct GPU for Resources
One interesting finding is that failing to select the correct GPU for your specific capture needs can lead to issues like the black screen in OBS. The preferred GPU to select varies depending on the capture mode:
- Game Capture: Use the dedicated graphics card (NVIDIA or AMD).
- Monitor/Display Capture: Use Intel’s integrated GPU.
Note: This solution applies only if you have a dedicated graphics card installed on your computer.
Follow the steps below depending on your capture mode:
- Right-click on your desktop and select NVIDIA Control Panel.
- Within the control panel, navigate to Manage 3D settings and click on Program Settings.
- Find OBS in the program settings. If it’s not listed, click on Add, then look for the software by navigating to its installation directory and select the executable file.
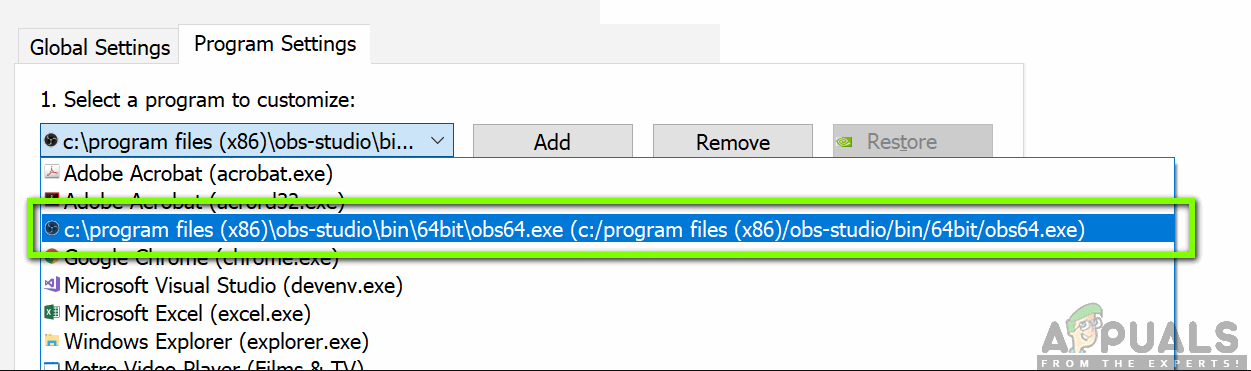
Selecting OBS in the NVIDIA Control Panel - Choose the correct graphics processor for the program based on the type of capture you’re using. In the example below, the NVIDIA processor is selected.
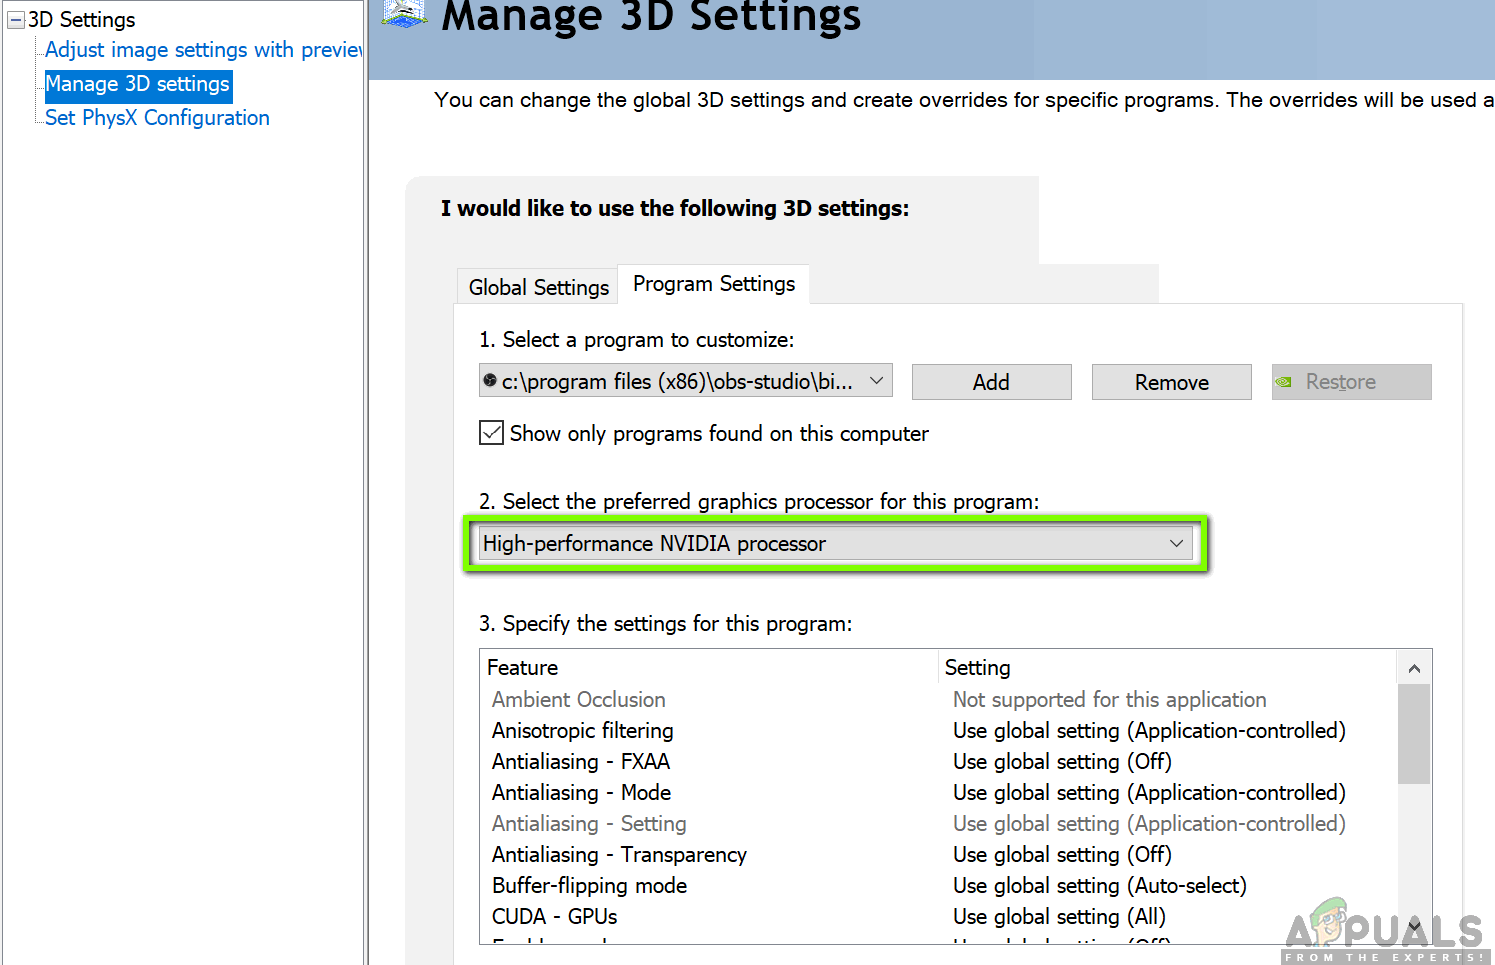
Selecting Integrated/Dedicated Graphics for OBS
- Save the changes and restart your computer, then launch OBS and check if the black screen issue has been resolved.
6. Change Drive Permission Settings
If OBS is installed on your primary drive (typically C:), it’s possible that you do not have full permission to edit and modify its contents. For security reasons, users are typically restricted from accessing this drive freely due to the presence of essential system files. Some users have found that changing the ownership settings of their primary drive can instantly resolve the issue. Ensure you are logged in as an administrator before following these steps.
- Press Windows + E to open File Explorer. Right-click your primary drive (C:) and select Properties.
- In the Properties window, go to the Security tab and then click on Edit under permissions.
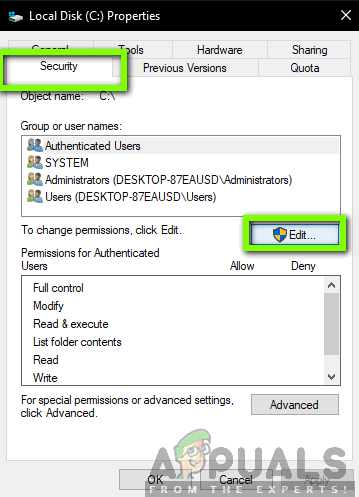
Editing Permissions of the C Drive
- Choose Authenticated users and tick the checkbox for Full control.
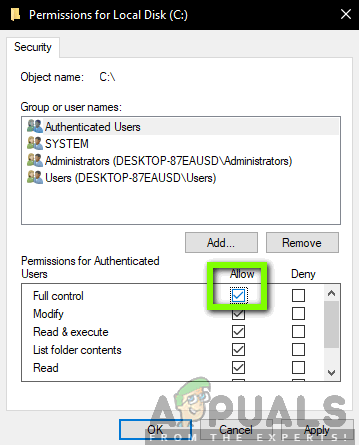
Granting Full Control to Authenticated Users
- Click Apply to save changes and exit. Restart your computer and restart OBS to check if the issue is resolved.
7. Change OBS Settings
It may be necessary to change specific settings within OBS if the default or custom configurations conflict with the software, leading to the black screen. Below are some settings adjustments to ensure OBS operates optimally:
Mode: *Select according to your preference*

Screen: *Select according to your game*

Priority: *Default setting is typically sufficient*

SLI/Crossfire: Check (You may try unchecking this option later if needed)

Force scaling: Uncheck

Transparency: Uncheck

Frame rate lock: Uncheck

Record cursor: Check

Anti-cheat compatibility hook: Uncheck

Overlays: Uncheck
After modifying the settings, restart OBS to test if you can now stream your screen or games without any difficulties.
Note: You might also want to switch from ‘Capture any fullscreen application‘ to ‘Capture specific window‘ if experiencing problems.
8. Enable Multi-adapter Compatibility
OBS includes a Multi-adapter compatibility setting, designed for computers using SLI or Crossfire technology. This technology allows the use of two graphics cards simultaneously to improve gaming or application performance. It was discovered that enabling Multi-adapter compatibility can fix the black screen problem in OBS, even on computers without SLI/Crossfire technology.
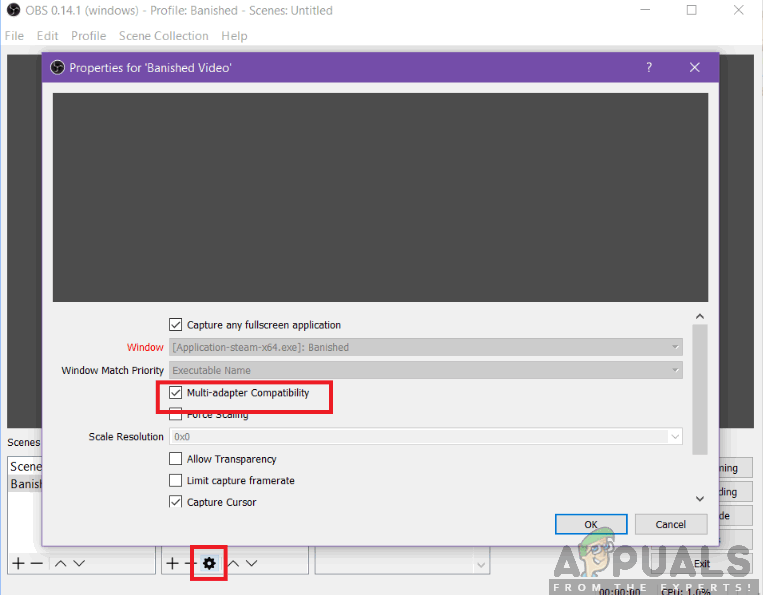
To enable this feature, select your stream and click on the gear icon. In the window that appears, you can check the option for Multi-adapter compatibility.
9. Disable Overclocking
Overclocking boosts your processor’s clock rate until it reaches the threshold temperature set by the manufacturer. The clock speed then reverts to the default to cool down before increasing again. Although it can enhance performance and frame rates, overclocking isn’t without potential issues.
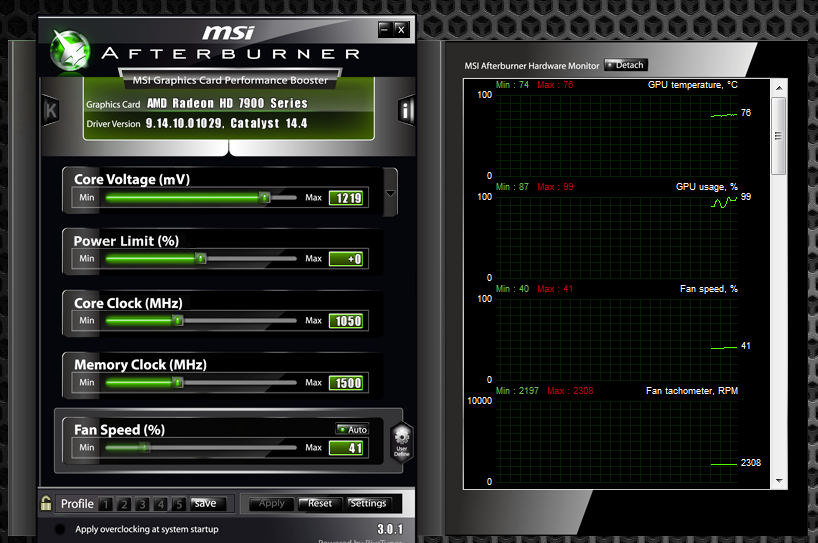
There have been instances where PCs with enabled overclocking experience black screen issues with OBS. If you encounter this problem, try disabling overclocking and any related software like MSI Afterburner. If the problem is resolved, you may want to disable overclocking while using OBS.
Note: Additionally, disable any overlays provided by software like GeForce Experience or the Windows Game Bar, as well as any other software offering game or video controls.
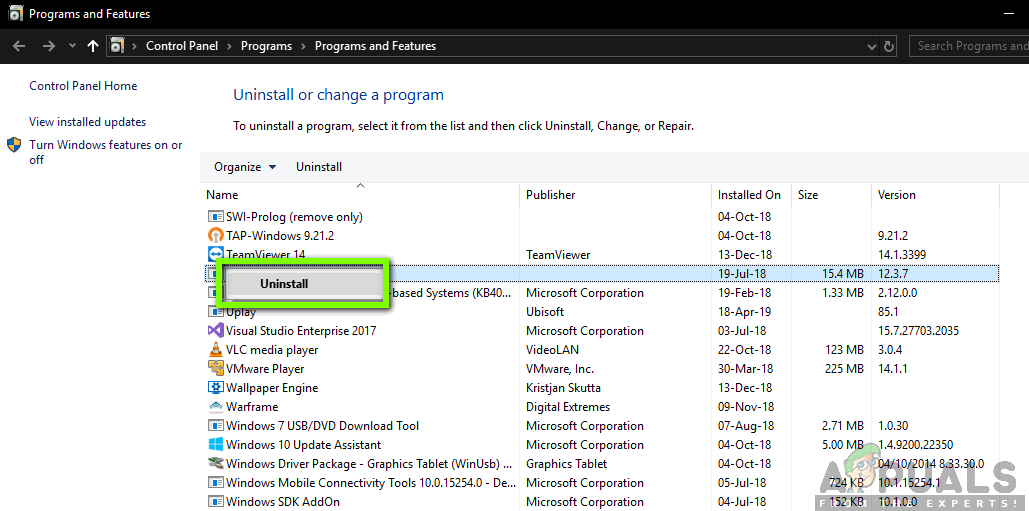
10. Check for Conflicting Software
OBS’s black screen issue may also arise from conflicting software, especially other screen capture and video recording tools that may be running in the background. Even when you think certain software isn’t active, it might still be functioning discreetly. To resolve conflicts, inspect your computer for any such software and uninstall it if necessary.
- Press Windows + R, type ‘appwiz.cpl‘, and press Enter.
- In the application manager, locate any recording software you may have installed, right-click on it, and select Uninstall.
Uninstalling Conflicting Applications
- Check the system tray or taskbar for any background applications, right-click each and choose to exit or close them.
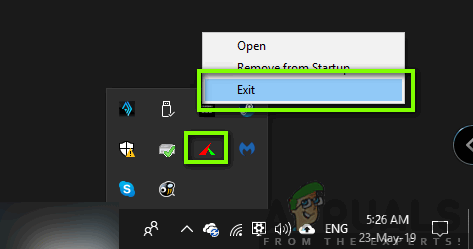
Checking Taskbar for Applications
- Once you have ensured no conflicting programs are running, launch OBS to see if the black screen issue has been rectified.
11. Reinstall the Application
If you’ve tried all the above solutions without success, it may be necessary to completely reinstall OBS. This approach addresses the possibility of a corrupt or outdated copy by delivering a fresh installation without any broken modules. However, be aware that this will delete any preset configurations, so save any essential work beforehand.
- Press Windows + R, enter ‘appwiz.cpl‘ in the dialogue box, and press Enter.
- In the application manager, locate OBS, right-click on it, and select Uninstall.
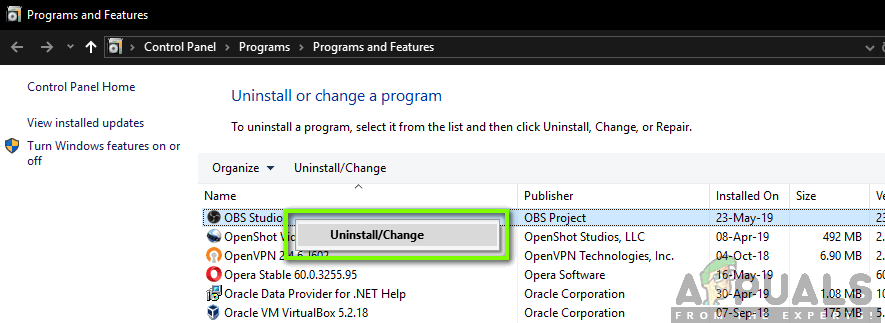
Uninstalling OBS Studio=
- Select both options (one of which should already be preselected) and click on Uninstall.
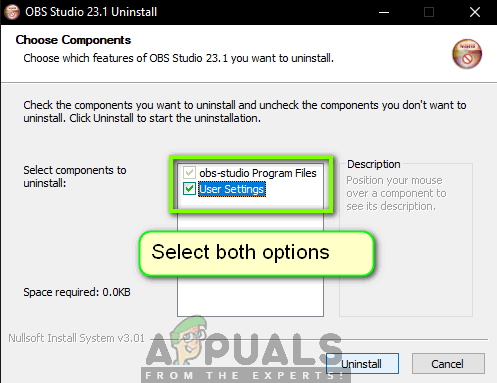
Deleting User and Program Data for OBS
- Restart your computer. Now, navigate to the OBS Studio official website and download the latest version. Install the new version and check if the issue persists.
By following these steps, you should be able to diagnose and fix the black screen issue in OBS. If problems continue, consider reaching out to the OBS support community or forums for further assistance.


You really helped me after reading your tutorials. Thanks very much