How to Disable Edge PDF Viewer in Windows?
PDF files with Windows 10 can be opened without the need to install additional software. In fact, Microsoft Edge, the default Web browser, provides native support for this type of file. But this is a minimal function option that may not meet the needs of users accustomed to using a third party software that is far more feature rich. Most of the people prefer to use Adobe Reader to view their PDF files as the software provides a flexible approach to opening, editing, and formatting the files.
Why does this happen?
Windows 10 File association protection mechanism is actually what that prevent any form of direct change to the User Choice in the registry for each form of a file. Whenever any no file association is found in the registry or in case any of the application incorrectly makes the hash void to “UserChoice registry key” to the set association then it triggers resetting of files for that program, making it switch back to the default Windows 10 set association.
This means that Edge will or may take over the PDF file default setting due to any reason, after an update or any other cases, and you will be notified about the app reset to default setting by the Action Center. What are the possible solutions to this problem? Let us have a glance.
Method 1: Using Settings
- Press Windows Key once
- Type Default Programs in the Start Search
- Click Default Programs from the search results
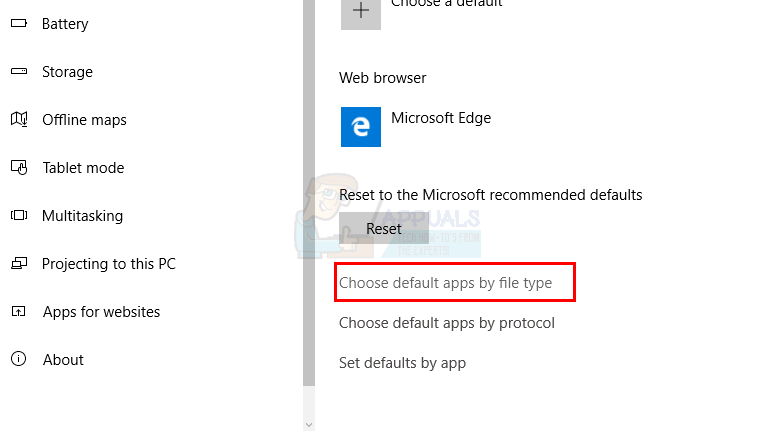
- Scroll down and click Choose default apps by file type
- Scroll down until you see .pdf. You should see Microsoft Edge icon on the right side of it (in the right pane)
- Click on Microsoft Edge
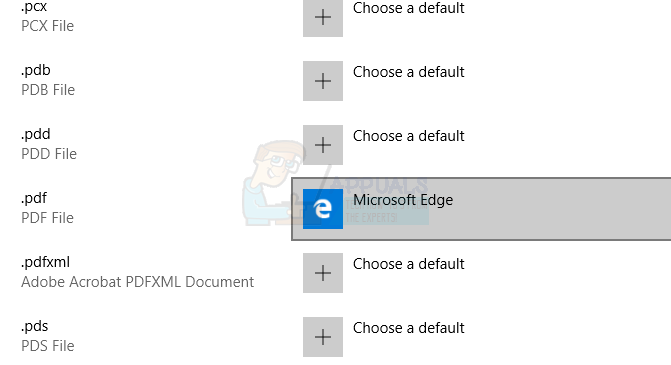

Click on your desired application to make it default for pdf reading e.g. Adobe Acrobat Reader
Method 2: Using Context Menu
You can change the default app for opening any kind of app just by right-clicking the file and selecting an option from there as well. Follow the steps given below to change the default apps for any file
- Locate the file that you want to change the default app for
- Right click on the file and go to Open with. Select Choose another app from the newly opened menu
- Select your desired app e.g. Adobe Acrobat Reader
- Check the option that says Always use this app to open .pdf files
- Click Ok
Now whenever you will run the file, it will open through the newly set default app.
Method 3: Using the Control Panel
- Hold Windows Key and press X
- Click Control Panel
- Click Programs
- Click Default Programs

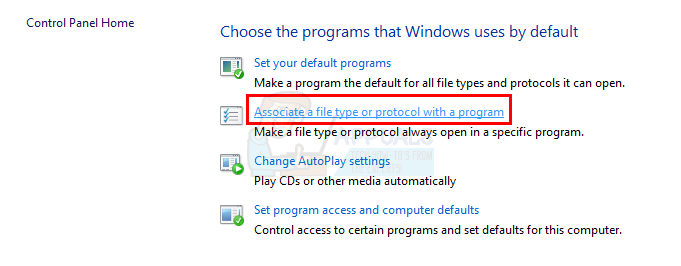
- Click Associate a file type or protocol with a program
- Locate and click .pdf from the list
- Now click on Change Program button located on the top right corner
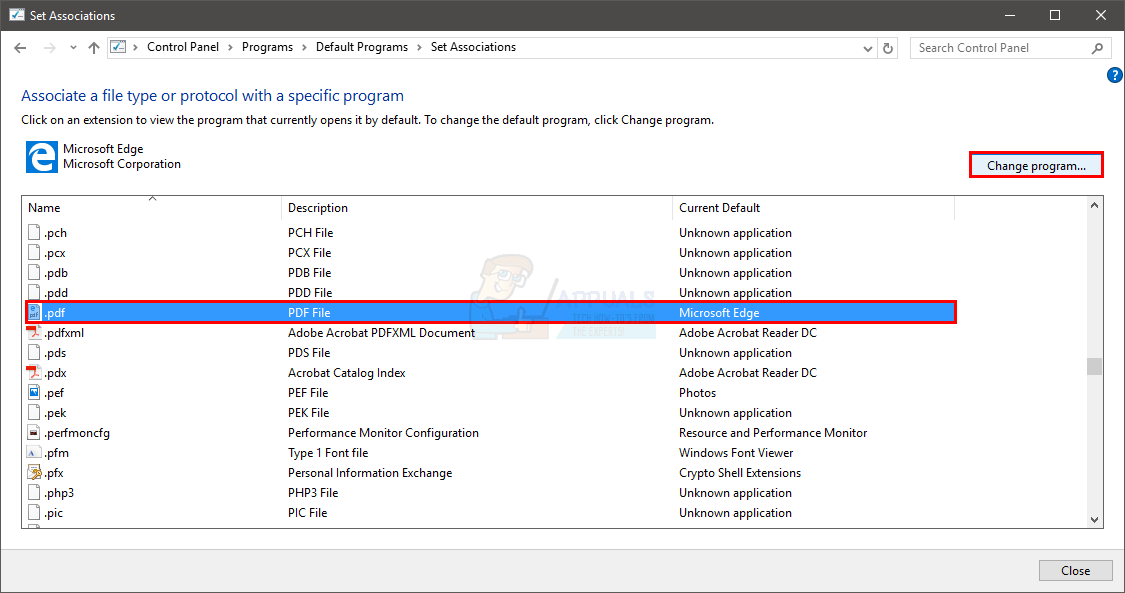
- Select your desired program e.g. Adobe Acrobat Reader and click Ok
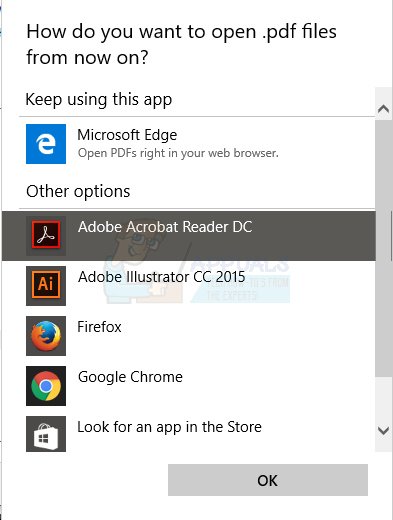
Now close the window. Now .pdf files always open in your selected app.
Method 4: Using Registry Editor
- Hold Windows Key and press R
- Type regedit.exe and press Enter. Click yes if it asks for confirmation
- Now go to this address HKEY_CURRENT_USER\SOFTWARE\Classes\Local Settings\Software\Microsoft\Windows\CurrentVersion\AppModel\Repository\Packages\Microsoft.MicrosoftEdge_25.10586.0.0_neutral__8wekyb3d8bbwe\MicrosoftEdge\Capabilities\FileAssociations. Follow the steps given below if you aren’t sure how to get to this path.
- Double click HKEY_LOCAL_MACHINE (from the left pane)
- Double click Software (from the left pane)
- Double click Classes (from the left pane)
- Double click Local Settings (from the left pane)
- Double click Software (from the left pane)
- Double click Microsoft (from the left pane)
- Double click Windows (from the left pane)
- Double click Current Version (from the left pane)
- Double click AppModel (from the left pane)
- Double click Repository (from the left pane)
- Double click Packages (from the left pane)
- Double click MicrosoftEdge_25.10586.0.0_neutral__8wekyb3d8bbwe (from the left pane). The MicrosoftEdge_25.10586.0.0 is your Microsoft Edge’s version number.
- Double click Microsoft Edge (from the left pane)
- Double click Capabilities (from the left pane)
- Click FileAssociations (from the left pane)
- Now locate the line that says .pdf under the Name section (in the right pane)
Remember the number in its Data section. Note the number or take a picture

Now go to this address
HKEY_CURRENT_USER\SOFTWARE\Classes\ AppXd4nrz8ff68srnhf9t5a8sbjyar1cr723. You can do that following the steps given below
- Scroll up in the left pane until you are back at the HKEY_LOCAL_MACHINE folder
- Click the arrow on the left side of HKEY_LOCAL_MACHINE
- Now double click HKEY_CURRENT_USER
- Double click SOFTWARE
- Double click Classes
- Click AppXd4nrz8ff68srnhf9t5a8sbjyar1cr723. You can easily locate it by looking at the last 3 numbers

- Click Edit and select New then String Value
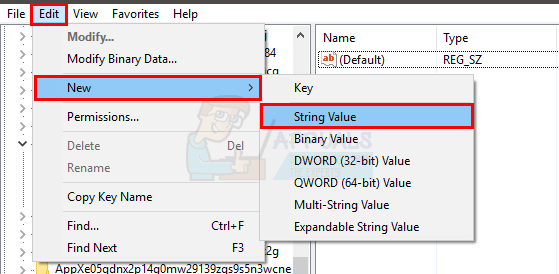
- Type its name NoOpenWith and press Enter


- If you are using the Windows 10 anniversary update then make a new string with NoStaticDefaultVerb name as well. Follow the steps 7-8.
Once you are done, Microsoft Edge won’t override the default apps anymore. However, after updating your Windows, you might want to repeat this process because Microsoft Edge tends to override the settings once Windows is updated.
Method 5: Renaming Edge Launcher Files
If all the above methods don’t work or Edge resets the file association after each Windows update, you can try renaming the Edge launcher files. Since the computer will only search for specific named files, it wouldn’t find them because you have renamed them. First, we will navigate to the directory and take permission of the Edge files. After we have the permission, we can easily rename them. Make sure that you are logged in as an administrator to perform this solution.
- Navigate to the following directory:
C:\Windows\SystemApps\Microsoft.MicrosoftEdge_8wekyb3d8bbwe
- Once you see the Edge launcher files move back one step so are seeing the folder itself. Right-click it and select Properties.

- Once in Properties, select Security tab and click on Advanced present at the near bottom of the page.

- Alongside owner, click on Change option so we can change the ownership of the folder.

- A new window will pop up. Click on the button Check names and then select Find now. Now select your Microsoft account. Press OK. This will change the ownership of the entire folder. Now restart the entire window and open the properties again. Make sure that you check Replace owner on subcontainers and objects. This is very necessary.

- After you open the properties again, click on Add and then click Select a principal. Now select Advanced and then click on Find now. Now highlight Administrators and click OK. Click OK again when a smaller windows asks for your notifications. Once the item is selected, click on Full control from the list of checkboxes to highlight all of them. Make sure that the item Applies to: is set to This folder, subfolders, and files. Now click OK on the preceding menu. Finally, click Apply.

- You now have ownership of the entire folder. Navigate inside and rename the following files:
MicrosoftEdge.exe

MicrosoftEdgeCP.exe
to names like
MicrosoftEdgeOld.exe

MicrosoftEdgeCPOld.exe
If you do not have ‘MicrosoftEdgeCP.exe’ and instead have ‘MicrosoftPdfReader.exe’, rename it.

- Restart your computer. Now set the file association as we did above in the article. Now the default opened for PDF files will not be changed.