How to Create Basic Android Game with Unity
In a previous Appual’s tutorial titled “How to Create a Basic Unity Platform Game” (and its part 2), we went over using Unity and the built-in WebGL plug-in to create a simple HTML5-based browser game – in this similar tutorial, we’ll be going over how to create a basic Android game using Unity.
Requirements:
- Unity
- A good text editor like NotePad++ (Optional but recommended)
- Android SDK
Launch Unity and create a new project. Make it a 2D project.
There are several panels to get familiar with – the Hierarchy panel which will contain all of our scene elements (scene = whatever “level” you’re currently working on). Then there is the Game tab which is used for playing / testing your game while inside the editor, and on the right you have the Inspector panel which is where you will edit various things like lighting, physics, etc.
The first thing we want to do is create a sprite – this will be our main character (that we control). You can either draw your own sprite, like just draw a square with eyes, or you can grab a sprite from the internet – just make sure it’s a .PNG file (transparent background).
Drag and drop your sprite onto the main scene window (the biggest window) – it will also appear on the Hierarchy panel on the left.
So now we’ll create a few platforms – these can be simple squares, because we’ll be able to easily resize them to make walls and other platforms.
So just create a new square “sprite” and drag and drop it onto the Scene window like you did with your sprite character.
Now we need to instruct Unity to give physics to our main character – click on your main sprite character (it should become highlighted in blue in the Scene window), then on the Inspector panel, look for “GameObjects”.
Click on “Add Component > Physics 2D > RigidBody2D”. This will automatically add physics to your sprite, which you would’ve otherwise had to script yourself in another SDK.
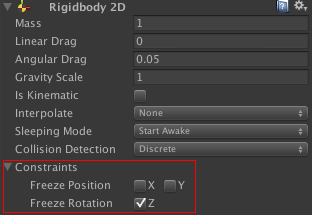
We want to prevent the main sprite character from spinning around out of control – so find the Constraints tab in the Inspector panel (with the main sprite still highlighted in the Scene window), and check the box for “Freeze Rotation Z”.
If you hit the “Play” button, your main sprite character should fall from the sky and just fall endlessly – we’re going to take care of that later, but just take note of how we were easily able to apply physics. The physics we applied are dependent on the shape they’re being applied to – so if you applied the same physics to a sphere, for example, it would roll around.
We also want to fix our orientation to prevent the character spinning and freewheeling around. Find ‘constraints’ in the inspector with the player selected and tick the box to freeze rotation Z. Now click play again and you should find your player now drops from the sky to his infinite doom.
In order to stop our main sprite character from just falling endlessly, we’re going to need to add a collider. This is basically just the solid outline of a shape which we’ll add to the main sprite character. Highlight your main sprite character, click “Add Component > Physics 2D > BoxCollider2D.
Now do the same exact thing with the platform you created earlier. Your main sprite character should now “collide” with the platform and stay there.
So now we want to make sure that the camera will follow your main sprite character – inside the scene, there should already be a camera object. You want to drag this on top of the main sprite character.
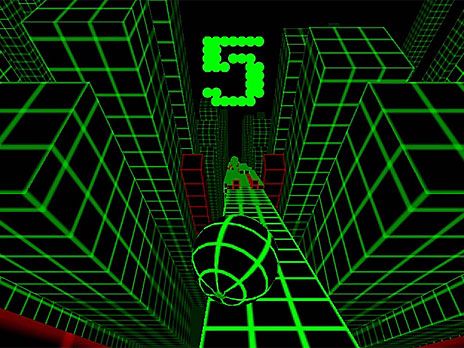
This is especially important if you’re creating a 3D based runner, something like Slope where you need the camera to remain constantly behind the primary game object (your main sprite character).
Now go to the Hierarchy panel and in the list of GameObjects, you want to drag the camera underneath the main sprite character (Player GameObject). This will make the main sprite character the ‘parent’ of the camera. So whenever the Player GameObject moves around the screen, the camera should follow.
So for this game tutorial, we’re just going to create a basic endless runner type game, something like Run 3, where your main character will run across the screen and dodge obstacles (or “game over” if you hit an obstacle”. This is going to take a few scripts, most of which will be provided in this guide.
Right click the “Assets” folder and create a new folder – name it Scripts. Now right click on this new folder and hit “Create > C# Script” and name it PlayerControls. This script is going to define the behavior of our main sprite character.
When you double click on this new script, it should open up in Visual Studio – alternatively (and my personal preference), you can edit it in something like NotePad++.
The script file should already have a bit of “boiler plate” code inside it – basically this is script that needs to be left alone or just adjusted to your needs, and will save us a lot of time. So we’re going to add a new object.
Above the line void Start():
public Rigidbody2D rb;
The next bit of code we need to add will go within the Start(), and is used to find the rigidbody – basically, we’re instructing Unity to locate the physics we attached to the GameObjects (our main sprite character), and Start() is going to be executed when a new object or script is created.
So next, locate the physics object.
rb = GetComponent<Rigidbody2D>();
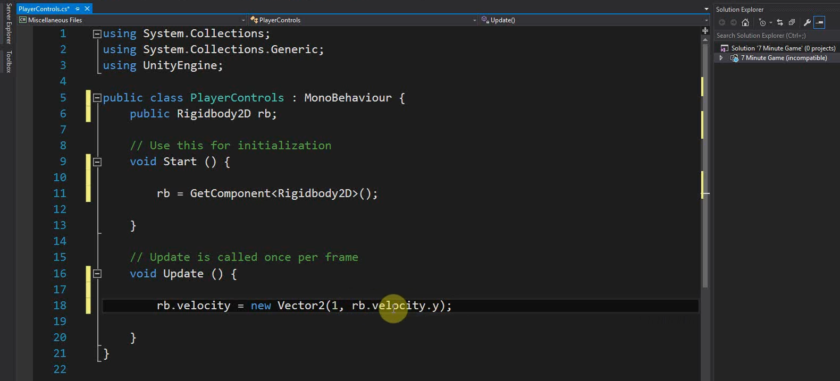
And you will add this line inside the Update()
rb.velocity = new Vector2(3, rb.velocity.y);
What Update() does is constantly refresh, so any code added in there will run continuously (unless the object is destroyed). So what we’ve done is instruct the script that we want the rigidbody to have a new vector using the same speed on the Y axis (rb.velocity.y), but with a speed of 3 on the horizontal axis. In the future, you can also use ‘FixedUpdate()’ which is similar but different, because there you can control the update / refresh amount of the script.
Save the script and go back into Unity, then click your main sprite character to highlight it. In the Inspector panel, go to Add Component > Scripts and add the script we just saved. Now when you click the Play button, the main sprite character should continuously move towards the platform edge.
Creating Player Input Controls
So because this is an endless runner style game with obstacles, we need to add controls for the player such as a ‘jump’ button.
Re-open the script from before, and we’re going to add this additional code:
if (Input.GetMouseButtonDown(0))  {

         rb.velocity = new Vector2(rb.velocity.x, 5);

         }
You’re going to put that inside the Update() method, and what it basically does is tell Unity that when the player clicks their mouse button (which will be translated as a screen tap on Android), the main sprite character will “jump” in the air. This is because we’ve added a velocity on the Y axis with a value of 5 (a higher value would mean a higher jump, of course).
If you’re not too familiar with coding, we used an If statement because If is basically a “do or don’t” kind of instruction – its literally saying IF this happens, do this command. So if the player is not clicking the mouse (or tapping their Android screen) then obviously the script will not run.
Go ahead and click the “Play” button and make sure it works correctly before continuing.
Next, we’re going to add our obstacles (which can “destroy” the main character sprite), a game score, and a “game over” menu.
If you tested the game so far, the only problem we have so far is that pressing the “jump” button we created will jump the character no matter if they’re grounded or not – this is basically Flappy Birds, and not a runner like we want. But we’re going to fix that.
In the script, add this bit of code above the Update() method:
public Transform groundCheck;

public Transform startPosition;

public float groundCheckRadius;

public LayerMask whatIsGround;

private bool onGround;

And then add this next line to the Update method above the if statement:

onGround = Physics2D.OverlapCircle(groundCheck.position, groundCheckRadius, whatIsGround);

And next you will change this following line to include “&& onGround”

if (Input.GetMouseButtonDown(0) && onGround) {

So our entire script should basically look like this:

public class PlayerControls : MonoBehaviour

 {

     public Rigidbody2D rb;

     public Transform groundCheck;

     public Transform startPosition;

     public float groundCheckRadius;

     public LayerMask whatIsGround;

     private bool onGround;


void Start() {

     rb = GetComponent<Rigidbody2D>();

     }


    void Update() {

         rb.velocity = new Vector2(3, rb.velocity.y);

         onGround = Physics2D.OverlapCircle(groundCheck.position, groundCheckRadius, whatIsGround);

         if (Input.GetMouseButtonDown(0) && onGround) {

                 rb.velocity = new Vector2(rb.velocity.x, 5);

                 }


    }


}
To explain what we’ve done, we have created a new “transform”, which means a position in the space of the game world. We have set its radius and we’re instructing Unity to check whether the radius is overlapping with our “ground” layer – and so if our radius is synced up with the “ground”, our character should be able to jump, and if we’re already in the air from a jump, we should not be able to jump again. Basically, onGround will be true if the transform named groundCheck is overlapping with the ground layer. Hopefully that makes sense.
So save the script and go back into Unity, and you’ll notice that more options have been added to the Inspector after highlighting the player. These are public variables and we can adjust these to our liking.
Now right-click on the Hierarchy and create a new empty object, and drag it so that its underneath the main character sprite in the main Scene window – position this empty object where we want the floor to be detected. Rename the object to “Check Ground”, and then drag it underneath the player’s game object like we did earlier with the camera (to create a parent – child relationship between the objects). Now the empty object will follow the main character sprite, just like the camera, and it will continuously check the floor distance.cam
Now select the main character sprite and go to the Inspector panel – drag the Check Ground object into the space called “groundCheck”. The ‘transform’ position should be equal to the position of this new object, and where it says “Radius”, make it 0.1.
We need to define the ground layer. Just select the ground terrain and in the Inspector, find the button for “Layer: Default” (it’s a dropdown box) and choose “Add Layer”.
Now select “ground” as the layer for our platform, and repeat this for any other platforms in the game window. Where it says “What is Ground” on our main character sprite object, also select the ground layer.
What we’ve done is instruct the player script to perform a check – if the small point on the screen is overlapping with anything matching the layer, the character will jump only if this is true.
Game Over on Collision and Game Menu
So to wrap it all up, the final things we want to do are A: Make colliding with obstacles result in a game over, and B: Create a “game over” menu screen with a play again button.
What you basically want to do is:
- Add a Player object and assign a rigidbody and a collider of your choice to it.
- Add an Enemy object and assign a rigidbody and a collider of your choise to it. (and optional, add “Enemy” tag to it)
- Create a new C# script and add it as a component to Player (or use any script attached to player, no need to create a new one if you already have one)
- Add this in your script:
void OnCollisionEnter(Collision coll){

           Debug.Log("Collision"); //Check to see if it even registers a collision, if it works you can remove this line

           if(coll.gameobject.tag == "Enemy"){ //sees if the object your player collided with has a tag called "Enemy", this can be replaced with if(coll.gameobject.name == ... but using a tag is an easy way to do it.

                    //Add your code here, like:

                    Application.LoadLevel("GameOver");

                    Debug.Log("Working");  //if working, you can remove this line.

           }
Play around with that example script – with some trial and error, you will get it to do exactly what we need.


