‘Convert an external Hard Drive into an internal Storage HDD Unit’
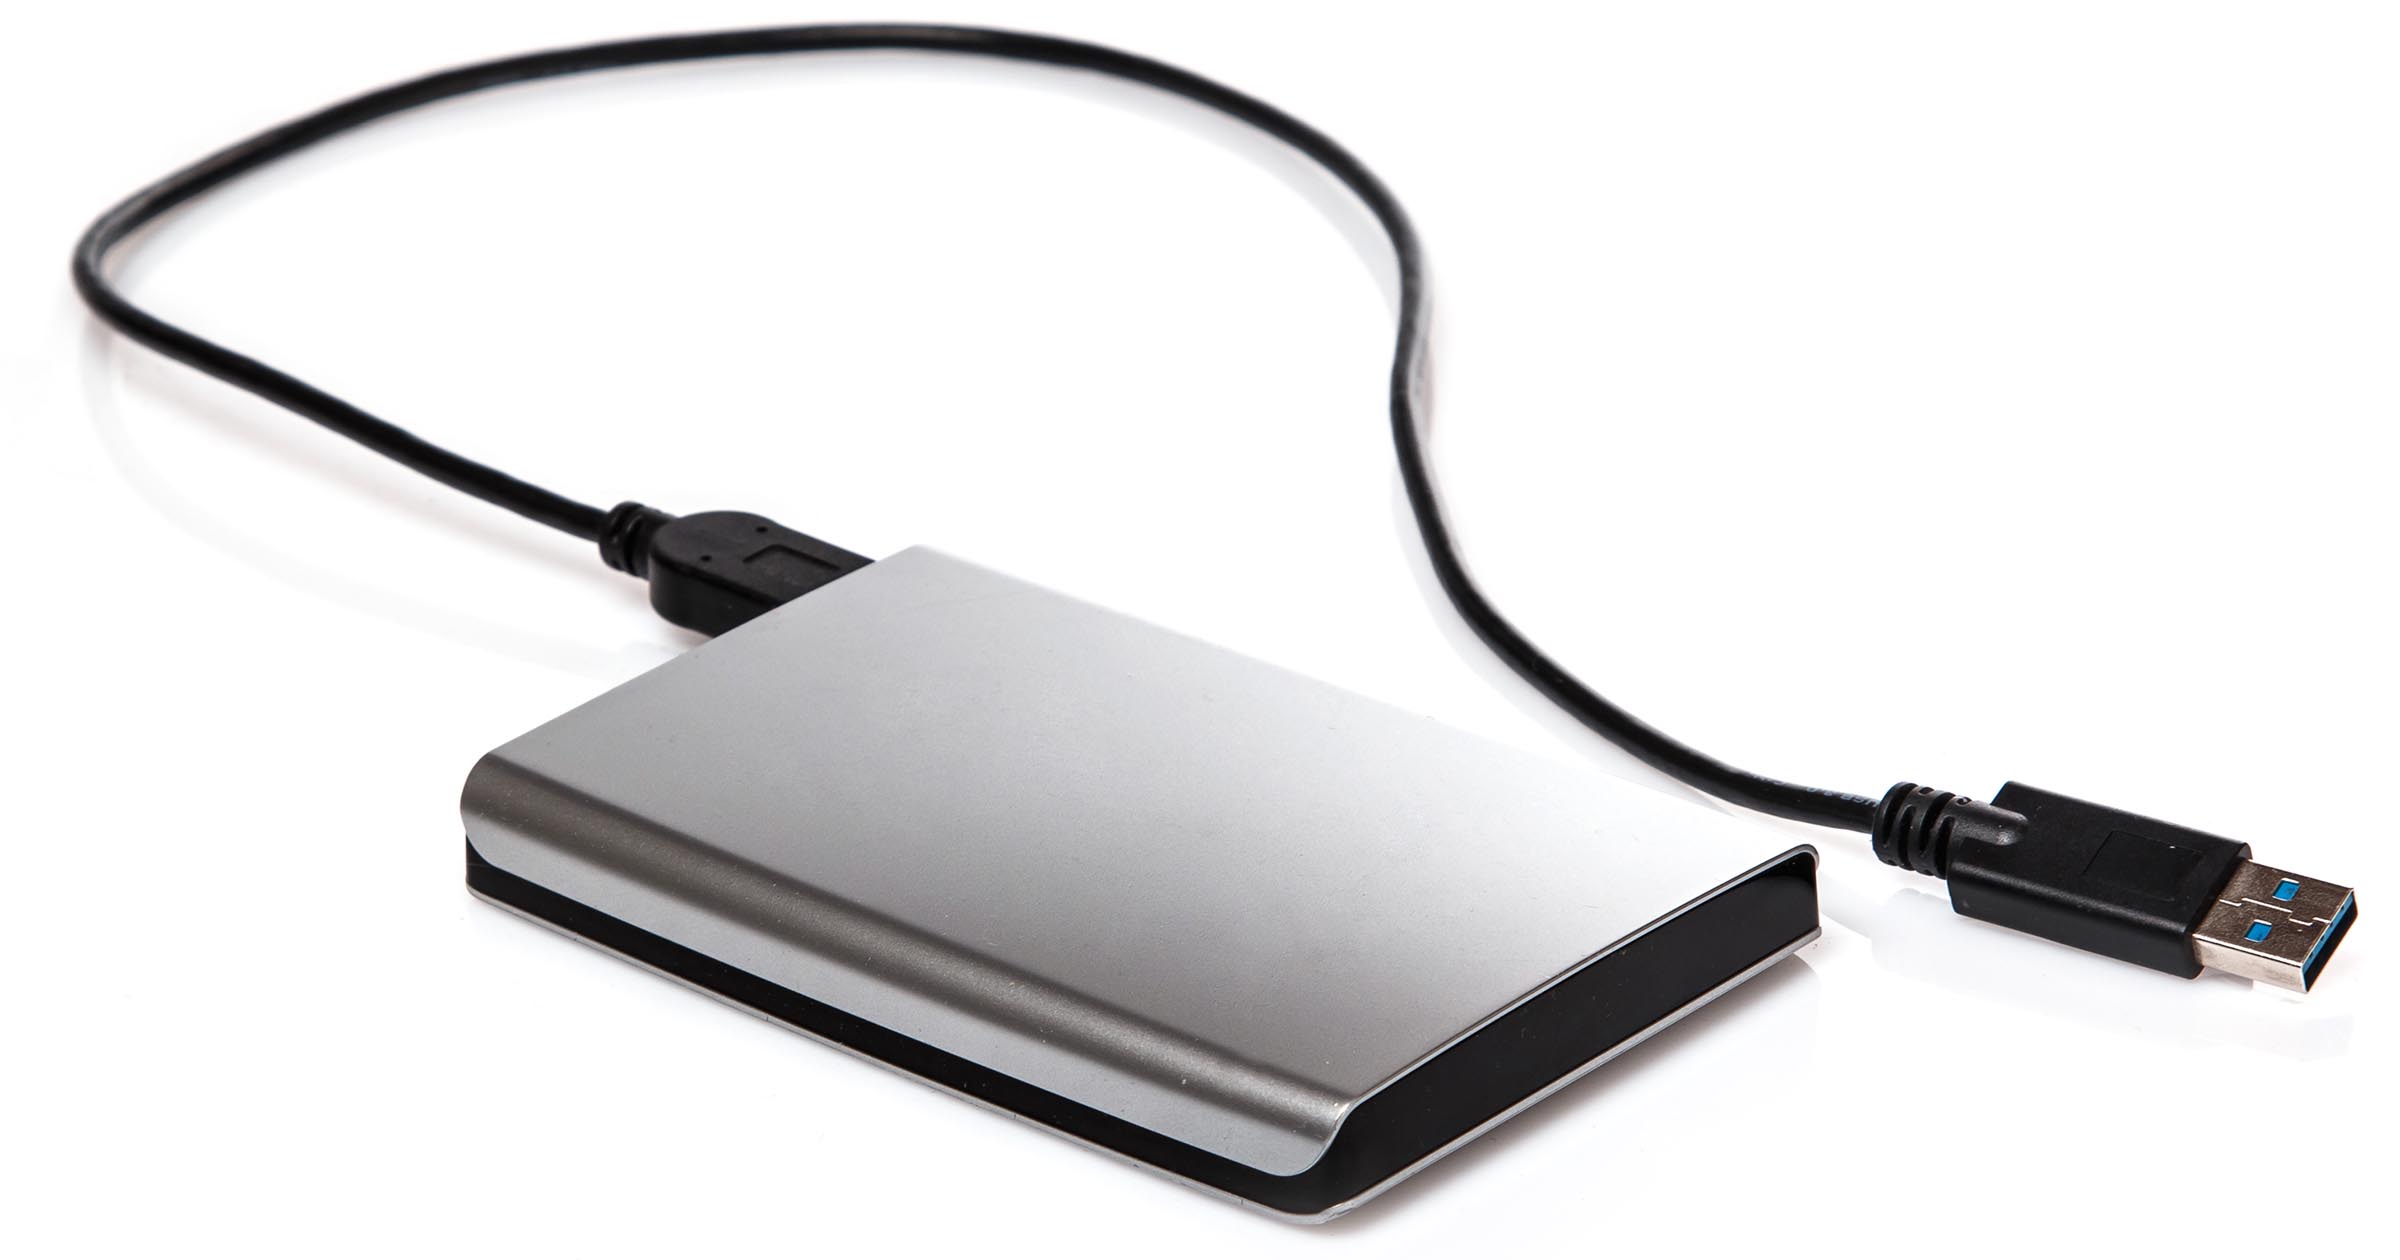
Anyone out to upgrade their computer’s storage capacity or find alternative means of storage to meet their needs will make the baffling but apparent observation that external hard drives are significantly cheaper than inbuilt internal ones. From a cost standpoint, this is baffling because external hard drives require more materials to manufacture into separate units and have an additional mechanism altogether that lets them connect via USB to your personal computer. This should mean that they cost more because they require more material to build. However, they are significantly less expensive which then begs the question whether these can be converted into internal storage drives and used inside your PC.
The answer to this question is yes, maybe. Yes, because from a technical standpoint, dismantling and installing them is rather easily possible. Maybe, because some hard drive manufacturers put lock mechanisms on their hard drives to keep you from dismantling them and configuring them as internal storage units. You can call this a business tactic that the whole electronic storage industry is mutually aboard on, but we have a way for your to diagnose your hard drives and navigate around this issue to potentially convert them into internal storage units. The good news is, we know just how to work around the external hard drive manufacturer’s in built blocking mechanism and we will show you how to bypass the 3.3 v signal detector to prevent virtually any hard drive from blocking the installation.
The procedure for going about this is laid out into three basic steps: checking drive health, dismantling, and installing. A disclaimer before you begin: taking apart your hard drive will likely void its warranty so take these steps if you are certain that this is the route you want to take. That said, let’s get started!
Step 1: Check Drive Health
There is no use going about taking apart and installing an external hard drive that is locked from configuring with your system. Your system is bound to reject it or not recognize it and you will have taken apart a usable hard drive for nothing. Another issue that can arise even after installation is that the hard drive may not be functioning properly on its own despite being configured into your system properly. The former can only be checked once you actually attempt to install the hard drive in step 3 but, before you begin, the first thing you need to check is if your drive’s health is good enough to move forward with the dismantling and installation procedure into your PC device, to begin with.
Let’s get started:
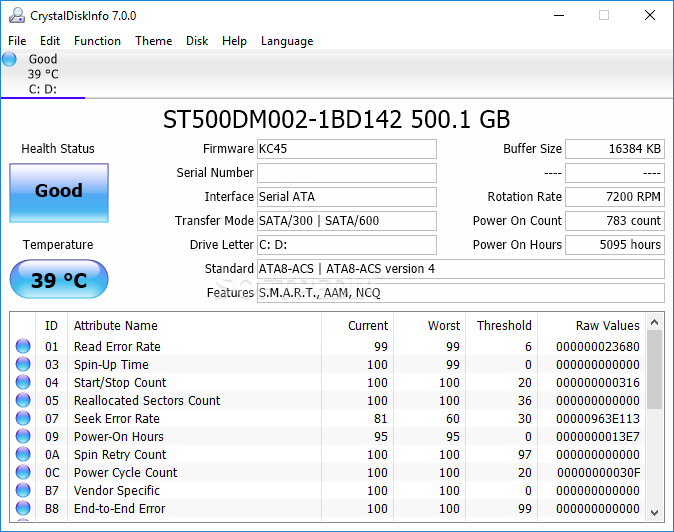
- Download the software CrystalDiskInfo from here.
- Once the installer downloads, follow the onscreen instructions to install it onto your system.
- After completing the installation, launch the application.
- Plug in your external hard drive via the provided USB cable.
- Navigate to where you see the name of your external hard drive and check its health.
- If the health indicator reads “good,” this is an indication that your hard drive is working well.
- To test this further, process some data transfer to/from the hard drive and remove it from your computer. Launch the application again in a few days, plug the external hard drive in, and check its health again. This will reaffirm that the hard drive is in good condition to use for internal configuration.
Step 2: Dismantle

Every external hard drive is structured differently but the general steps to take when dismantling one are as follows:
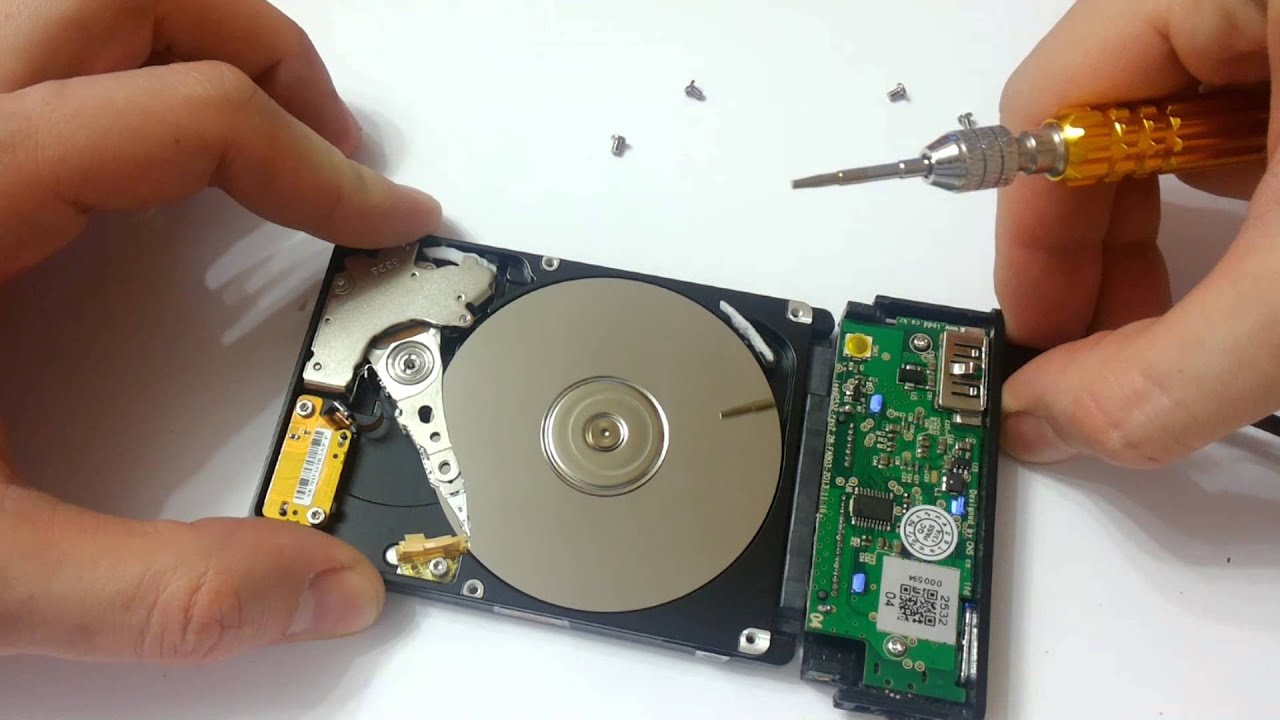
- Take a thin blade to the external hard drive’s side (or wherever you notice a partition) and try to separate the cover into two pieces. Be careful not to damage or break the casing. This place should naturally feel like an opening for the casing to separate into two parts. Be careful not to damage any of the internal parts with your blade.
- The casing should come apart revealing the inside circuitry of the external hard drive. Pop the cap or side off so that this is showing.
- Slide the internal drive circuitry out.
- Unscrew the USB port adapter mechanism from the hard drive. This is usually found on one side of the hard drive’s printed circuit board. Be careful not to scratch or damage any internal part. This is a very delicate task.
Step 3: Install & Configure
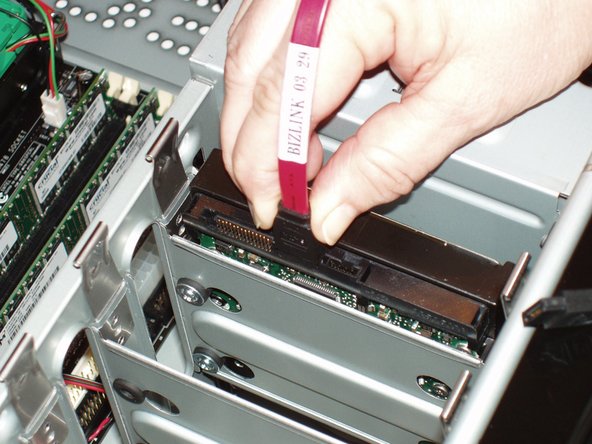
To install the separated hard drive, open up your PC or laptop computer. Find the spacing to insert an internal hard drive and pop your hard drive into place. This should not be too difficult and should easily plug into your system.
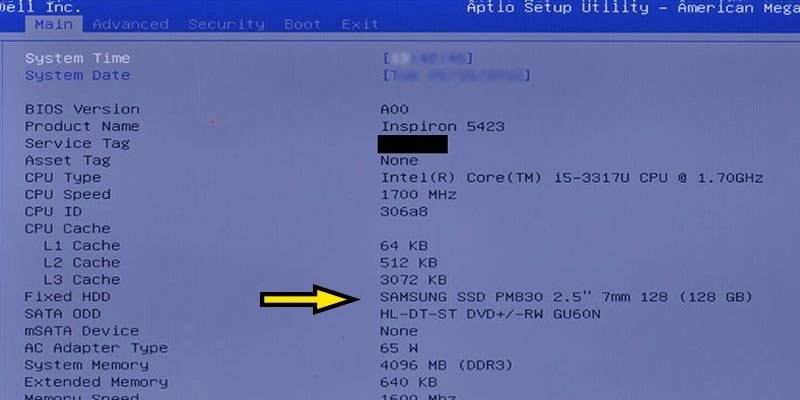
Once you have plugged in the hard drive, close your computer back up and head into its BIOS. For this, you will have to start the device and hold F2 (or the key specified by your motherboard’s manufacturer). Check to see if your device recognizes the newly inserted hard drive. If so, you are good to go.
If not, open up your computer again to ensure that the drive was plugged in correctly. If it is plugged in correctly and your device is not recognizing it, then chances are that it is locked or not compatible with your device internally.
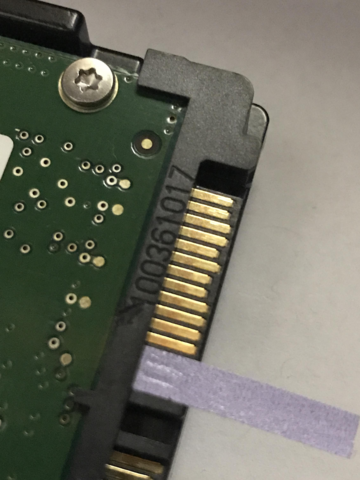
One workaround for this is blocking its 3.3 v circuit. To do this, open up your computer, count the third pin from the left on your hard drive’s SATA power connector, and insulate it with some scotch tape. Hard drive manufacturers such as WD use this pin to look for a 3.3 v signal which your computer is likely to provide and subsequently lock the device from being used. By taping it, you will prevent the pin from picking up this signal. The two pins beside it do not play any significant role in your hard drive’s function so you can go ahead and tape over all three of the left-most pins.
After taping the pin(s), pop the hard drive back into your PC and close it up again. Enter the BIOS and you should now be able to see the hard drive displayed and recognized by your system. This means that your installation has been successful. You can now power up your PC and use your additional external-turned-internal hard drive to meet your storage needs.
Final Thoughts
While many external hard drive manufacturers try to keep you from converting their cheaper external hard drives into internal storage units, knowing the works of their security measures such as WD’s 3.3v signal detecting pin can help you bypass these blocking mechanisms and successfully install your hard drive internally. The steps above layout exactly what needs to be done in an easy to carry out fashion. Be delicate with your technology throughout and do not damage any of the internal circuitry of your hard drive or computer. Doing either could lead to your devices becoming permanently damaged or unusable.
Your picture with the title “Taking apart a hard drive’s input port circuitry to isolate the storage module” shows a hard drive with the platter exposed. Going this far will destroy a mechanical hard drive. If you see a sticker with Western Digital, Seagate, Tohshiba, or other drive manufacturer logo, do not take it apart past that point.