‘Clear or Disable HSTS for Chrome, Firefox and Internet Explorer’
Improper setup of HTTP Strict Transport Security (HSTS) can block access to a site and trigger errors like NET::ERR_CERT_AUTHORITY_INVALID. These issues often lead users to clear or disable HSTS settings.
What is HSTS?
HSTS is a security feature that makes browsers use only secure HTTPS connections for certain websites, protecting against attacks like SSL stripping that downgrade connections to HTTP. However, if SSL/TLS certificates are misconfigured or expired, HSTS can cause errors like “Your connection is not private” and block access to websites without allowing a bypass.
If the site works on another browser or device, it’s likely an HSTS issue. Clearing or disabling HSTS can temporarily fix the error, but this reduces security.
1. Clear HSTS settings in Chrome
A problem with HSTS settings in Chrome typically results in a “Your connection is not private” error. By expanding the Advanced menu linked to this error, you might see a note about HSTS, such as “You cannot visit *website name* because the website uses HSTS. Network errors and attacks are usually temporary, so this page will probably work later.”
- Open Google Chrome and paste the following in the omnibar:
chrome://net-internals/#hsts
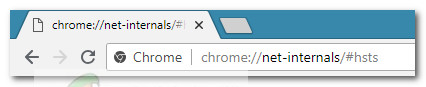
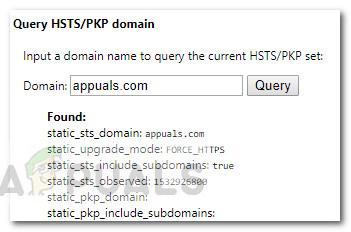
- Ensure the Domain Security Policy section is expanded. Use the Domain box (under Query HSTS/PKP domain) to enter the domain for which you’re trying to clear the HSTS settings. A list of values will appear.
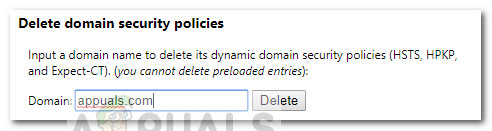
- After the values appear, scroll down to Delete domain security policies. Enter the same domain name and click the Delete button to clear the HSTS settings.
- Restart Chrome and check if you can access the domain you cleared the HSTS settings for. If the issue was related to the HSTS settings, the website should now be accessible.
2. Clear or Disable HSTS settings in Firefox
Compared to Chrome, Firefox offers multiple ways to clear or disable HSTS settings. We will start with the automatic methods, but manual approaches are also included.
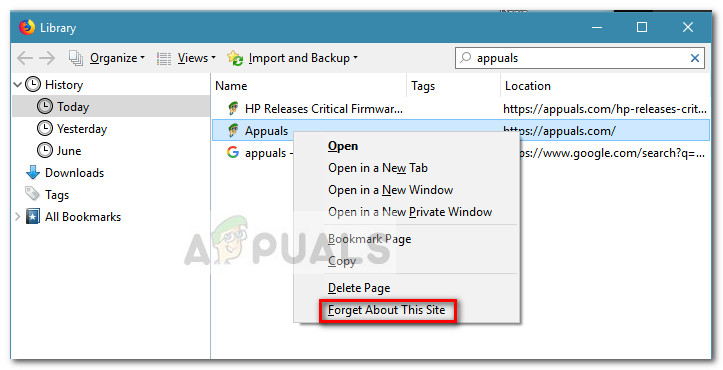
2.1. Clear the Settings by Forgetting the Website
- Open Firefox and close all open tabs and pop-ups.
- Press Ctrl + Shift + H (or Cmd + Shift + H on Mac) to open the Library menu.
- Search for the site you want to delete HSTS settings for. Use the search bar in the top-right corner to help.
- Once you find the website, right-click on it and select Forget About this Site. This will clear the HSTS settings and other cached data for this domain.
- Restart Firefox and check if the issue is resolved. If it was an HSTS issue, you should now be able to access the website normally.
If this method wasn’t effective or you’re looking to clear the HSTS settings without clearing the rest of your cached data, move to the other methods below.
2.2 Clear HSTS by Clearing Site Preferences
- Open Firefox, click the Library icon, and select History > Clear Recent History.
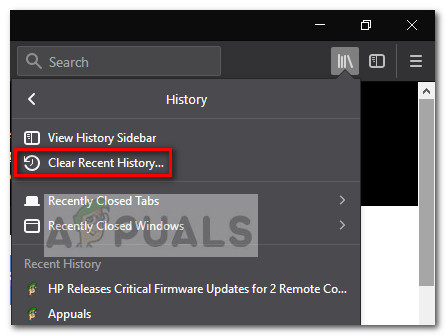
- In the Clear All History window, set the Time range to clear drop-down menu to Everything.
- Expand the Details menu and uncheck every option except for Site Preferences.
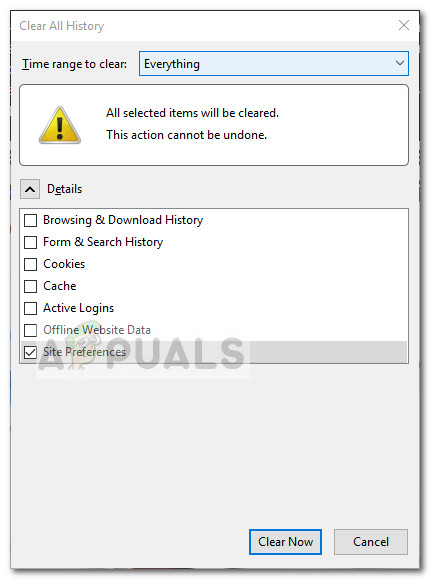
- Click the Clear Now button to remove all site preferences, including HSTS settings.
- Restart Firefox to check if the issue has been resolved at the next startup.
2.3. Clear the HSTS settings by editing the user profile
- Close Firefox completely, including all pop-ups and tray icons.
- Go to your Firefox user profile location. Here are possible paths:
C:\Users\*YourUsername*\AppData\Local\Mozilla\Firefox\Profiles

C:\Users\*YourUsername*\AppData\Roaming\Mozilla\Firefox\Profiles

/Users/*YourUsername*/Library/Application Support/Firefox/Profiles - Mac
Note: You can find your user profile by typing “about:support” in the navigation bar and pressing Enter. Under Application Basics, find the Profile Folder and click Open Folder. Ensure Firefox is fully closed after accessing.
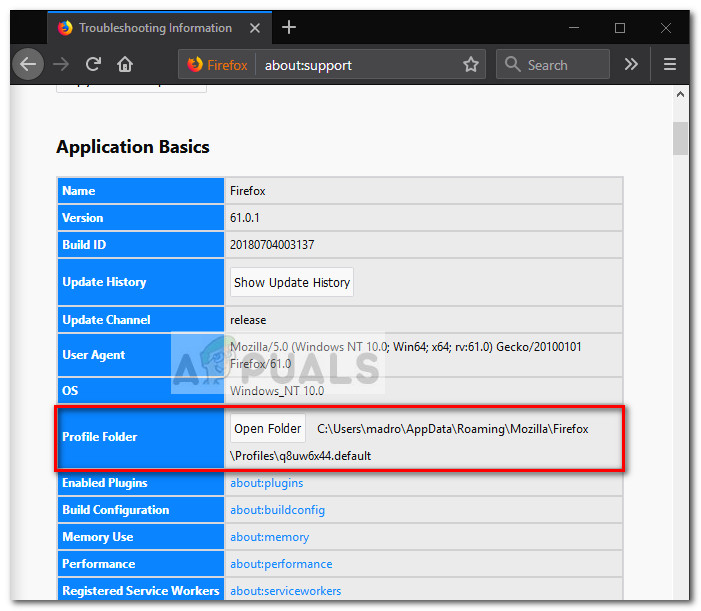
- In the Profile Folder, open SiteSecurityServiceState.txt with a text editor. This file holds cached HSTS and HPKP settings.
- To clear HSTS settings for a domain, delete the entire entry, and save the .txt document. Be cautious not to remove other information, as the format is disorganized. Example of an HSTS entry:
appual.disqus.com:HSTS 0 17750 1533629194689,1,1,2
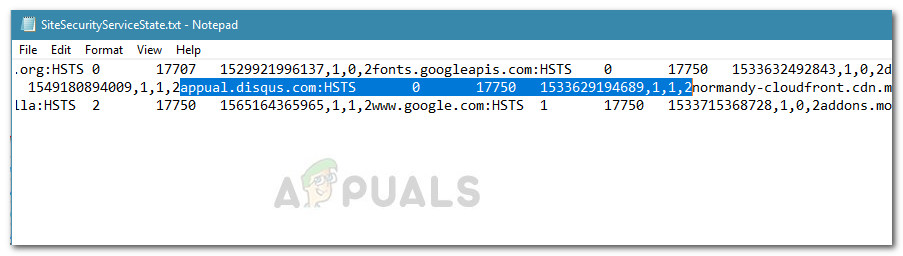 Note: You can rename the file from .txt to .bak to keep the original, forcing Firefox to create a new file and clear existing HSTS settings.
 - After deleting the entry and saving the file, close SiteSecurityServiceState.txt and restart Firefox to check if the issue is resolved.
2.4. Disable HSTS from inside the Firefox Browser
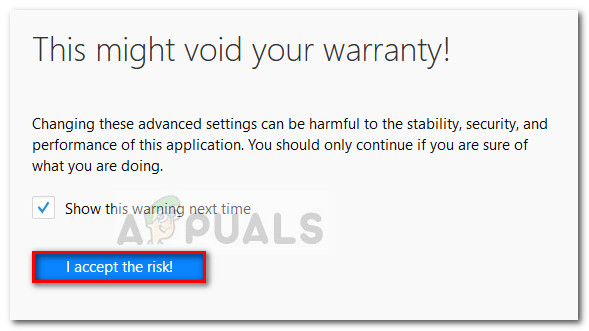
- Open Firefox and type “about:config” in the address bar. Click the I accept the risk! button to access the Advanced settings menu.
- In the search bar at the top-right corner, type “hsts” to find the relevant settings.
- Double-click security.mixed_content.use_hstsc to toggle the setting and disable HSTS in Firefox.
3. Clearing or Disabling HSTS settings in Internet Explorer
HSTS is a key security feature and is enabled by default in both Internet Explorer and Microsoft Edge. While it’s generally advised not to disable HSTS in these browsers, you can disable it in Internet Explorer if necessary.
Note: The procedure is longer if you have an x64-based system than if you have an x86-based system.
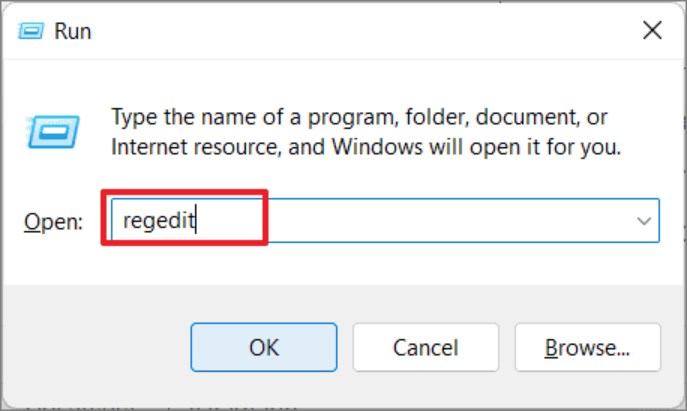
- Open a Run box by pressing Windows key + R. Type regedit and press Enter to launch the Registry Editor.
- Navigate to the following path:
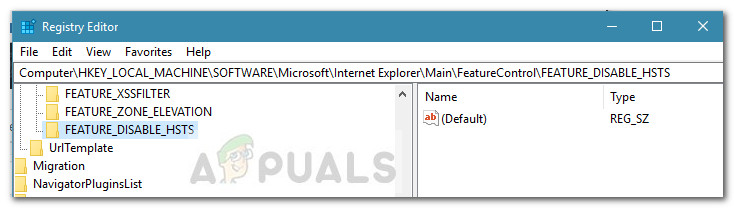
HKEY_LOCAL_MACHINE\SOFTWARE\Microsoft\Internet Explorer\Main\FeatureControl
- Right-click FeatureControl, select New > Key, and name it FEATURE_DISABLE_HSTS.
- Right-click FEATURE_DISABLE_HSTS, choose New > DWORD (32-bit) Value.
- Name it iexplore.exe and press Enter.
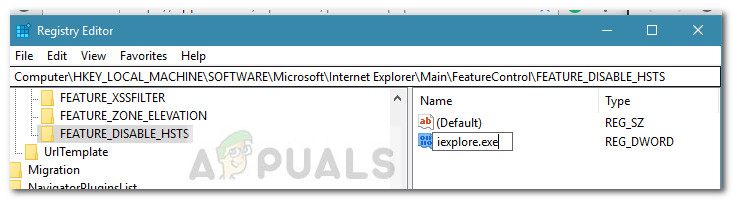
- Right-click on iexplore.exe, select Modify, set the Value data to 1, and click OK.
Note: For x86 systems, save and reboot to apply changes. For x64 systems, continue below. - Go to:
HKEY_LOCAL_MACHINE\SOFTWARE\Wow6432Node\Microsoft\Internet Explorer\Main\FeatureControl
- Repeat the steps to create FEATURE_DISABLE_HSTS and iexplore.exe as before.
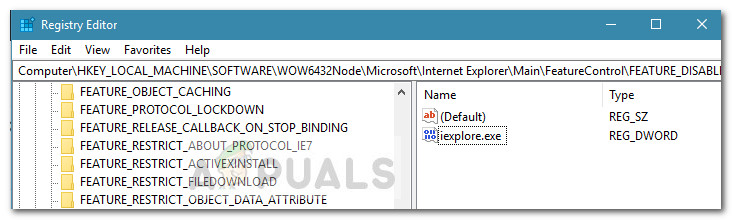
- Double-click iexplore.exe, change the Value data to 1, and click OK.
- Reboot your computer to apply the changes and check if HSTS is disabled in Internet Explorer.


disable on IE doesn’t work, at least on windows10