Geforce ShadowPlay Install Failed? Try These Fixes
Geforce ShadowPlay fails to install because of problems associated with the software attributes of the computer including the Operating System, corrupt installation files, and missing of external libraries. This issue is known to occur in numerous iterations of Windows including 10, 8, and 7. Even though GeForce Experience and Windows, both are frequently updated, this issue hasn’t seemed to go away.
NVIDIA’s ShadowPlay is a utility for easy gameplay recording, live streaming, and it can also work as an FPS counter overlay. On all platforms, it can automatically record gameplay in the background if specified by the user.
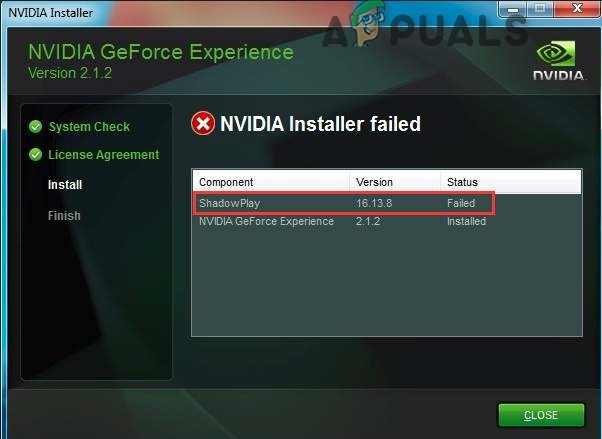
This error can happen due to many reasons but before indulging in detailed solutions, let us make sure that your system fulfils the system requirements of ShadowPlay. For the complete list of system’s requirements visit the official website of NVIDIA’s ShadowPlay. Once you are sure that your system meets all the requirements, only then proceed with the solution.
What causes NVIDIA ShadowPlay to Fail during Installation?
As mentioned in the introduction, the causes behind the failure of ShadowPlay installing are usually software-based and stem from the operating system itself. Here are some of the most common ones:
- Corrupt Registry Keys: The registry in your computer is a set of instructions that dictate how your computer will respond or how it will behave. If the registry keys for ShadowPlay are somehow corrupt or incomplete, you will not be able to install it.
- Bad Service: Every application runs a service on Windows if it has to run anything on it. The same is the case with ShadowPlay. If NVIDIA’s services are not running properly or have corrupt variables, ShadowPlay will refuse to be installed.
- Integrated Graphics: If you have installed NVIDIA’s graphics card after purchasing your computer, it is certain that your computer also has integrated graphics alongside the dedicated ones. If the dedicated graphics are running, the application will fail to install.
- Administrative Privileges: Every application/feature requires administrative access to install properly on any computer. If the ShadowPlay installer doesn’t have administrative access, it might not install because of not being able to access system folders.
- Compatibility Problems: Compatibility problems are not be ignored here. If the current version of NVIDIA’s ShadowPlay is not compatible with your operating system, it will fail to install.
- Corrupt Account: A corrupt account attempting to install ShadowPlay might also cause the application to fail installation. Using a new account might help here.
- DirectX: DirectX is usually the core of graphics of any Windows machine. If the graphics drivers are not installed, you will not be able to install ShadowPlay because these libraries are indeed a requirement.
- Media Player: Even though there is no apparent link between Windows Media Player and ShadowPlay, we came across instances where if the media player wasn’t installed, the software would refuse as well.
- Windows problems: Last but not least, we also encountered some Windows problems which included Safe Mode issues, Window’s installations, etc. Resolving those discrepancies usually solves the problem.
Make sure to log in using an administrator account before starting the troubleshooting methods.
Solution 1: Restarting Services and Deleting Registry Values
If any service is running for a longer period, there are instances where they might go into error configurations or get ‘frozen’ which will cause other discrepancies for example, where you will not be able to install ShadowPlay. Similarly, if the Registry values are incorrectly set due to previous installations, you will not be able to proceed with the installation. Here, we will end every running process of NVIDIA and also delete the registry values.
Then when we reinitialize the installation process, everything will be started anew and if there was an issue with these, the problem will be resolved.
- Press Windows key + R to open Run command box and type “services.msc“.
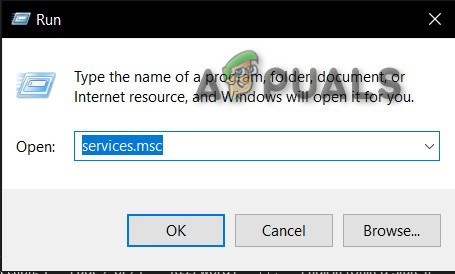
Run Services Command - Find all the services that are starting with NVIDIA and close them.
- Right-click on the Taskbar and in the menu that pops out, click on the“Task Manager”.
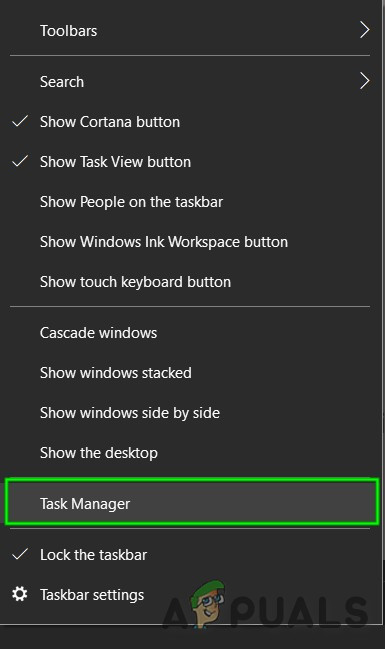
Open Task Manager - Look for processes starting with nv or NVIDIA. Kill those processes one by one by Right-click on it and click on “End Task”.
- Press Windows key + R to open Run command box and type “regedit”.
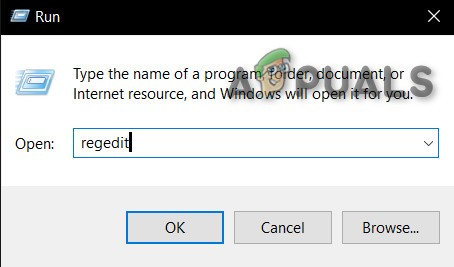
Regedit Command - Search for the following keys one by one and Right-click on the entry and then click “Delete”.
HKEY_LOCAL_MACHINE\SOFTWARE\NVIDIA Corporation\Logging

HKEY_LOCAL_MACHINE\SOFTWARE\Wow6432Node\NVIDIA Corporation\Logging
- Restart the system and now try to install ShadowPlay again.
- If it is still having a problem in installing, Press Windows Key and type “Control Panel” and open it.
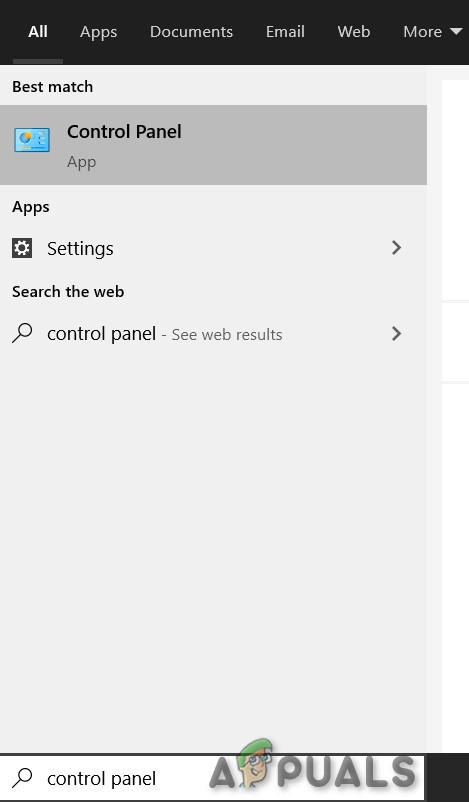
Control Panel in Windows Search Box - When In Control Panel, under the “Programs” find “Uninstall a program” and click on it.
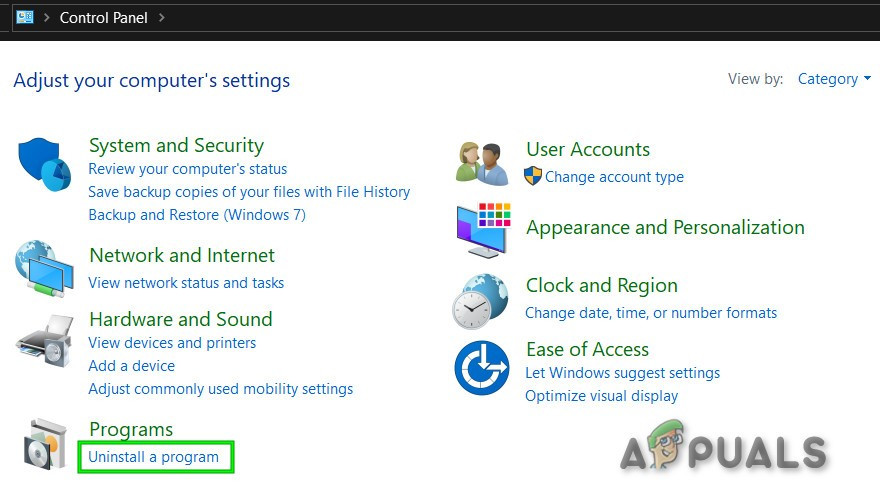
Uninstall a Program in Control Panel - Right-click on any NVIDIA program and click on uninstall.
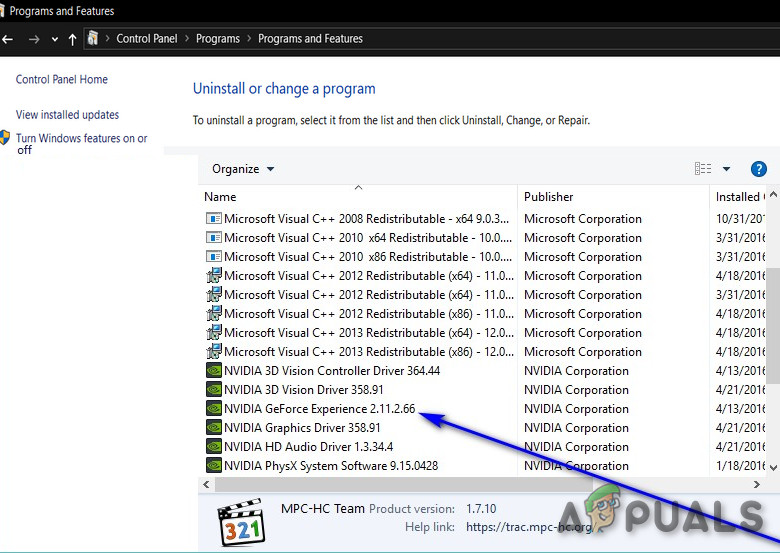
Uninstall NVIDIA programs - Uninstall all NVIDIA programs from Control Panel.
- Repeat steps 1 to 7 and try reinstalling ShadowPlay through GeForce Experience.
If the problem reappears, move to the next solution.
Solution 2: Force the Computer to Use NVIDIA Graphics Card
If there is more than one graphics card in the system (dedicated + integrated), then if the integrated card is turned on during the installation of ShadowPlay, it will fail to install. Before the applications start copying necessary files, it checks the availability of an NVIDIA card. If it doesn’t find the graphics card running, it will automatically abort the installation process.
Here, what we can do is disable the integrated graphics card completely from your computer and then try installing ShadowPlay. If the issue was indeed the integrated graphics card clashing, it will be fixed.
Solution 3: Run GeForce as Administrator
GeForce Experience will not install ShadowPlay if it cannot have non-restricted access to some system files. Hence, running GeForce Experience Setup File as an administrator may solve the problem. Follow the steps:
- Right-click on the “Setup” file of GeForce Experience & then choose the “Run as administrator”.
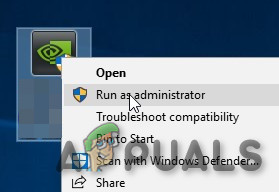
Run GeForce Experience Setup as Administrator - Then click “Yes” when the UAC appears.
Hopefully, the problem is solved, if not move to the next solution.
Solution 4: Run Compatibility Checker for GeForce Experience
Compatibility problems are there since the start between NVIDIA’s ShadowPlay and Windows OS. Since ShadowPlay is present for a long time, if you are installing an older version of Shadow Play, it might cause problems if the OS is the newer version of Windows. Here in this solution, we will change the compatibility of the installer and see if this works.
- Right-click the Setup file, select Properties, and then select the Compatibility.
- Select Run compatibility troubleshooter.
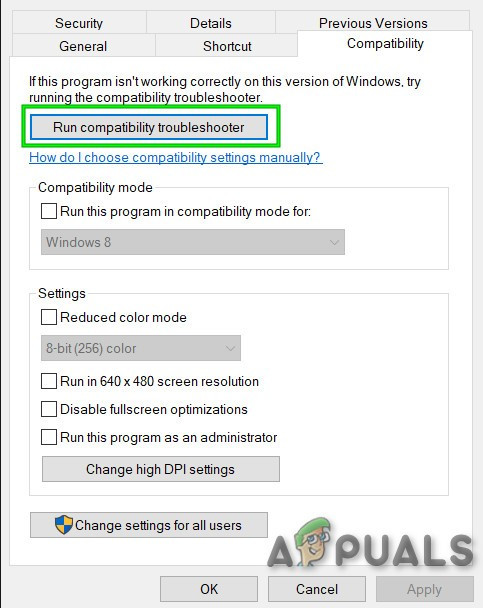
Run Compatibility Troubleshooter - Reinstall the GeForce Experience and see if the problem is solved.
- If not, again open the Compatibility Tab.
- Find the checkbox next to“Run this program in compatibility mode for” and click on it to enable it.
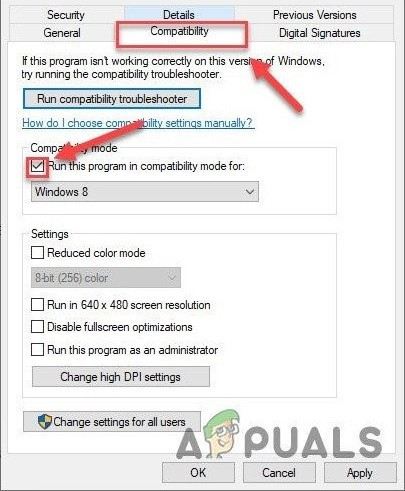
Run this Program in Compatibility Mode For - Click the list box below to select Windows 8, then click OK.
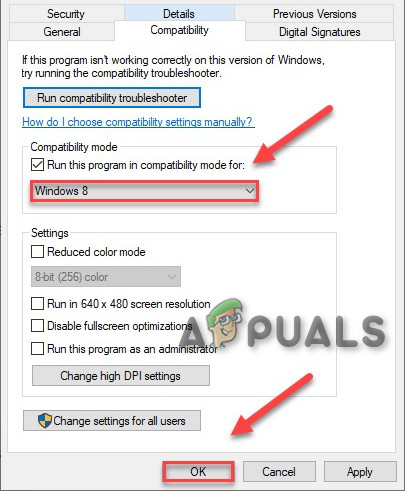
Confirm Running in Compatibility Mode - Run the setup If it still fails to install ShadowPlay, repeat the same steps for Windows 7 and run the setup again.
Solution 5: Disable RGB Lighting
RGB lighting on your system looks stunning and gives a beautiful look to your setup. But this beautifulness sometimes costs you several functionalities, especially of the graphics card. So, disabling RBG lighting may solve the problem.
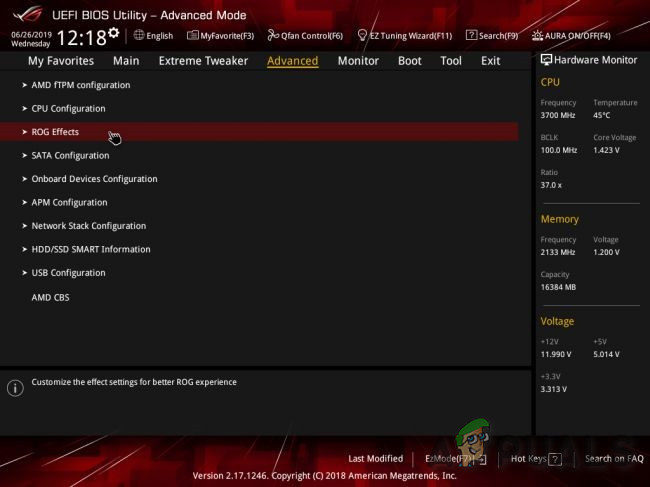
Sometimes, a setting in the BIOS could be available to disable the RGB, but then there are also motherboard manufacturers who use their lighting control applications e.g. Asus Aura. Either way, you should try disabling your RGB lighting on any application in which it is active.
After turning off RGB Lighting, reinstall the GeForce experience. If you still get the error move to the next solution.
Solution 6: Use Another User Account with the Folder and Profile on the C Drive
The system creates a user profile the first time when a user logs in to the system. Afterwards, on each login, the computer loads the user’s profile, & then other system elements are loaded for the information in the profile. Many users tend to shift this profile onto non-system drivers. But GeForce Experience in its recent versions is not supporting user profiles that are not on the drive on which Windows is installed. And if you are using a profile that is not on the system drive, then it can cause the GeForce ShadowPlay Install failed issue.
- Press Windows Key and I to open Settings of the system.
- In the Settings click on Accounts.
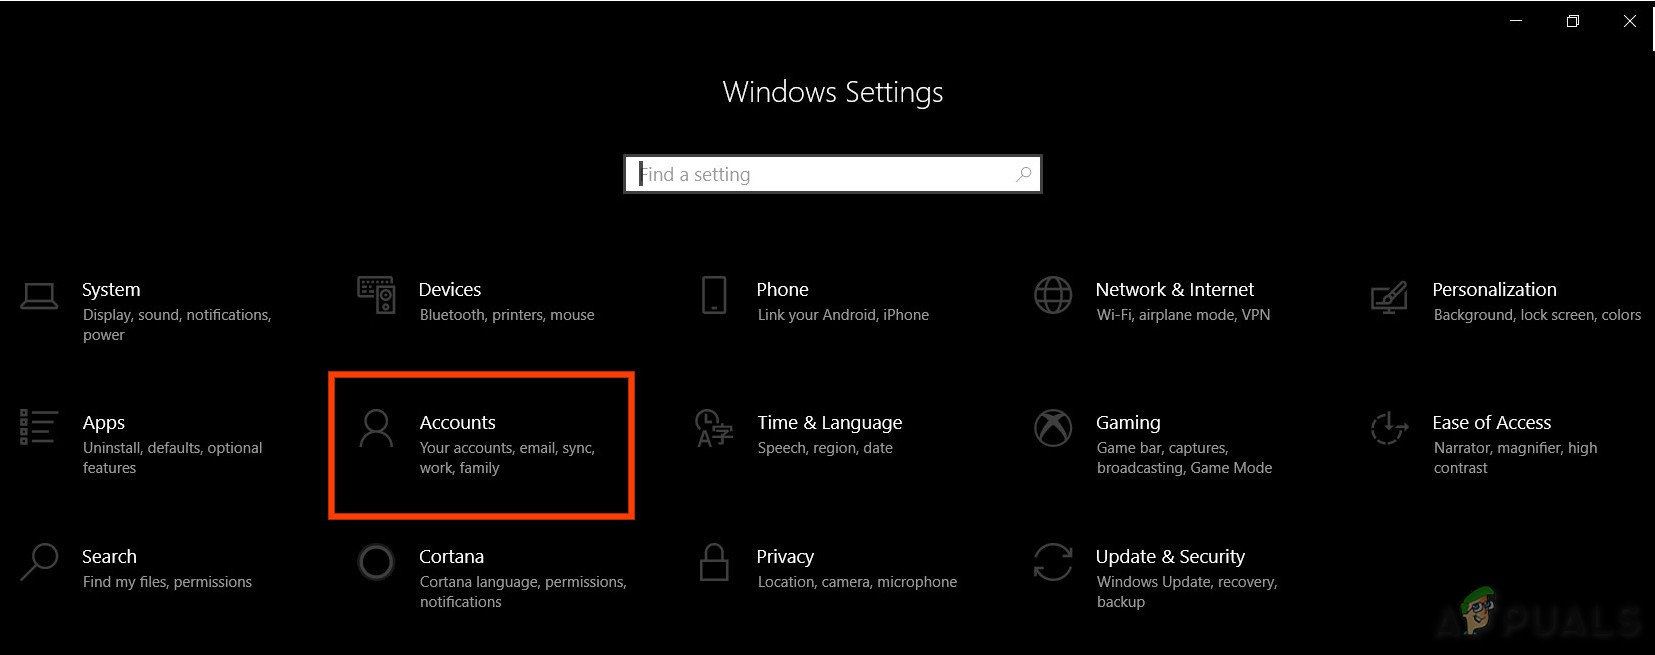
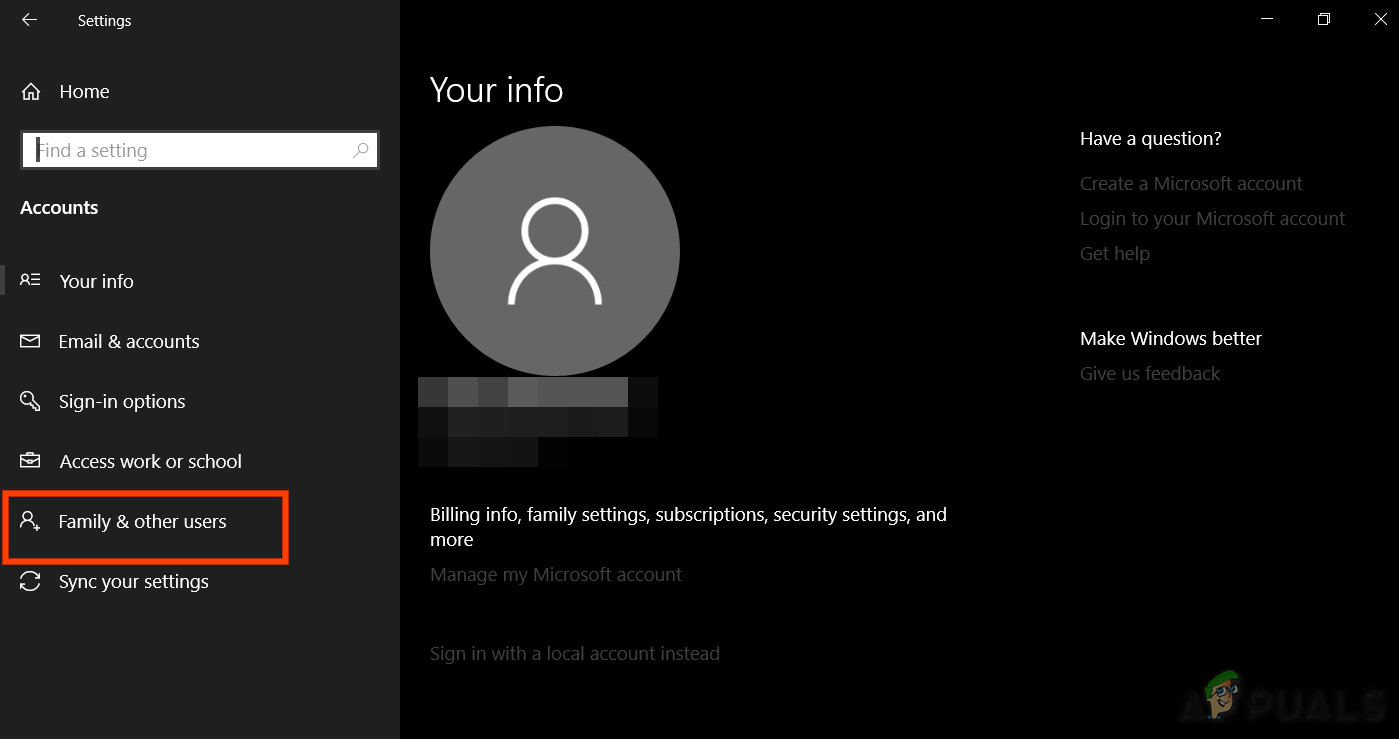
Accounts in Windows Settings - Now click on Family & other users. (You may see Other users depending on your Windows Edition.)
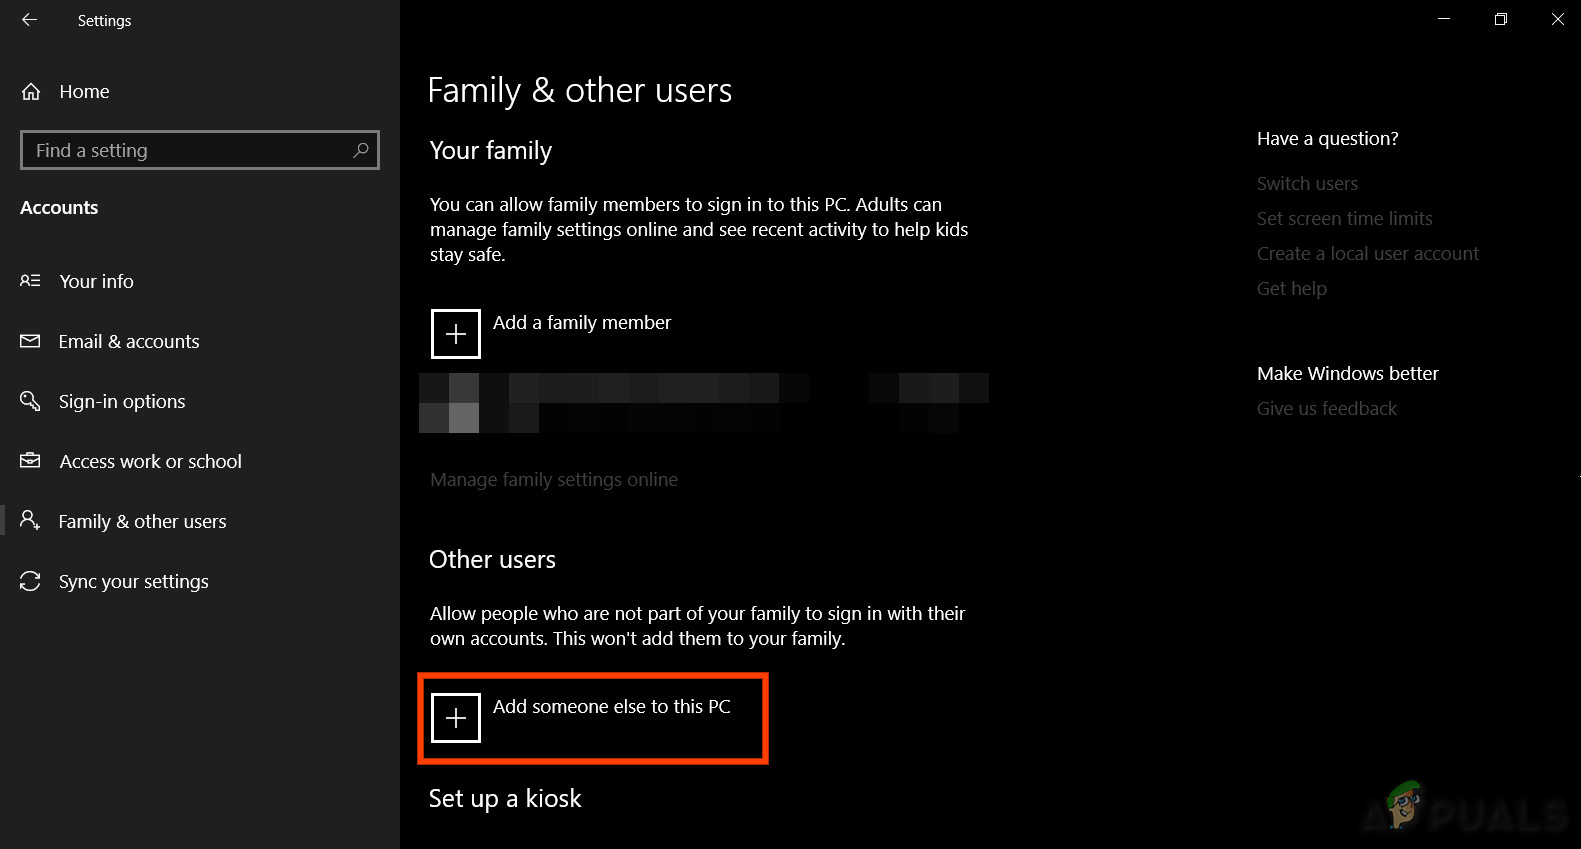
Family & Other Sync - Select Add someone else to this PC.
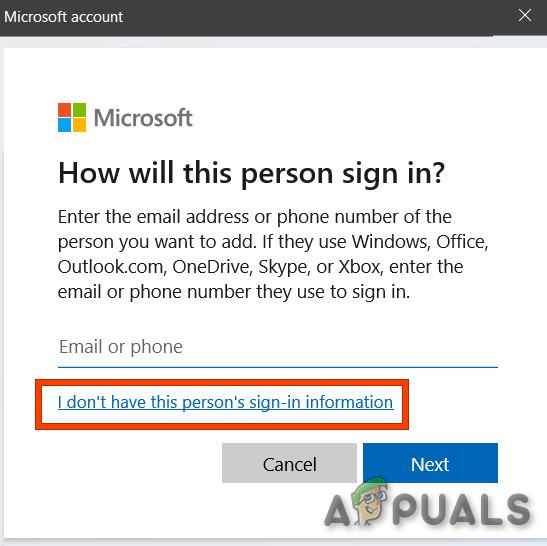
Add Someone Else to This PC - Select I don’t have this person’s sign-in information
I don’t have this person’s sign-in information in Microsoft Account Dialogue Box - Then select the option “Add a user without a Microsoft account“.

Add a user without Microsoft Account - Enter a user name, password, confirm the password and then click Next.
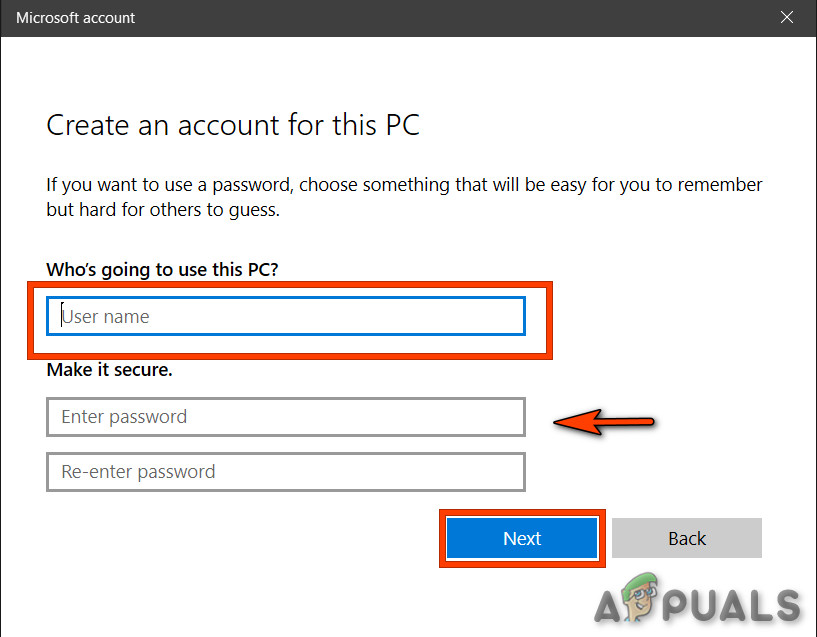
Enter Account Details - Restart the system and log in to the newly created user.
- Now reinstall GeForce Experience using this new user.
If you still cannot install ShadowPlay, then proceed to the next solution.
Solution 7: Update Display Adapter Driver Through Device Manager
The ShadowPlay uses an API named Nvidia NVFBC & NVIFR to capture the gameplay directly bypassing the graphics API. And if the display driver is outdated then it can become incompatible either with Windows or GeForce Experience, which can result in the failed installation of the ShadowPlay. So, updating Display Adapter Driver through Device Manger may solve the problem.
- Press the Windows key and type “Device Manager“. And in the results, click on Device Manager.
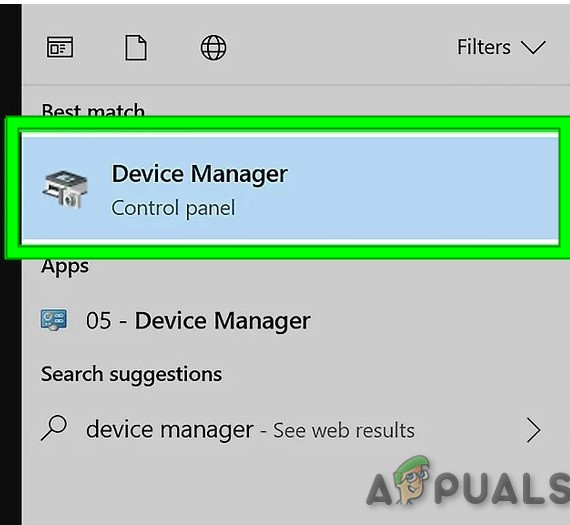
Device Manager in Windows Search Box - Go to “Display Adapter” and expand the list. Your graphics card should be there. Right-click on it and select “Update Driver Software“.
- And in the options displayed, click on the “Search Automatically for updated driver software”.
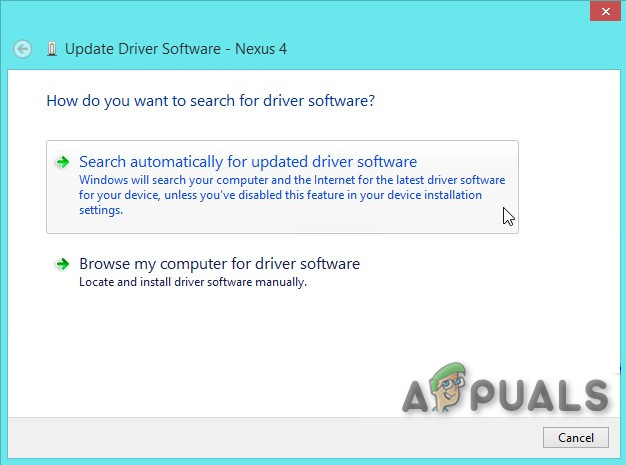
Search automatically for updated driver software - Wait for the process to complete. Restart the system.
- Now try to reinstall the GeForce Experience.
If the problem is still not solved, move to the next solution
Solution 8: Disable Anti-Virus
Sometimes Anti-Virus false positives can result in the restricted operation of a particular program. So, to see that if that is the problem, temporarily disable the Anti-Virus and Security Software. You firstly disable such software and if the problem is solved then you should add the exception for GeForce Experience or replace the Anti-Virus.
After disabling the Anti-Virus check if the problem is not solved, reenable the Anti-Virus and proceed to the next solution.
Solution 9: Install DirectX
Microsoft DirectX is designed to help Windows PC in running and displaying multimedia applications such as full-colour graphics, video, 3D animation, and rich audio. DirectX has security and performance updates as well as new features that can be accessed by applications using the DirectX APIs. If Directx is not installed or its installation is corrupted then the GeForce Experience setup cannot access the Directx which can result in the issue of failed installation of ShadowPlay.
- Download DirectX from the Microsoft website.
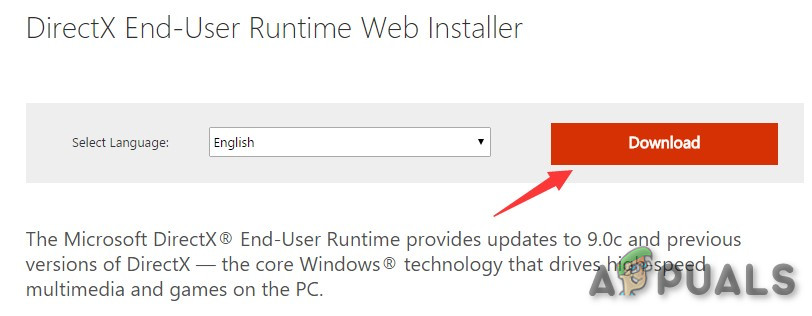
Download DirectX - Select the Language and click on Download
- You may not need to check the box next to the MSN default homepage & Bing default search engine. Click Next.
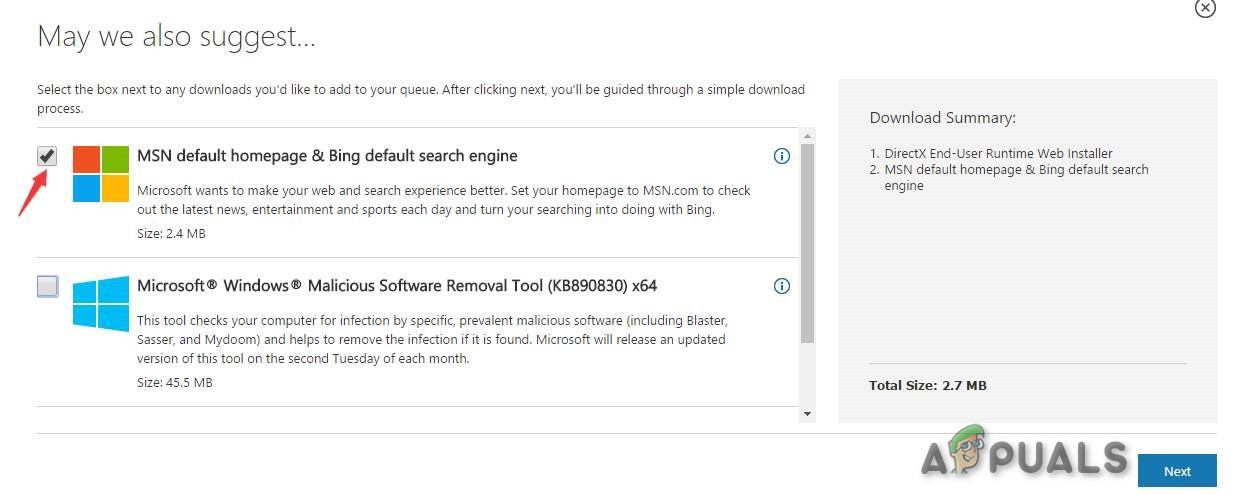
MSN default homepage - When the download completes, double-click on the downloaded file, and follow the on-screen instructions to install it.
- Run the NVIDIA Geforce Experience setup again.
If you are still having the issue then the DirectX files might be corrupted or misplaced. Then follow the steps below to fix it: - Navigate to
C:\Windows\System32
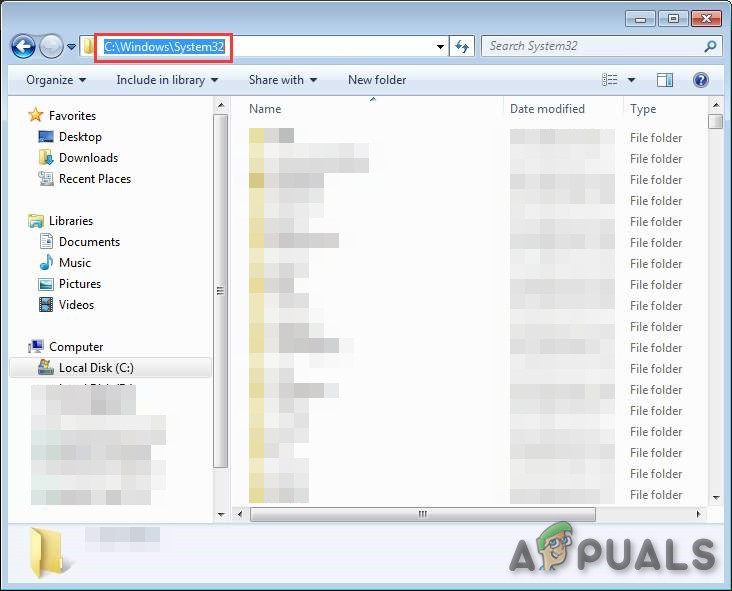
Open System 32 Folder - Delete any existing DirectX files e.g d3dx10_43.dll, d3dx9_43.dll and d3dx11_43.dll)
- Install Geforce Experience again.
Solution 10: Install Windows Media Player
Some websites and software like Windows Store apps, Microsoft Office, and Encarta, etc. rely, on Windows Media related files packed as Windows Media Feature Pack which are part of Windows Media Player. Windows Media Player is not included in different editions of Windows or if its installation has corrupted then the user will not be able to use the applications which use Windows Media Feature Pack. To make these websites and applications work correctly the user can install the Windows Media Feature Pack. So the issue of failed installation of ShadowPlay can occur if the system doesn’t have Windows Media Feature Pack on your system. To solve it, one should install Windows Media Player.
- Download Windows Media Player.
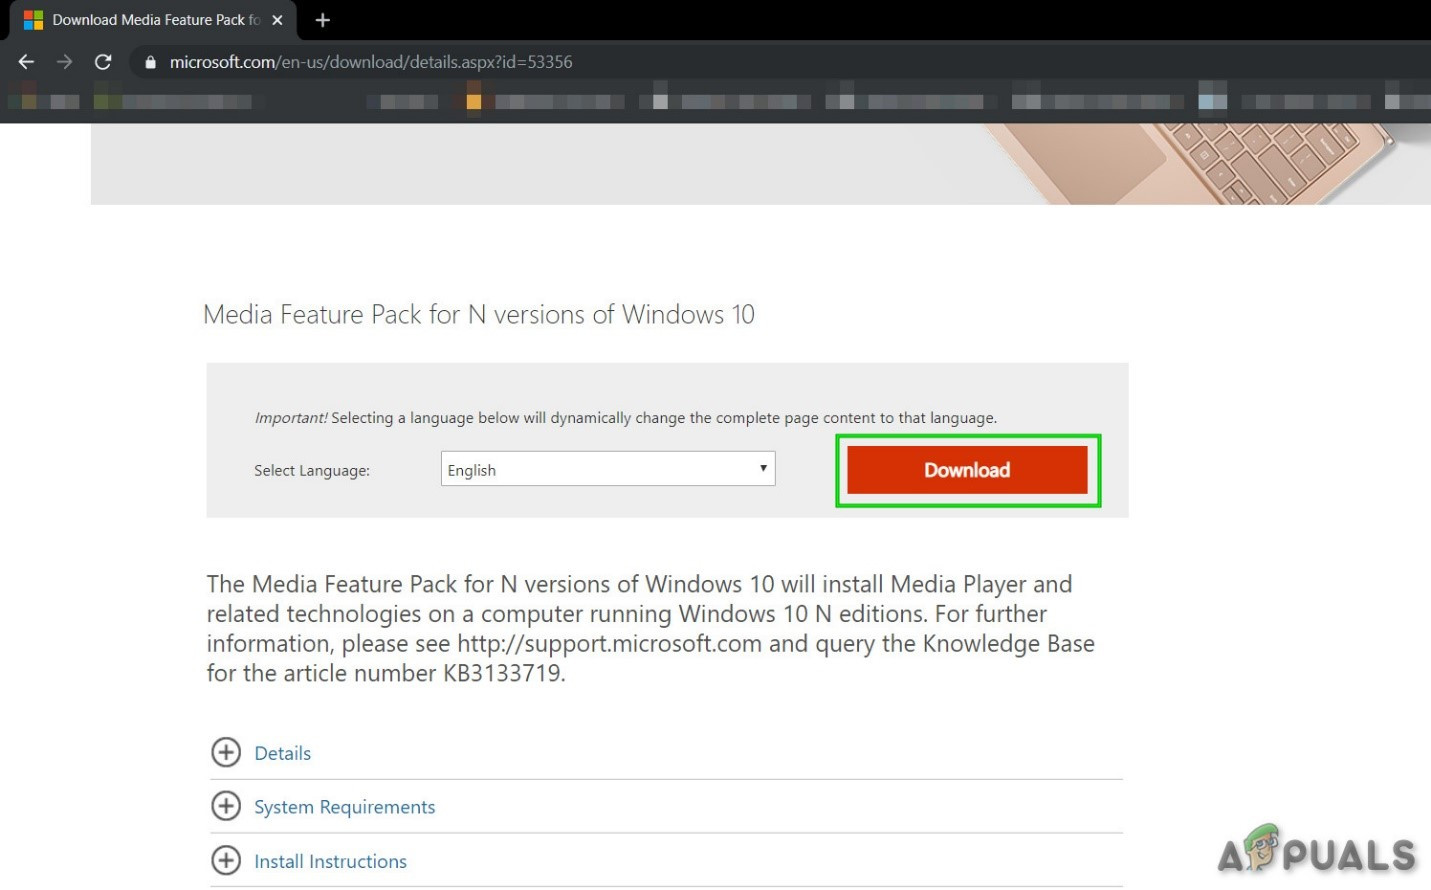
Download Windows Media Player - Install Windows Media Player using administrator access.
- Run GeForce setup again for ShadowPlay and see if the issue is resolved.
Solution 11: Try an Older Version of Geforce Experience
The latest version of Geforce Experience has been updated to 3.20. Many users have said the updated version is creating problems for them. So you can try to install an older version of Geforce Experience which was working for you. But before installing the older version, first uninstall the installed version, if you have any.
- Press the Windows Key and type “Control Panel” and in the resulting list click on “Control Panel”.
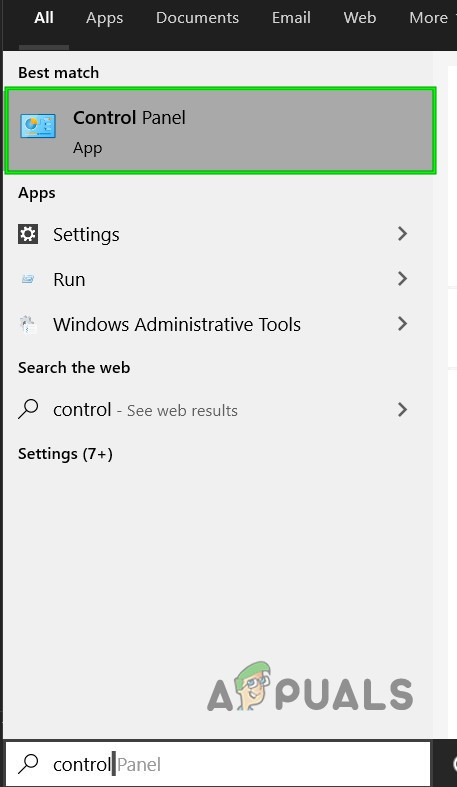
Control Panel in Windows Search Box - Click “Uninstall a program” under the Programs.
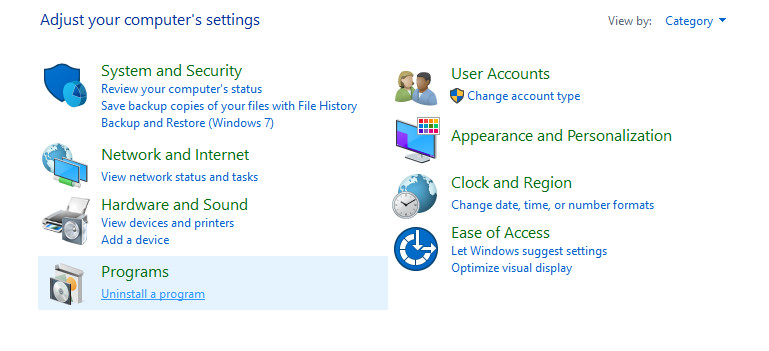
Uninstall a Program in Control Panel - Find GeForce Experience from the list. Right-click on it and click Uninstall/Change and then Uninstall.
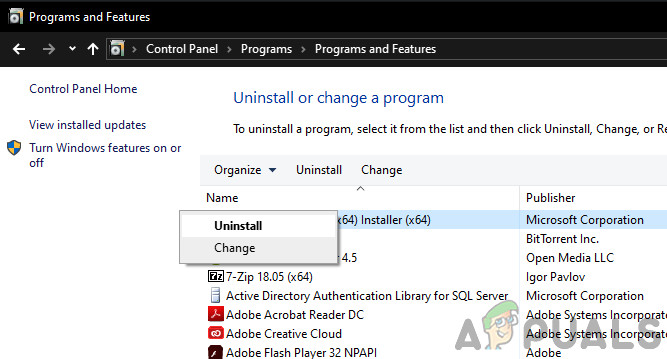
Uninstall NVIDIA GeForce Experience - Now Navigate to the directory where GeForce was installed and delete any files left there.
- Restart the PC.
- Download the old version of GeForce Experience as per your liking and install it.
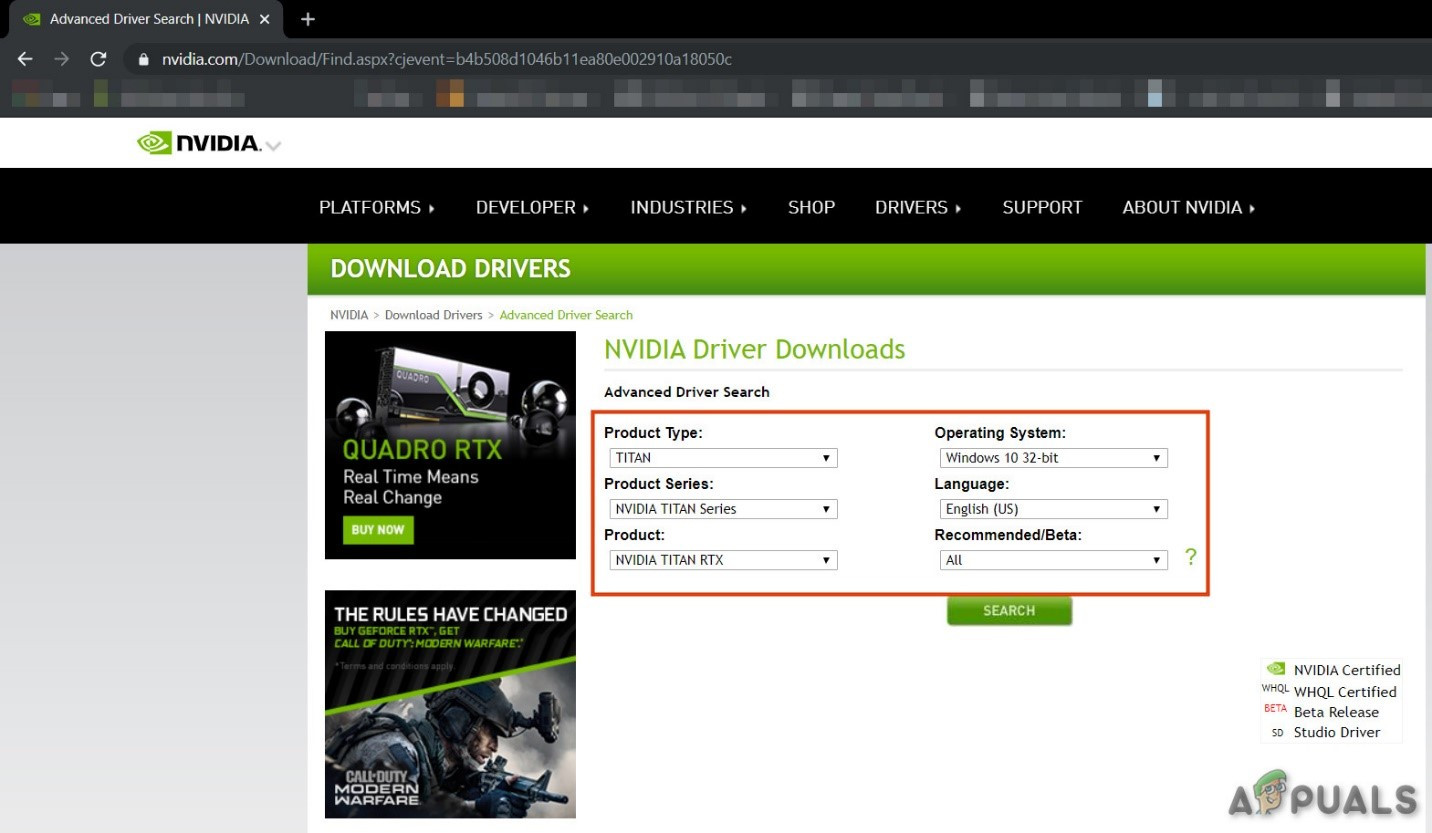
Download NVIDIA Drivers
Check if the problem is solved, if not move to the next solution.
Solution 12: Run System File Checker
The missing/corrupted/damaged system files can cause the GeForce ShadowPlay Install Failed issue. There is a built-in System File Checker (SFC) that can check and repair any problematic files, use the SFC tool to fix missing or corrupt system files to solve the problem.
- Type cmd in the search bar on your desktop and right-click Command Prompt & select Run as administrator.
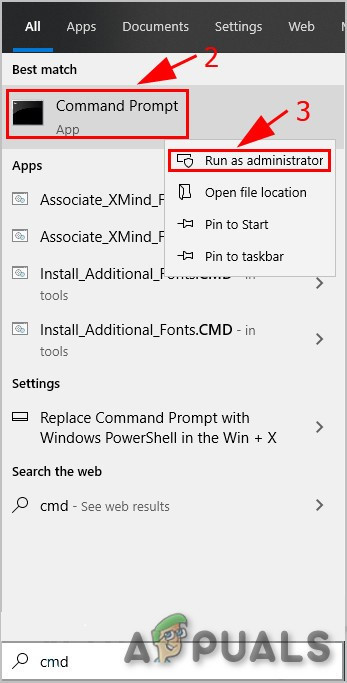
Run Command Prompt as Administrator - In the Command Prompt, copy & paste the following command
sfc /scannow
and press Enter.
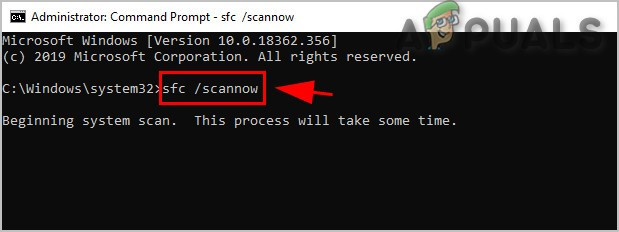
Run SFC Command - Wait for the process to 100% complete.
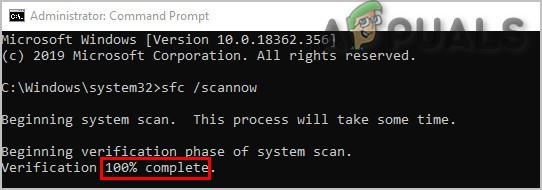
Completion of SFC Command - Type exit in Command Prompt and press Enter.
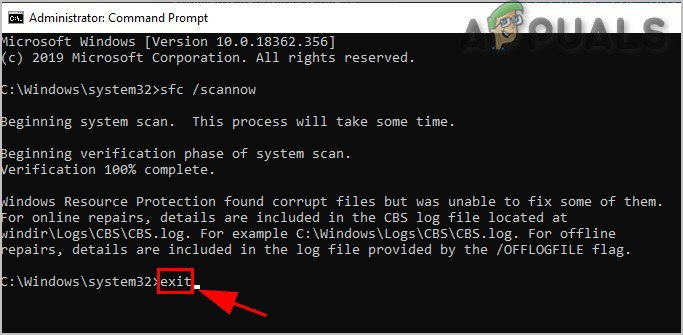
Exit Command Prompt - Please keep in mind that this scan can take time, so please be patient and let it complete. Restart the system.
- Uninstall any version of GeForce if installed.
- Reinstall the GeForce to see if the problem is solved.
If the problem persists, proceed to the next solution.
Solution 13: Install in Safe Mode
Start Windows In Safe Mode, the system starts with a minimum set of drivers, software & services. A program that is not installing in normal mode can be installed as only limited processes are running and if any process or service which was creating problem in installing is most probably is not running.
If the problem is not solved, move to the next solution.
Solution 14: Reinstall Windows
If still, nothing has helped you so far then it is time to move to the last resort i.e. re-installation of windows.
Hopefully, you can now install the GeForce Experience ShadowPlay and can record and stream your game without any problem.


