[FIXED] 0xA00F4292 Photo Capture Start Time Out
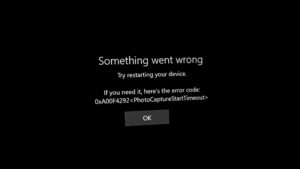
The Camera app may show the 0xA00F4292 error if the Camera app installation is corrupt or because of an outdated Camera driver. The issue arises when the user launches the Camera app but a black camera screen is shown with the following message:
“Something went wrong. Try restarting your device. If you need it, here’s the error code: 0xA00F4292<PhotoCaptureStartTimeout>”
The issue is reported on internal as well as on external cameras. In some cases, users were able to use the Camera through another application (like Skype) but the Camera app did not show any results.
Before moving with the solutions, check if changing the Camera resolution sorts out the problem. Last but not least, make sure the antivirus interference is not causing the issue (by temporarily turning off the antivirus).
Solution 1: Edit the Privacy Settings of Your System
The Camera app may show the error under discussion if the camera access is blocked in the privacy settings of your system. In this context, allowing the Camera access in the privacy settings may solve the problem.
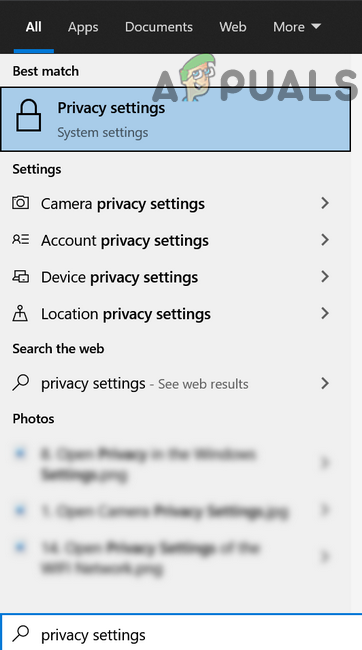
- Click Windows, type: Privacy Settings, and then open Privacy Settings.
Open Privacy Settings of Your System - Then, in the left pane, steer to the Camera tab and click on the Change button (under Camera Access for This Device).
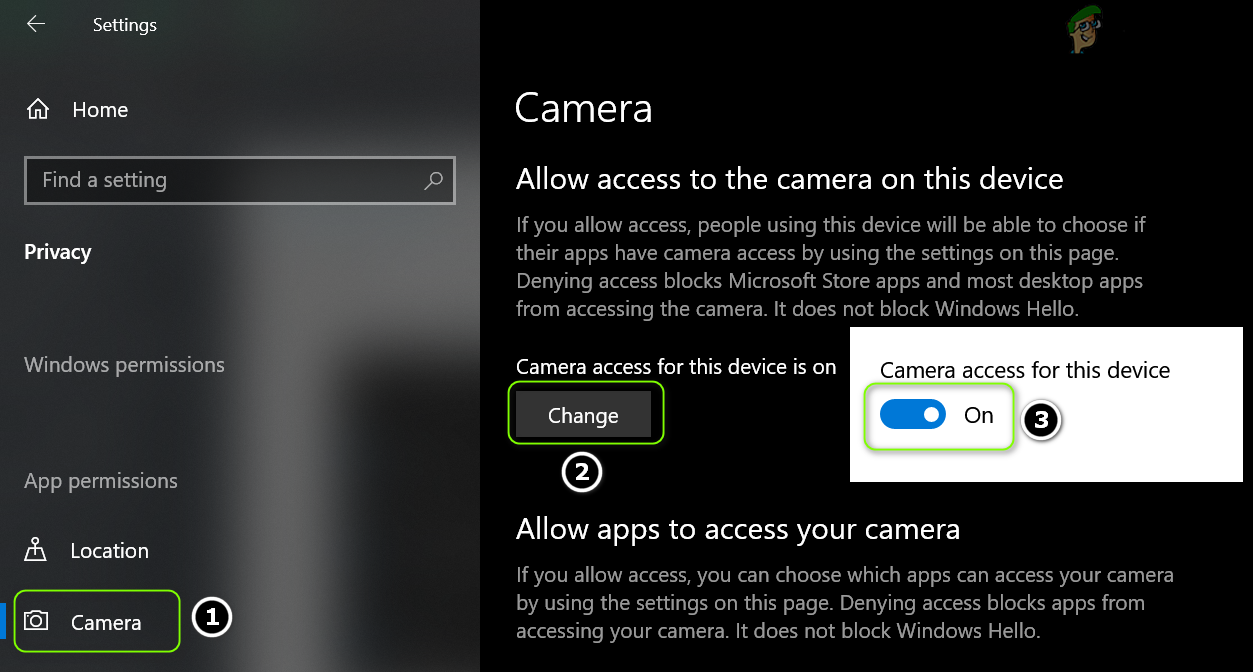
Enable Access to the Camera on This Device - Now toggle its switch to the on position and then enable the option of Allow Apps to Access Your Camera by toggling its switch to the on position.
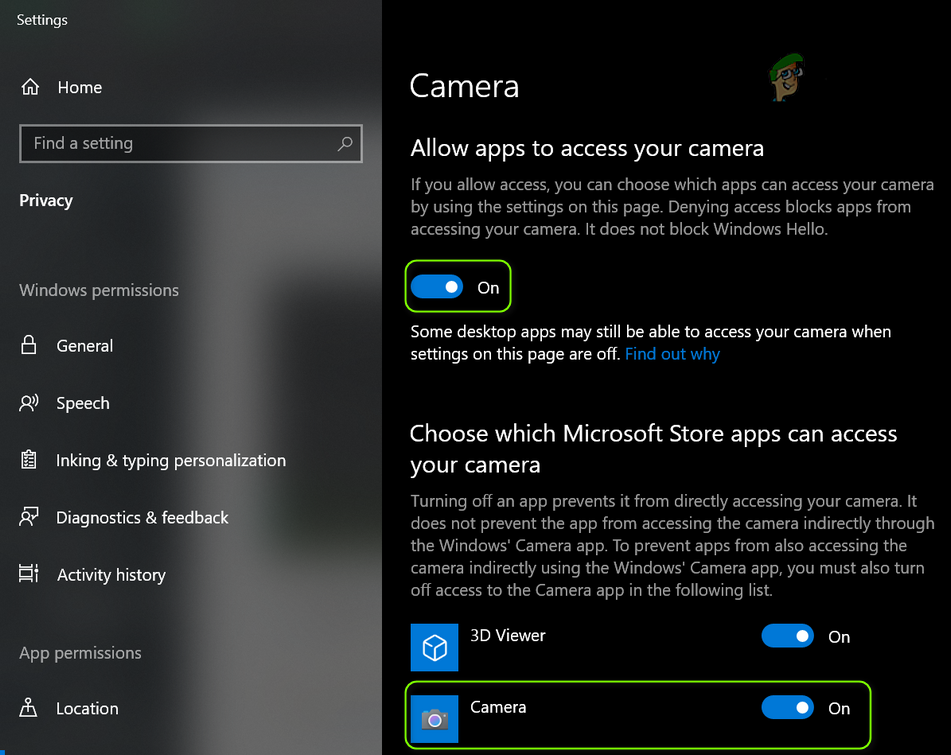
Allow the Camera App to Access to the Camera Device - Then in the section of Choose Which Microsoft Store Apps Can Access Your Camera, enable Camera and check if the Camera app is clear of the 0xA00F4292 issue.
Solution 2: Run the Hardware and Devices Troubleshooter
The 0xA00F4292 issue may be caused by a glitch in modules operating the system’s hardware/devices. In this case, running the “Hardware and Devices Troubleshooter” may clear the glitch and thus solve the problem.
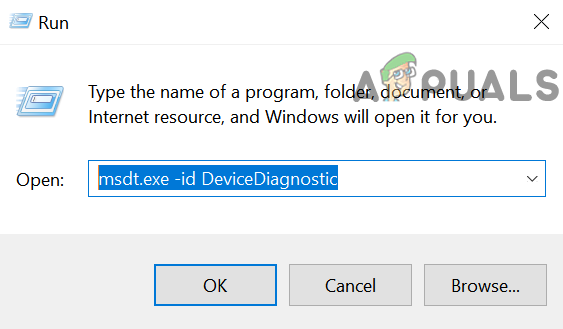
- Right-click Windows and select Run.
- Now execute the following:
msdt.exe -id DeviceDiagnostic
Launch the Hardware and Devices Troubleshooter Through the Run Command Box - Then, in the Hardware and Devices troubleshooter window, click on Next and let the troubleshooter complete its course.
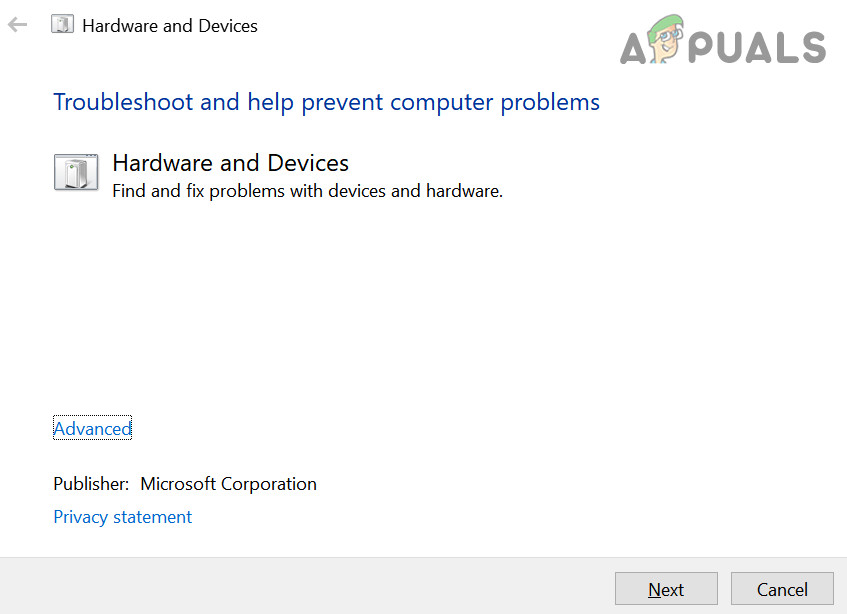
Hardware and Devices Troubleshooter - Once completed, apply the troubleshooter’s recommendations and check if the Camera app is clear of the photo capture issue.
If the issue persists, check if disabling/enabling HDR in the Camera settings (click on the gear icon to open Settings) resolves the photo capture issue.
Solution 3: Reset the Camera App to the Defaults
The Camera app may show the 0xA00F4292 issue if the installation of the camera app is corrupt. In this context, resetting the Camera app to the defaults may solve the problem.
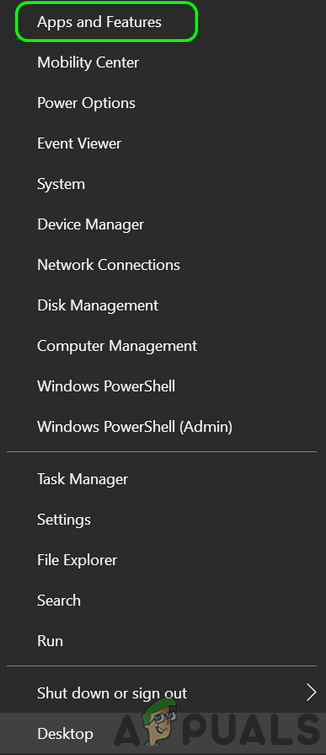
- Right-click Windows and open Apps & Features.
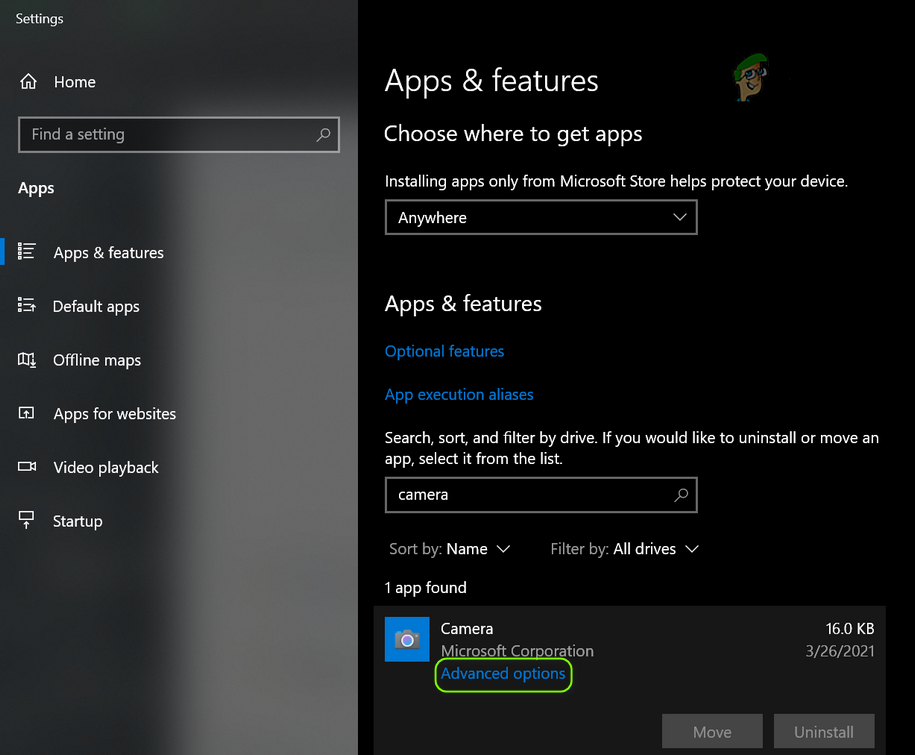
Open Apps & Features - Now find the Camera app and click to expand it.
- Then open Advanced Options and click the Terminate button.
Open the Advanced Options of the Camera App - Now click on the Reset button and then confirm to reset the Camera app.
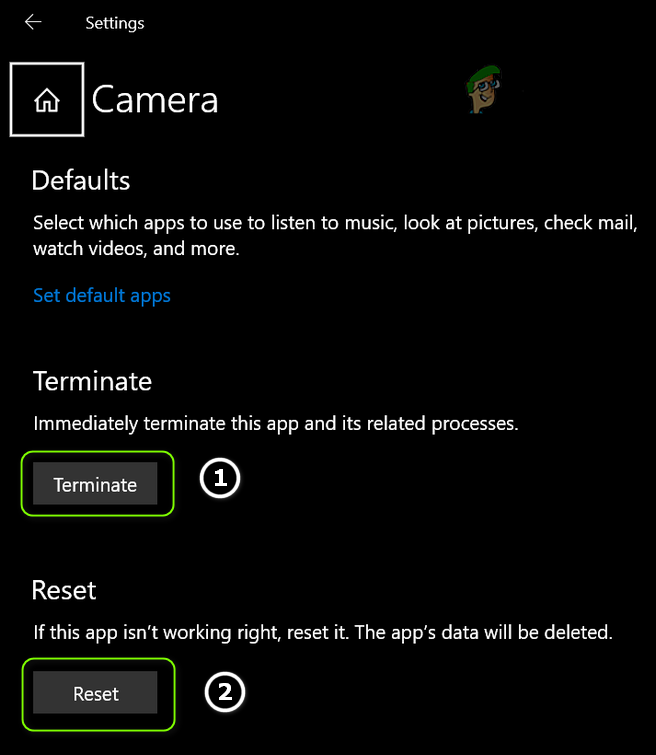
Terminate and Reset the Camera App - Then reboot your PC and upon reboot, check if the system is clear of the 0xA00F4292 issue.
Solution 4: Delete the Camera Roll Folder and Camera’s Local State Folder’s Contents
The camera app may show the capture start time out issue if the local data of the Camera app is corrupt. In this case, deleting the Camera app’s local data may solve the problem.
- Firstly, make sure no process related to the Camera app is operating in the Task Manager of your system.
- Then, right-click Windows and open Run.
- Now navigate to the following path:
Pictures
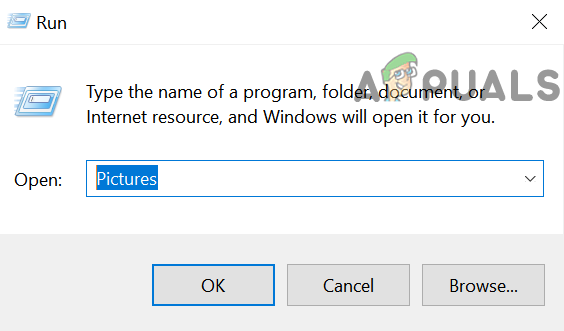
Open the Pictures Folder Through the Run Command Box - Then delete the Camera Roll folder and reboot your PC.
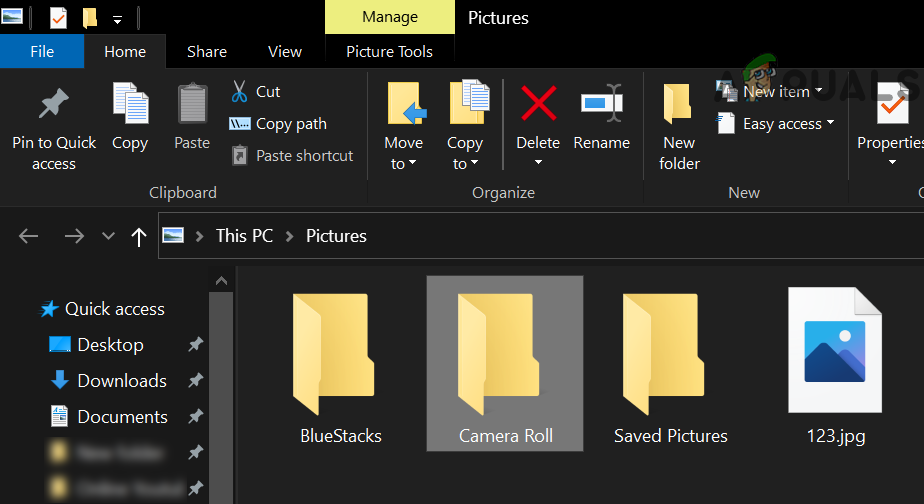
Delete the Camera Roll Folder in Pictures - Upon reboot, check if the Camera app is clear of the photo capture issue.
- If not, then navigate to the following path in the Run Command box:
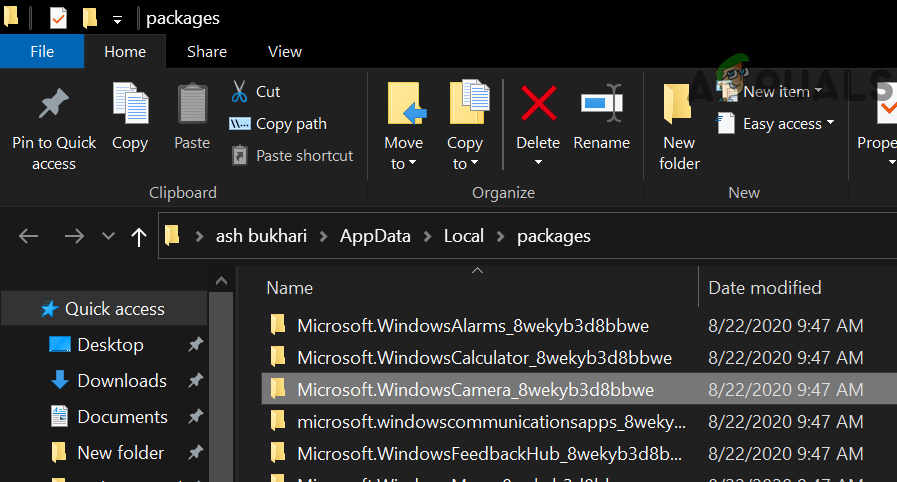
%localappdata%\packages
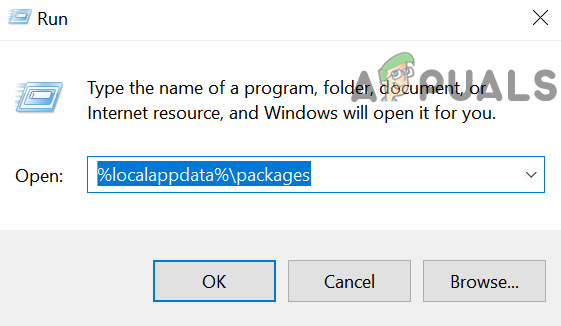
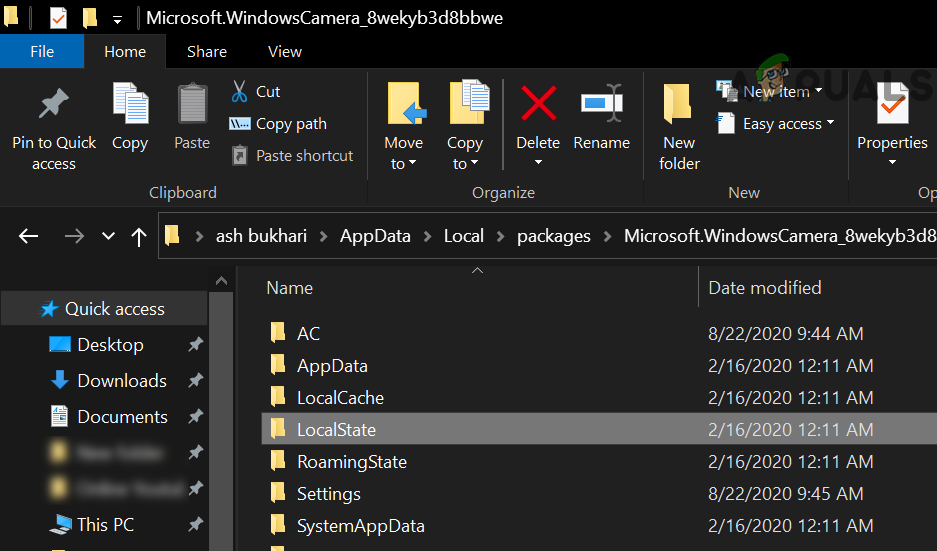
Open Packages Folder in the Local App Data - Now open the Microsoft.WindowsCamera_8wekyb3d8bbwe folder and double-click on the Local State folder to open it.
Open Microsoft Camera Folder in Packages - Then delete all the contents of the Local State folder and reboot your PC.
Open the Local State Folder and Delete its Contents - Upon reboot, check if the Camera app is operating fine.
Solution 5: Reinstall the Camera App
The corrupt installation of the Camera app (that can’t be repaired by resetting the app) can be the root cause of the photo capture issue. In this scenario, reinstalling the Camera app may solve the problem. Proceed at your own risk if the Camera app fails to reinstall, then you may have to reinstall the Windows, so, creating a restore point will be a good option.
- Right-click Windows and open PowerShell (Admin).
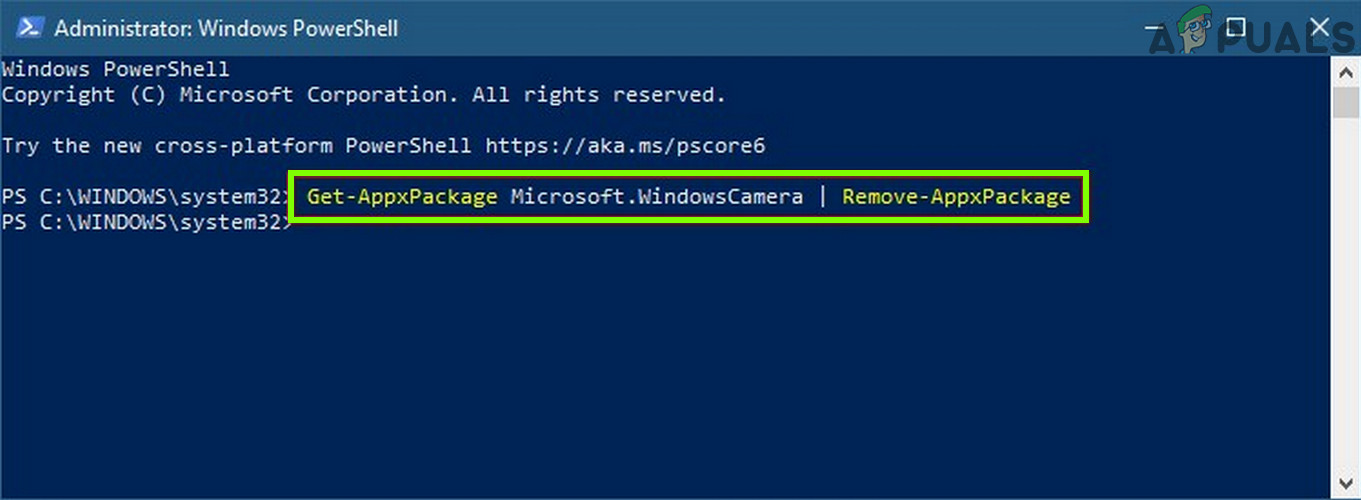
- Now execute the following to remove the Camera app:
Get-AppxPackage * windowscamera * | Remove-AppxPackage
Uninstall the Windows Camera App - Then reboot your PC and upon reboot, install the Camera app by executing the following (where C is the system drive):
Get-AppXPackage -AllUsers | Foreach {Add-AppxPackage -DisableDevelopmentMode -Register "C: \ Program Files \ WindowsApps \ * windowscamera * \ AppXManifest.xml"} - After reinstalling the Camera app, check if the system is clear of the Photo Capture issue.
Solution 6: Rollback/Update/Reinstall the Camera Driver
The capture issue may arise if the Camera driver of your system is incompatible, outdated, or corrupt. In this scenario, rolling back (if the issue occurred after an update), updating, or reinstalling the Camera driver may solve the problem.
Rollback the Camera Driver
- Right-click Windows and open the Device Manager.
- Now expand Cameras (or Imaging Devices) and right-click on the camera.
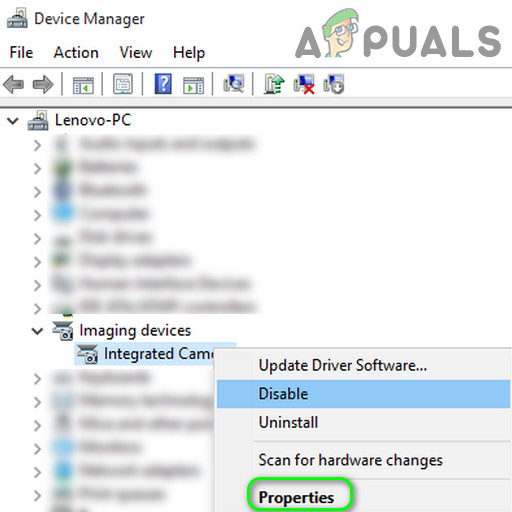
Open Properties of Camera in the Device Manager - Then choose Properties and head to the Driver tab.
- Now click on the Roll Back Driver button (if the button is greyed out, then you may try the update driver option) and follow the prompts to complete the process.
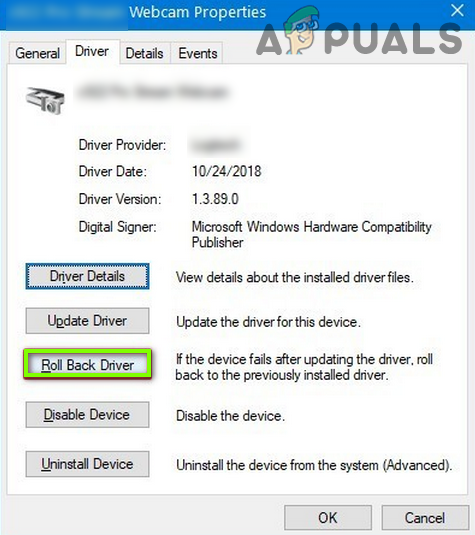
Roll Back the Camera Driver - Then reboot your system and check if the Camera app is clear of the 0xA00F4292 issue.
Update the Camera Driver
- Firstly, make sure the Windows of your PC is updated to the latest build as many OEMs prefer the Windows Update Channel to release the device drivers’ update. If your OEM has an update utility (e.g., Dell Support Assitant), then update the system’s Driver through that utility and check if the Camera is operating normally.
- If not, Right-click on the Camera in the Device Manager (as discussed above) and choose Update Driver.
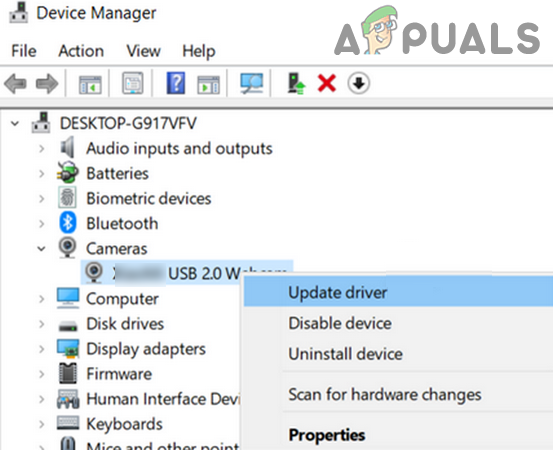
Update the Camera Driver - Now select Search Automatically for Drivers and let the driver update (if an update is available).
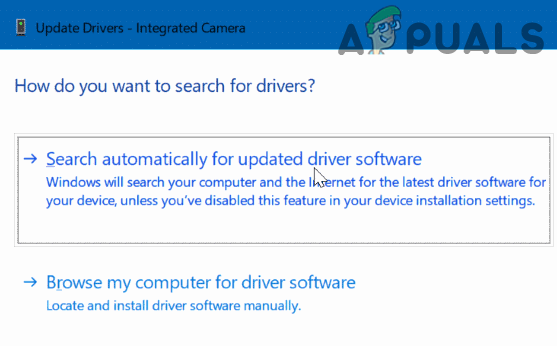
Search Automatically for the Camera Driver - Then reboot your PC and check if the photo capture issue is resolved.
- If the issue persists, repeat steps 1 and 2 but at step 2, select Browse My Computer for Drivers and then select Let Me Pick from a List of Available Drivers on My Computer.
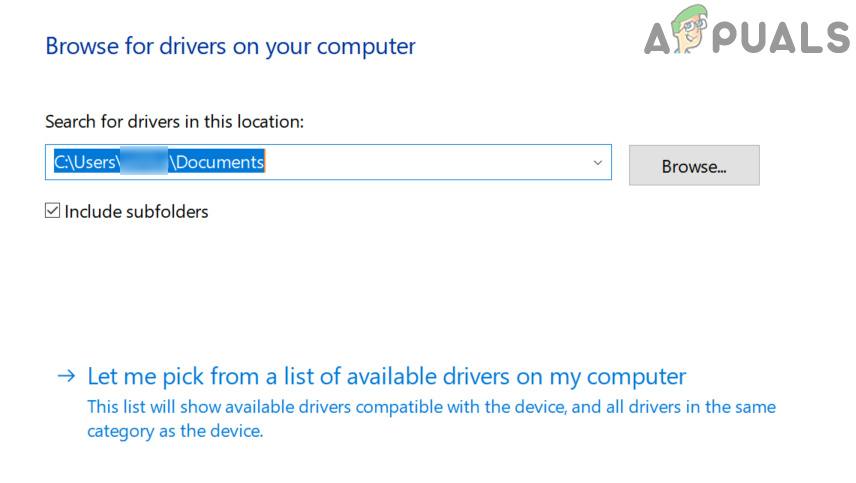
Let me pick from a list of available drivers on my computer - Now, choose a different driver (not the driver currently in the use) and click on the Next button.
- Then let the driver install and reboot your PC to check if the Camera is clear of the 0xA00F4292. If that driver did not solve the problem, you may try all the drivers (shown at step 6) one by one (you may uncheck “Show Compatible Hardware”) to check if any of the drivers resolve the issue.
If that did not do the trick, check if installing an older driver from the OEM website resolves the photo capture issue.
Reinstall the Camera Driver
- Firstly, download the latest Camera driver of your PC from the OEM website.
- Then, right-click on the Camera device in the Device Manager (as discussed above) and choose Uninstall Device.
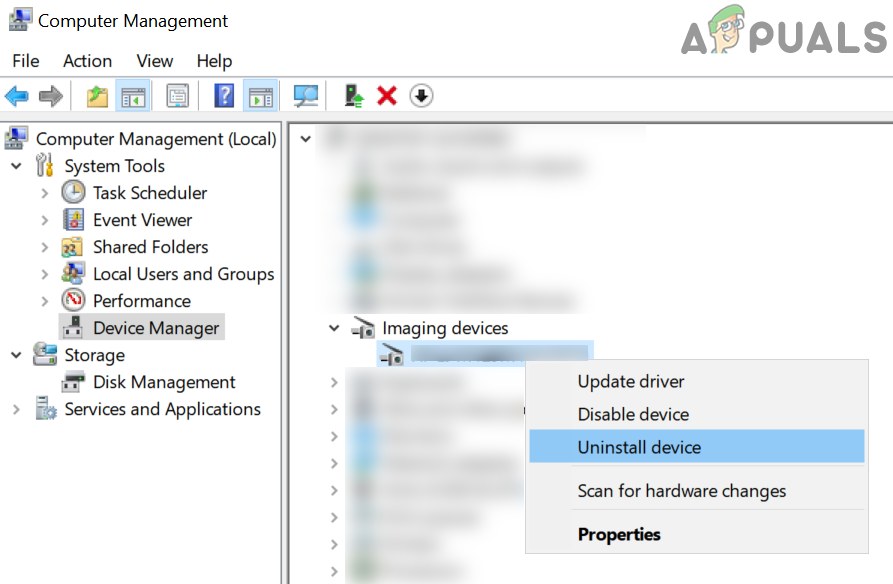
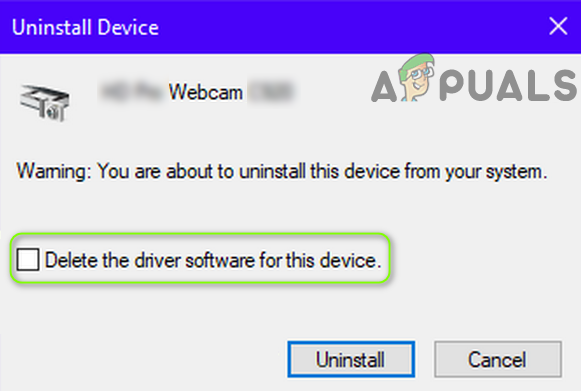
Uninstall the Camera Device from the Device Manager - Now, checkmark the Delete the Driver Software for This Device option and click on Uninstall to confirm the uninstallation of the camera driver.
Checkmark Delete the Driver Software for This Device for the Camera - Then open the View menu and select Show Hidden Devices.
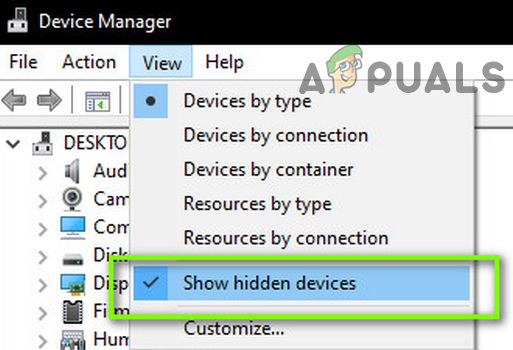
Show Hidden Devices in Device Manager - Now make sure to remove all the hidden camera drivers. Do not forget to check under Universal Serial Bus Controllers for a hidden or yellow-marked Camera device.
- Then reboot your PC and upon reboot, check if the Camera app is working fine (if a generic driver is installed by Windows).
- If the issue persists, install the latest Camera driver (downloaded at step 1) and check if the Camera app is working normally.
If that did not do the trick, check if reinstalling the Display/Graphics driver (a solution reported by some users) resolves the Camera issue. You can also check if installing an OEM camera utility (like Dell Webcam Central) resolves the
Solution 7: Create a New User Account
The Camera app may show the capture start time out issue if the Windows user profile is corrupt. In this case, creating a new user profile on the PC and using the Camera through that account may solve the problem.
- Create a new Windows user account (preferably, a local administrator account) and log out of the current user profile.
- Now, log in using the new Windows user account and check if the Camera app is working fine. If so, then you may have to transfer all the data of the old account (a tedious task) to the new profile.
Solution 8: Edit the System’s Registry
If none of the solutions did the trick for you, then you may edit the system’s registry to solve the Camera issue.
Warning: Advance with the utmost caution and at your own risk, as editing the system’ registry is a skillful/proficient task and if not done properly, the system/data may be harmed/compromised.
- Firstly, create a backup of your system’s registry (just in case you need to revert the change).
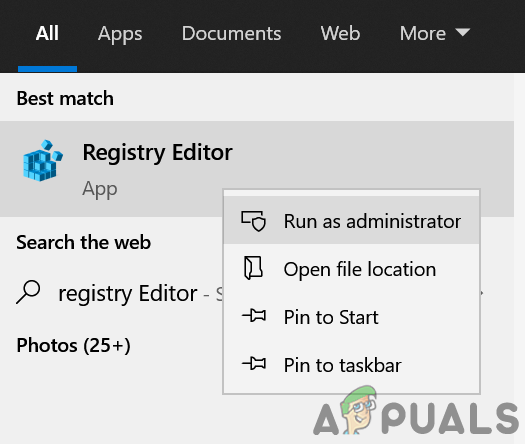
- Click Windows, type: Registry Editor, and right-click on the Registry Editor. Then, choose Run as Administrator.
Open Registry Editor as Administrator - If UAC prompts, choose Yes and navigate to the following path (copy-paste the address in the address bar of the Registry Editor):
Computer\HKEY_LOCAL_MACHINE\SOFTWARE\Microsoft\Windows Media Foundation\Platform
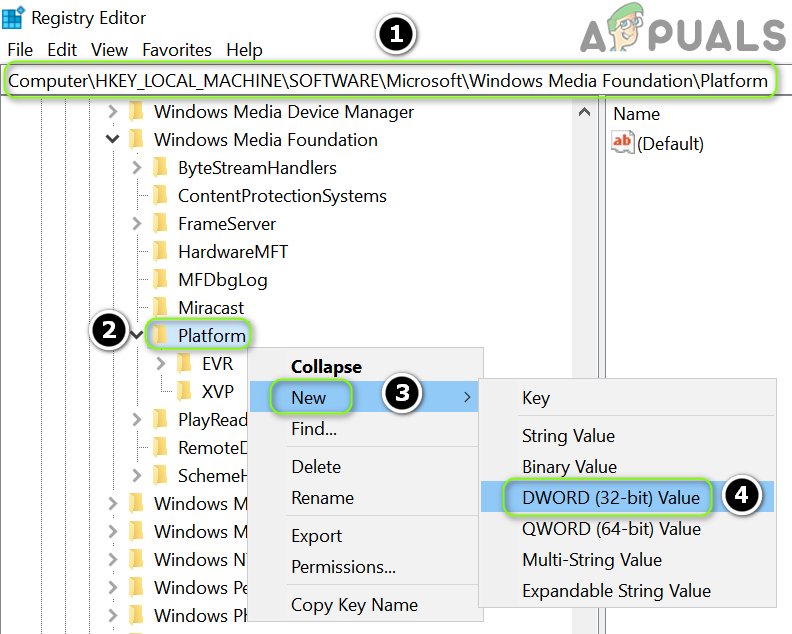
Create a New Dword (32-bit) Value in the Platform Key - Now, in the left pane, right-click on the Platform key and choose New>> Dword (32-bit) Value.
- Then name the key as EnableFrameServerMode and double-click on it.
- Now set its value as 0 and exit the Editor.
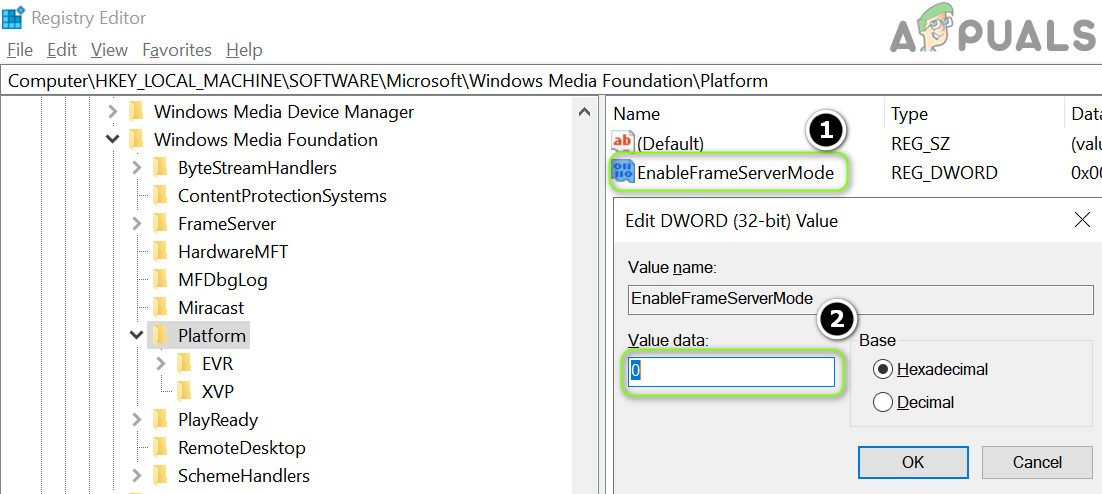
Set the Value of EnableFrameServerMode to 0 - Then reboot your PC and check if the Camera is clear of the photo capture issue.
If the issue persists, then check if performing a system restore sorts out the Camera problem. If that is not an option, then you may try an in-place upgrade or Reset the PC to the factory defaults (use the Keep Files and Apps option). If that did not do the trick, then get your system checked for a hardware issue.


