Fix: Xbox 360 Open Tray Error
The Open Tray error on Xbox 360 is definitely one of the most troublesome errors you can encounter on your console as its cause is usually related to hardware, rather than software issues, meaning you sometimes really need to have someone to look at it or you need to perform some maintenance carefully.
There are quite a few solutions to this problem and you never know which one might be suitable for your situation. If the Xbox 360 is not able to read discs, you are not able to install any new games or even play a game if it requires the disc to be inserted. Follow the solutions presented below to get rid of the Open Tray error once and for all.
Solution 1: Dismantle Your Xbox and Leave it Like That For a While
Even though this solution seems like something that wouldn’t work for a majority of cases, the solution has helped some people get rid of the error. There are several reasons why this method may produce outstanding results and it’s definitely something you should try at the beginning, before starting any advanced methods.
- Press and hold the power button at the front of the Xbox 360 console until it shuts down completely.
- Unplug the power brick from the back of the Xbox. Press and hold the power button on the Xbox several times to make sure there is no remaining power in the console itself.
- After you have made sure of that, disconnect everything from the console including the controllers and all additional hardware you may have connected to it.
- Plugin the power brick and wait for the light located on the power brick to change its color from white to orange.
- Turn the Xbox back on as you would do normally and check to see if the Open Tray error code keeps on appearing on it.
Solution 2: Turning Certain Parts to Their Proper Place
It seems that there is a certain square part located in your Xbox 360 that gets moved out of place during certain activities. Plenty of users confirmed that getting these parts back to their place managed to fix their issue entirely but know that you will need to be extra careful since you will need to open your Xbox 360 entirely to get access to them.
Disconnect your Xbox 360 from all input and output devices. Your console should be completely free of any wires or attachments, including external storage you may own, HDMI cables, charging cable and the controllers.
- If there is a disk in the console, make sure you eject it and place it somewhere else before proceeding.
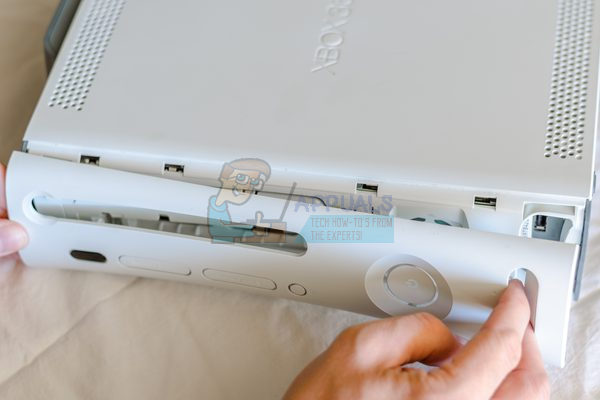
- Pry off the faceplate by inserting your finger into the USB port section, which is located to the right of the power button, and pulling the faceplate toward you. You can be relatively firm while doing this—the Xbox 360 doesn’t have fragile parts behind the faceplate like later models do.
- Release the end grilles by poking a large, bent paperclip through the holes in the top row of ventilation spaces on the Xbox 360’s casing, prying up each time. This will unhook the clips holding the grille.
- Insert a flathead screwdriver into space where the grille connects with the console case, then work the screwdriver around, prying up as you go.
- If you have a hard drive on your Xbox 360, first remove it before removing the end grills by simply pulling them away from the Xbox 360’ case.

- Unclip the front of the case which is held by four clips on the front side of your console by simply pulling its top towards yourself.
- Unclip the back of the Xbox’s case and place your hand inside the space on the right where the grille used to be and apply pressure to the connected halves of the casing while inserting the flathead screwdriver into the slots on the back.
- Remove the bottom of the case by simply pulling it off. You should be able to look at the metal part. Take out the screws holding the top with a Torx screwdriver.
- Take out the screws holding the top of the case in place. Use your Torx screwdriver for this; if you see a screw that won’t fit your screwdriver, don’t try to unscrew it—it isn’t necessary for disassembly. There are six total screws in the metal part of the case that you’ll need to remove.
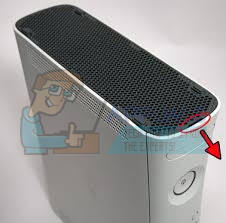
- Remove the eject button located on the left side of the console’s front part. Gently ease your flathead screwdriver under the green ribbon on the left of the console’s front and pry.
- Lift the top of the case off of the Xbox and check the disc tray. Make sure you located the two squares just like in the picture below:
Make sure you align them properly like in the picture if one of them has moved out of its position and check to see if the Xbox tray error code keeps appearing.
Solution 3: Be Violent
That actually helped certain people deal with this same issue and the reason for it is unknown. Sometimes simply being mildly violent with the console by closing and opening the tray repeatedly or by pushing the cartridge back on forth simply works and users have confirmed. A little “smack” on top of the Xbox 360 also worked to avoid the issue instead of solving it. This method is also easiest to try out before giving up.
Solution 4: Forcing the Disc Tray Inside
This solution was quite popular on YouTube and it helped quite a few users deal with this error. The explanation for this one is that the tray should actually not be forced in but it can be done without causing any damage. However, forcing the tray in launches a self-check of some kind for the laser and it appears it actually repairs itself.
- Press and hold the power button at the front of the Xbox 360 console until it shuts down completely.
- Turn the Xbox on by clicking on the open disc tray and physically make the disc tray go back in with not too much force to knock the tray of its tracks but with enough force to close it manually.
- Wait for a couple of seconds until the tray stops and the console to recalibrate itself before rebooting the Xbox and checking to see if the issue is really resolved.
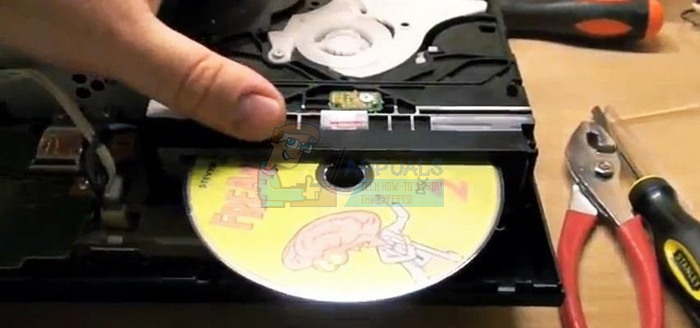
Solution 5: Open Your Console and Clean the Laser
Opening the Xbox is sure to get your off your warranty but it may be the only solution for you to get rid of the error. These types of issues are usually caused by a faulty or dusty laser and you can hope for the best that simply giving it a thorough cleaning will help you solve the issue easily.
- Follow the instructions on how to open your Xbox from the top of the article.
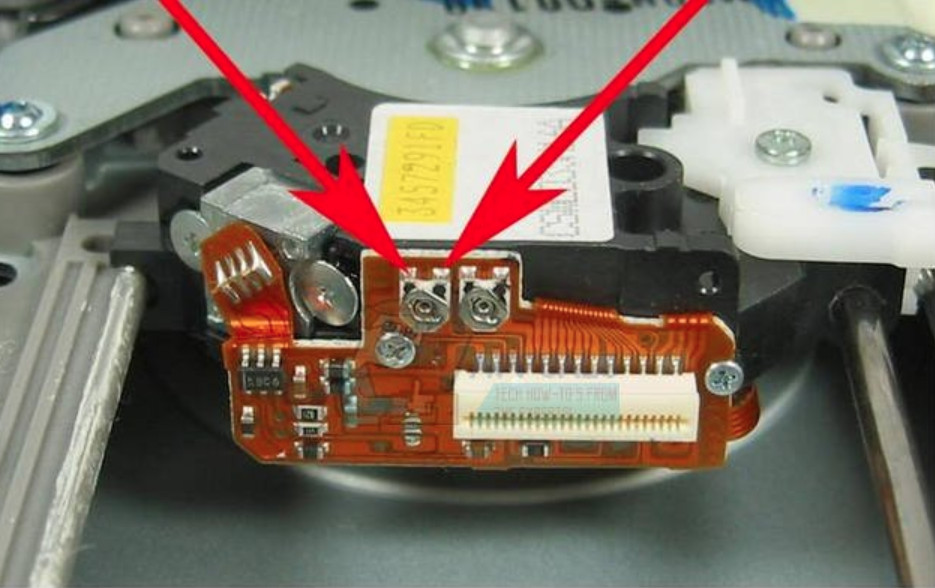
- Use a q-tip and some rubbing alcohol to clean the laser which is located at the disc tray like displayed on the photo.

- Also, make sure you use a mini vacuum cleaner to get rid of the dust inside and also use a couple of extra q-tips to get rid of the dirt.
Solution 6: Adjusting the Hardware
In some cases, the hardware might get clogged due to the accumulation of certain dust particles inside the Xbox or in and around the cables. Therefore, if you haven’t tried it already, it is always a good choice to try to clean the Xbox Disc Tray, the Disc, and all the power cords and other cables connected to the console. Make sure to look for any clogged dust particles and remove them to allow for proper airflow and the optimal performance of the console.
The disc that is inserted into the Xbox tray consists of two parts: one on which the disc spins and the second one is the laser which is used to read the disc. Sometimes an error occurs and the laser gets dragged out of its original position towards the outer edge of the disc drive. Therefore, you just need to get the laser back into its initial position and the error would get fixed. Be cautious and do not touch the upper top of the laser because this part comes in direct contact with the disc from where it reads the data.
Solution 7: Diagnosing USB Flash Drives
Try to replace or reformat the USB flash drives connected to the Xbox console and then see if the problem gets fixed. Follow the steps below:
- Firstly, turn off the Xbox.
- Detach any USB flash drive connected to the Xbox console.
- Now turn on the console again and try to play the game disc.
- Observe that if your console can read the disc without the USB flash drive attached to it then replace it using a different USB flash drive.
Solution 8: Checking for faulty Disc and Analyze Disc Specifications
To check whether there is an issue with your disc try loading multiple discs into your Xbox console. The result you would get here would help you to determine if there is any problem with your disc or not. Perform the following steps for this:
- Replace the old disc with a new one in your Xbox 360 console and try playing it.
- If your console gets successful in playing this disc it means that the fault exists in your previous disc and you need to replace it. You can contact the disc manufacturer for the repair of the faulty disc too.
One of the things that you could try is to verify the disc’s type, region, and format. You can do this by looking at the packaging of the game disc. Since the 360 Xbox console cannot play all the Xbox games you need to check whether the disc is an Xbox 360 game or not. Xbox 360 games are clearly specified on the packaging of the disc. Secondly, verify the correct disc region. You can do it by counter checking the region code on your game disc. It should match with the country where you purchased your Xbox console originally. In short, you need to substantiate the fact that both your disc and Xbox 360 console belong to the same region.
Similarly, in the case of DVD’s you also need to match the region code of both DVD packaging and Xbox 360 console. There is a predetermined table of specific region codes along with the corresponding geographic regions in which the discs can be played. Like if a console is purchased in U.S territories or Canada the console will only be able to play region 1 DVD discs. Similarly, for a console bought in Europe or the Middle East, it can play region 2 DVD discs and so on. The same is the case for CDs. The Xbox 360 console can only read some specific CD formats and file types. Some of those disc formats include CD-DA, CD-ROM, CD-ROM XA, CD-R, CD-RW, CD-Extra. While the readable file types consist of Windows media audio (WMA), MP3, JPEG. Usage of any other disc formats and file types other than this list would result in the non-readability by Xbox 360 console.
Solution 9: Clear System Cache
Another remedy for resolving the “Xbox-360-open-tray-error” could be clearing the system cache. This could be done as follows:
- Browse to the settings option on your Xbox console and then hit the Memory icon.
- Here highlight your hard drive and press the “Y” key.
- A menu will open up on your screen. Then find and press the “Clear system cache” option.
- Your Xbox should reset automatically now. If it doesn’t do so you can do it yourself manually.
Solution 10: Repair your console
If none of the above-mentioned solutions worked in your case then your console might need service or repair. You can submit an online application for service which is the quicker and easier method. At first you need to sign in at Device Services and select Register new device. After the registration step you can regularly check the warranty status of your device. You can check out Getting your Xbox serviced for submitting an online repair request.
So I have tried everything and I can’t get my drive to work without the disc staring out crooked. I made a video and uploaded it for anyone that may be able to help me. Thanks in advance for any help you can give me. https://youtu.be/kTVUZss2pkM