Fix: Wolfenstein 2 could not write crash dump
The error “Wolfenstein 2 could not write crash dump” occurs when the game crashes because of mostly graphics issues and display the error message on the computer. This error usually occurs because of incorrect configuration of graphics on your computer or when your graphics drivers are outdated.

There are several workarounds to fix this error message starting from checking the graphics drivers on your computer to changing in-game settings. We will go through each of them starting with the easiest one first. Make sure that you have an administrator account before proceeding with the solution.
How to fix Wolfenstein 2 could not write crash dump
- Wolfenstein 2 could not write crash dump AMD: This situation refers to the scenario where your graphics card is of AMD and the game crashes each time when you launch it.
- Wolfenstein 2 could not write crash dump NVIDIA: Similar to the error message, this condition occurs when the graphics card installed in NVIDIA and the refuses to launch and crashes.
Solution 1: Update the game and client
Before we move on to more tedious and lengthy solutions, you should first make sure that the game and the game client are updated to the latest build. Every now and then, the developers of Wolfenstein release patches to fix bugs or introduce new features in the game.

If you have a Steam client, you should make sure that the game is updated from there or if you are using a standalone game client, navigate to the Wolfenstein’s website and download the latest patch.
Solution 2: Changing compatibility settings
Every computer application has compatibility settings which determine how the application will perform and what are the compatibility settings that will govern the main running of the application. We can try changing some compatibility settings of the game in the Steam folder and see if this fixes the problem. You can always revert the changes if this doesn’t work.
- Navigate to the Steam’s installation directory. From there locate the executable of the game. The file path may differ according to 32 or 64-bit type of the application.
For example, the file path can be:
D:\Steam\steamapps\common\wolfenstein 2\game\bin\win64
- Once in the folder, right-click on the game executable and select Properties.
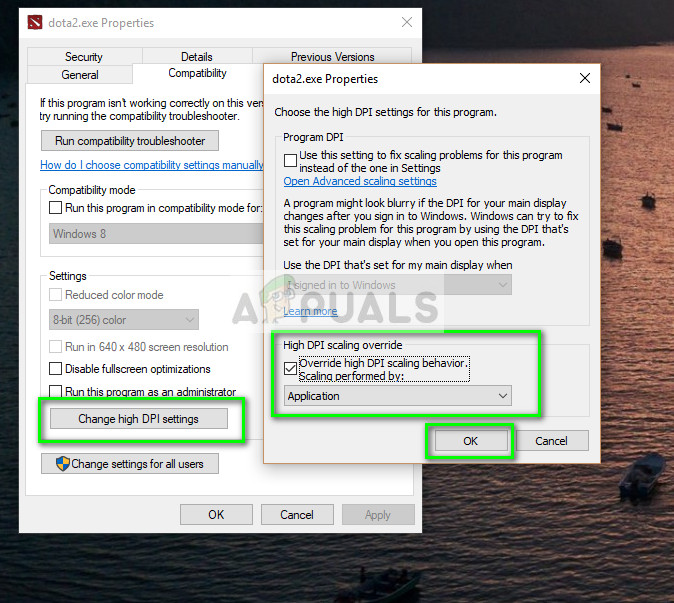
- Once in properties, navigate to the compatibility tab and click on Change high DPI settings. Check the option Override high DPI scaling behavior. Select Application from the drop-down menu.

- Press OK to save changes and exit. Restart your computer and try launching the game again.
You can do the same with the Steam client or the standalone version of the game.
Solution 3: Disabling Async Compute
Another thing to try if the above solutions don’t work is disabling the Async compute on the game or on your computer. The Async compute enhances the graphics output of the game on your computer. However, in several cases like this one, it causes problems and forces the game not to launch.
You can disable the feature from your graphics card or if you are able to enter the game, you can disable it from there. Once disabled, restart your computer completely and try launching Wolfenstein 2.
Solution 4: Deleting the ‘config’ file
Each game has a configuration file saved locally on your computer. The settings of the game are stored in this config file so whenever you launch the game, the application fetches the settings from here and then loads its modules.
It is possible that the configuration file is corrupt and hence you are unable to even launch the game. If we delete the configuration file, the game will detect that none is present and then make a new one with default values.
- Navigate to the following directory:
C:\Users\Username\Saved Games\MachineGames\Wolfenstein II The New Colossus\base\Wolfenstein II The New ColossusConfig.local
- Delete or cut paste the config file to another location. Now restart your computer completely and try launching Wolfenstein.

If you have an i7 or i5, you can also try disabling igpu before launching the game.
Solution 5: Checking your graphics drivers
If all the above methods don’t work out, you can try making sure that your graphics drivers are updated to the latest version. This can be the primary reason why your game is crashing because it doesn’t have access to the latest and updated graphics drivers. We will make use of the utility DDU to help to remove the remnants completely from your computer.
- Download and install DDU (Display driver uninstaller) from its official website.
- After installing Display Driver Uninstaller (DDU), launch your computer in safe mode. You can check our article on how to boot your computer into safe mode.
- After launching the DDU, select the first option “Clean and restart”. The application will then automatically uninstall the installed drivers and restart your computer accordingly.

- Now after the uninstallation, boot your computer normally without safe mode. Press Windows + R, type “devmgmt.msc” in the dialogue box and press Enter. Right-click on any empty space and select “Search for hardware changes”. The default drivers will be installed. Try launching the game and check if this solves the problem.
- If the default drivers don’t work you, you can update them to the latest build. There are two ways to go through it; either update the drivers automatically or manually. You can try automatically first and if that doesn’t work, you can move to the manual method.
In the manual method, you have to download the drivers from the manufacturer’s website and install the drivers from there.

- After you have installed the drivers, restart your computer and check if the problem is solved.


