Fix: Windows sockets registry entries required are missing
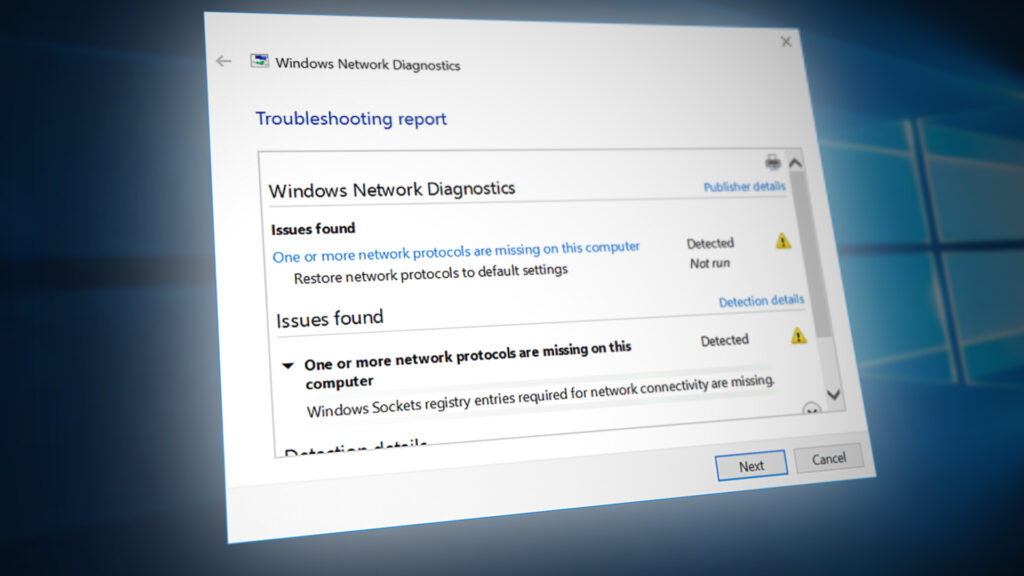
The “Windows sockets registry entries required for network connectivity are missing” error refers to corruption inside Windows Sockets (also known as Winsock) registry entries. Windows Sockets is a programming interface that acts as a supporting program by managing incoming and outgoing network requests. If the network requests aren’t processed by Winsock, the internet connection will not work at all. Many of us hoped the launch of Windows 10 will put an end to random network issues. Unfortunately, that was not the case, since many Windows 10 users are reporting errors that prevent them from connecting to the internet.Upon investigating the issue with the built-in troubleshooter, Windows reports the following: “Windows Sockets registry entries required for network connectivity are missing”. As you might expect, the chances of Windows Troubleshooter automatically fixing the issue are virtually non-existent.
Here’s a shortlist of the most common causes that will trigger the “Windows Sockets registry entries required for network connectivity are missing” error:
- One or more network protocols are missing on this computer
- Windows Sockets registry entries missing
Strangely enough, the problem first started appearing after a Windows update (KB3034229). Immediately after applying the update, a lot of users have been left without the possibility of connecting to the internet. The issue is also linked with the upgrade to Windows 10 that ends up messing with the Winsock registry.
The good news – your registry entries are not really missing. A more accurate way to put it is that the entries have become corrupted or have been modified to something different from what the system expects. Another scenario is that a 3rd party application is preventing the entries from being modified.
The bad news – you need to be prepared for an extensive troubleshooting session, as the issue is known to be caused by a lot of different factors. Depending on your situation, the error can be misleading and the actual problem might have nothing to do with Windows Sockets.
Now that we know the potential causes, let’s get to the fixing part. Below you have a collection of fixes that have successfully helped Windows 10 users to solve the “Windows Sockets registry entries required for network connectivity are missing” error and connect to the internet again. Please follow each method in order until you encounter a fix that works for your situation.
Method 1: Resetting the Winsock component
Winsock is a specification guideline that defines how the built-in Windows network software is accessing the network services. If a corrupted Winsock is what’s causing the problem, the simplest and most effective way to solve the issue is to reset the Windows Sockets using Command Prompt. If this is the underlying cause of the error, it’s likely that it also affected TCP/IP settings as well.
Let’s try running a series of commands in Command Prompt to reset Winsock and the TCP/IP settings. Follow the quick step-by-step guide below and see if the issue is resolved:
- Click the Windows start bar (bottom-left corner) and search for “cmd”. Right-click on Command Prompt and choose Open as Administrator.

- Type/paste the following commands into Command prompt and press the Enter key after each one:
netsh winsock reset
netsh int ip reset
ipconfig /release
ipconfig /renew
ipconfig /flushdns
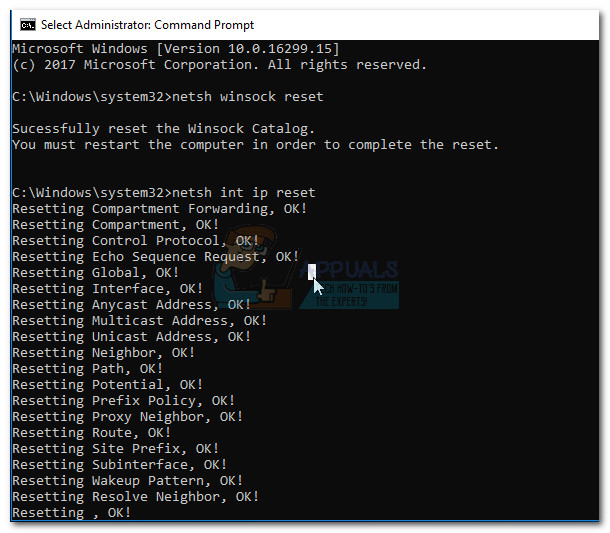
- Reboot your computer and see if you managed to solve the issue. If the “Windows Sockets registry entries” error is still preventing you from connecting to the internet, move to Method 2.
Method 2: Uninstalling the network adapter drivers
If a Winsock reset didn’t allow you to restore the normal functionality of your network components, let’s eliminate the possibility of a faulty network driver. Although it’s not that common, there are cases where the ethernet adapter is not installed properly. This typically happens when the user upgrades from Windows 7 or Windows 8 to Windows 10.
Some users have managed to fix the “Windows Sockets registry entries required for network connectivity are missing” error by uninstalling the network adapter drivers and reinstalling them after a clean reboot. Here’s a quick guide to doing just that:
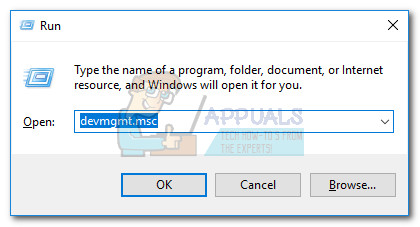
- Press Windows key + R to open a Run window, type “devmgmt.msc” and hit Enter to open Device Manager.
- In Device Manager, scroll down to Network adapters and expand the drop-down menu. Depending on your setup, you might have one, two or more drivers under Network adapters.
- Typically, the first entry is the ethernet adapter driver that needs to be reinstalled. Right-click on it and hit Uninstall device.
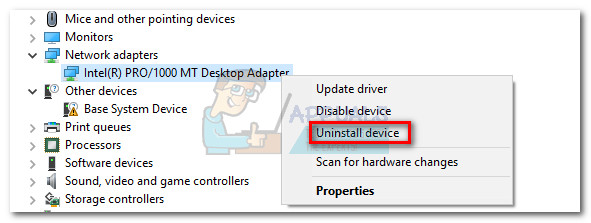 Note: If you use a laptop, also uninstall the Wireless Network Adapter.

- Once the network adapter driver has been uninstalled, trigger a system reboot in order to force Windows to reinstall the missing driver. If the error was caused by the ethernet adapter driver, you should be able to connect to the internet once the system reboots. If you have the same problem, move to Method 3.
Method 3: Deleting the Winsock Registry and Reinstalling TCP/IP
To absolve Winsock of any implications regarding the “Windows Sockets registry entries required” error, let’s go the long way and completely delete the Winsock Registry and reinstall TCP/IP. While this method takes longer than a simple Winsock reset, it will ensure that your Winsock registry entries are free of corruption.
Note: This procedure involves manipulating registry files. While following the steps below correctly poses no risk, any mistake might lead to unexpected system problems. It’s highly recommended that you create a System Restore point before attempting this method.
Once you have the restore point in place, follow the steps down below:
- Press Windows key + R, type “regedit” and hit Enter to open Registry Editor.

- In Registry Editor, use the left pane to navigate to the following location: HKEY_LOCAL_MACHINE \ SYSTEM \ CurrentControlSet \ Services \ WinSock2
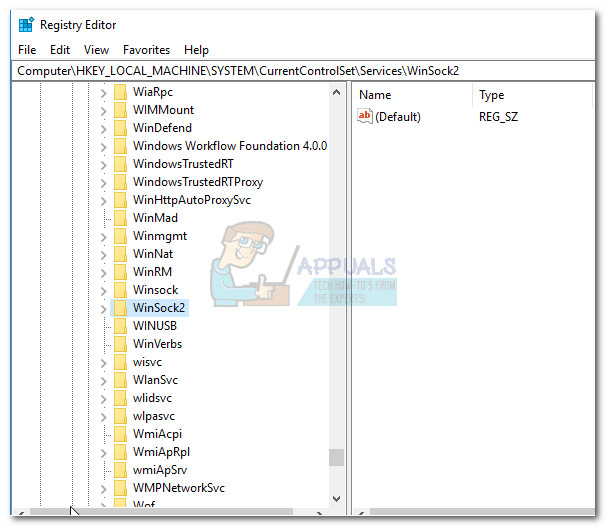
- Right-click on the WinSock2 key and choose Export, then save the registry backup to a safe location. This step is done as a backup, just in case.

- Once the backup is in place, right-click on WinSock2 again and select Delete.
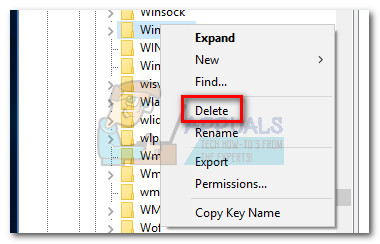
- Repeat step 3 and step 4 with the WinSock folder. Now you can safely close Registry Editor.
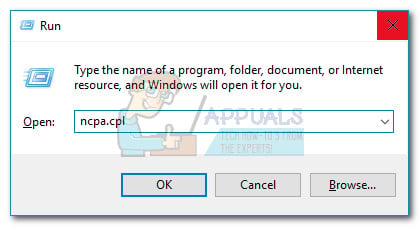
- Press Windows key + R to open a Run window, type “ncpa.cpl” and press Enter to open Network Connections.
- Right-click on your Local Area Connection (or Ethernet) and select Properties.
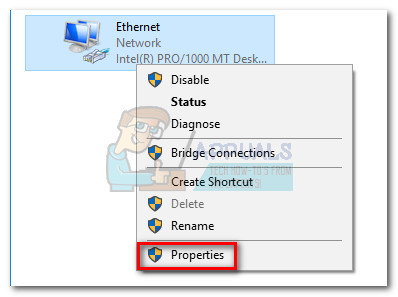
- In the Properties window, hit the Install button.

- Select Protocol under Select Network Feature type and click on Add.

- In the Select Network Protocol window, click on Have Disk.
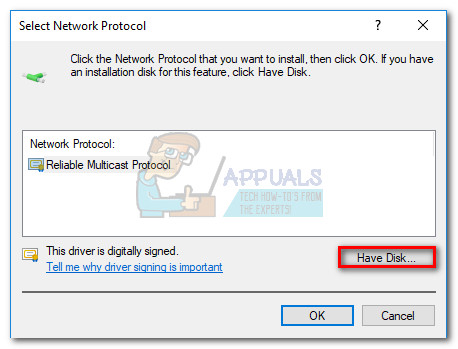
- When you get to the Install From Disk window, type C:\Windows\inf and hit Enter.

- Under Select Network Protocol, select Internet Protocol (TCP/IP) – Tunnels and click OK.

- Restart your machine and see if the issue is resolved.
Method 4: Disabling the VPN / Proxy connection
If you burned through the first three methods without a result, you can at least be certain that the Winsock registry is intact.
If you use a VPN / Proxy solution to protect your anonymity and browse safely, you should definitely do some investigations. As some users have reported, the “Windows Sockets registry entries” error is sometimes occurring when the connection with the VPN / Proxy is weak or unstable.
Note: If you don’t use a VPN or Proxy, move straight to Method 5.
See if your VPN / Proxy is to blame for the issue by disabling the connection and restarting your system. If the error “Windows Sockets registry entries required for network connectivity are missing” is not appearing while the VPN/Proxy is disabled, you’ll need contact support from your VPN/Proxy provider and see if they can be of any help. Else, you might need to look for a different solution to protect your anonymity.
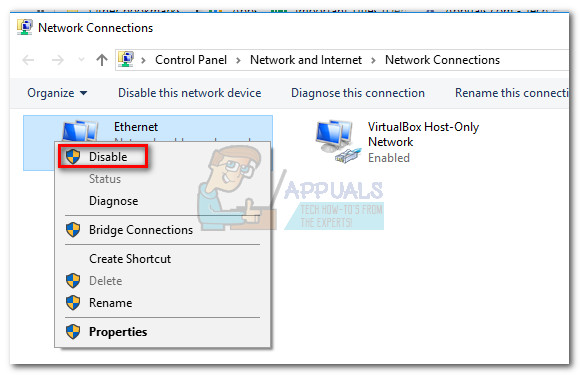
If you’re using a Virtual Private Network (VPN) that is appearing in your Network Connections window, you might be able to temporarily fix the issue by disabling and re-enabling the ethernet adapter. To do this open a Run window (Windows key + R), type “control ncpa.cpl”, and hit Enter. Once in the Network Connections window, right-click on the Ethernet adapter and choose Disable. When the adapter is disabled, right-click on it again and Enable it again.
Method 5: Uninstalling the external antivirus suite
Another potential culprit that might be causing the “Windows Sockets registry entries required for network connectivity are missing” error is your antivirus suite. From what we gathered, this issue is not known to be caused by Windows Defender and is only confirmed to happen with a few external antivirus suites.
Note: If you don’t use an external antivirus suite, scroll down to Method 6.
BitDefender and Avira are often reported as culprits, but there could be more 3rd party security suites that will trigger this issue. Although the reasons why some antivirus suites are causing WinSock problems are unclear, there is speculation that some security solutions might be overprotective with the registry files.
Unfortunately, disabling the antivirus temporarily will not reveal if the suite is the underlying cause of the issue. The only way to test this issue is to uninstall the antivirus suite, reboot the system and see whether the error is removed. If the issue is still appearing, move to the method below.
Method 6: Uninstalling legacy games and applications
Legacy applications and games are bound to cause compatibility problems on the newest versions of Windows. Some users have reported that the “Windows Sockets registry entries required for network connectivity are missing” error started appearing after the installation of a legacy game or application.
Even if the game in question installs and runs perfectly well with Compatibility mode on Windows 10, there’s a high chance that the installation kit will be bundled with old drivers that are incompatible or no longer supported by the new OS.
If you recently uninstalled an old game or application that was not configured to run on Windows 10, try uninstalling it along with any drivers that were included in the installation kit. Once every trace of the legacy program is removed, reboot your system and see whether you’re able to connect to the internet. If the issue persists, move to Method 7.
Method 7: Resolving a static IP conflict
If you use a static IP for your computer, you might want to investigate if you’re dealing address conflict. Duplicate IP address conflicts are known to produce the “Windows Sockets registry entries required” error. A conflict like this occurs when two endpoints are assigned the same IP address.
Most of the time, an IP conflict happens because the system administrator mistakenly assigns two computers on the local area network the same IP address. However, an IP conflict could also be produced if one computer is configured with multiple adapters or if the ISP accidentally assigns two customers the same IP address.
If you’re using a static IP, start by making sure you don’t have another device in your local area network that was assigned the same IP. If the issue is not local, go for a different static IP and see whether that fixes the issue.
Method 8: Manually changing the DNS server address
Netsh, the built-in utility in Windows can do a lot of cool thing with your local network, but it has also helped some users solve the “Windows Sockets registry entries required” error.
To be specific, they managed to resume their network connection by using Netsh to manually change the DNS servers address. Here’s how:
- Click the Windows start bar (bottom-left corner) and search for “cmd”. Right-click on Command Prompt and choose Open as Administrator.

- In Command Prompt, type ” netsh interface ip set dns “Ethernet” static 8.8.8.8″ and hit Enter.
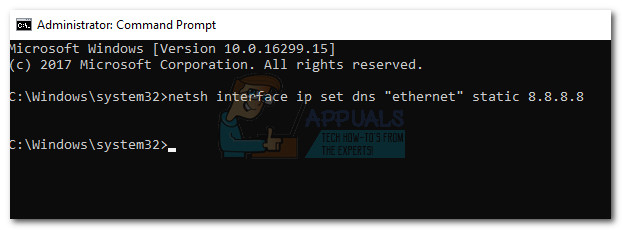 Note: Replace ethernet with your adapter name, if it’s different than in our scenario.
 - Reboot and see if the error is solved.
Method 9: Changing the Wireless Mode
If you’re experiencing the issue on a wireless connection, it might have something to do with the Wireless Mode. Some users have managed to remedy the issue by changing the wireless mode from 802.11b+g+n to 802.11g.
From what we gathered, Windows 10 does’t really like the 802.11b+g+n wireless mode and will often act up when working with a wireless network connection of that type. This is known to happen mostly on Dell laptops running Windows 10.
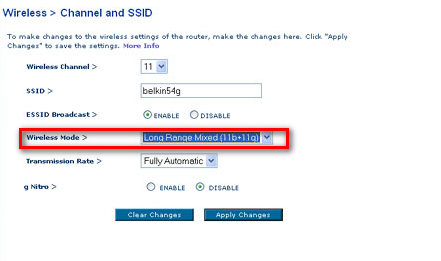
If you can access your router settings, look for an entry named Wireless Mode. If you have it set to 802.11b+g+n, set it to 802.11g or anything else.
Method 10: Resetting the router/modem to factory state
If nothing has been successful, you might want to turn your attention towards the router. Start light by unplugging/turning off your router in order to force it to reconfigure the network settings.
If that doesn’t yield results, use the Reset button on the back. All routers/modems have a reset button – it’s usually located on the back and requires something sharp to push since it’s out of reach.
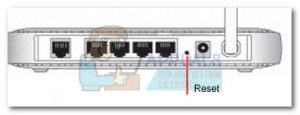
Note: Depending on the model, resetting your router to factory settings might also reset the router’s password. To protect against any unexpected developments, search online for the specific reset procedure related to your modem/router model.
If you have another router/modem laying around, you can also try setting the other one up and see it produces the same “Windows Sockets registry entries required” error. If it doesn’t, you’ll need to do a firmware reset on the faulty router/modem. Keep in mind the exact procedure varies from manufacturer to manufacturer.