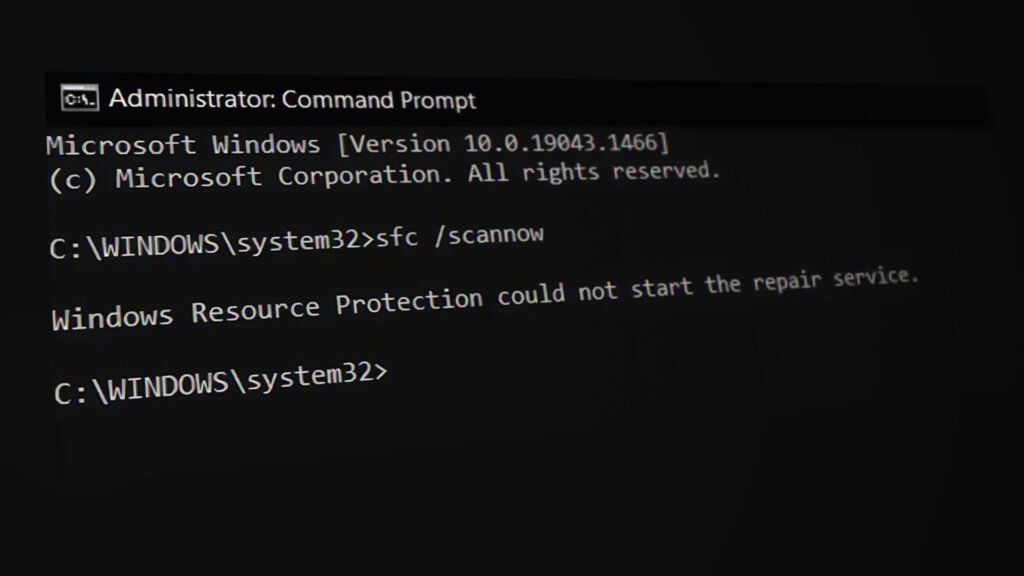
Fix: Windows Resource Protection Could not Start the Repair Service
This error is quite an annoying one because it usually appears when you are trying to run certain services which are used to fix your computer such as the SFC (System File Scanner) and it prevents you from fixing other errors on your PC.
That is why you should give it extray attention and try to solve it using any of the methods displayed below. The problem is no stranger to any version of the Windows operating system and the methods below can be applied to all of them.
Solution 1: Start the Windows Installer Service (sometimes called TrustedInstaller)
The Windows Modules Installer or TrustedInstaller service enables installation, modification, and removal of Windows components. If this service is disabled, install of Windows updates or system repair tools might fail for this PC. This service has full access to Windows Resource Protection files and registry keys and it needs to run in order for the Repair Service to run.
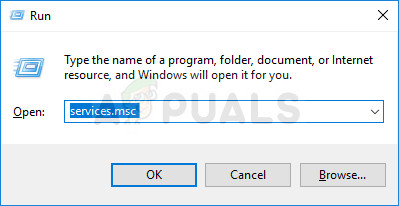
- Open the Run dialog box by using the Windows Key + R key combination. Type “services.msc” without the quotation marks in the Run dialog box and click OK.
- Locate the Windows Installer Service or the TrustedInstaller service, right-click on them and select Properties.
- Make sure that the option under Startup type in Windows Store Services’ Properties is set to Automatic.
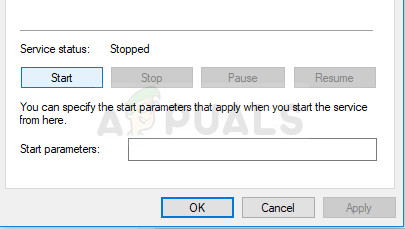
- If the service is stopped (you can check that just next to the Service status message), you can start it immediately by clicking on the Start button.
You may receive the following error message when you click on Start:
“Windows could not start the Windows Installed Service on Local Computer. Error 1079: The account specified for this service differs from the account specified for other services running in the same process.”
If this occurs, follow the instructions below to fix it.
- Follow the steps 1-3 from the instructions above in order to open Windows Installer Service properties.
- Navigate to the Log On tab and click on the Browse… button.
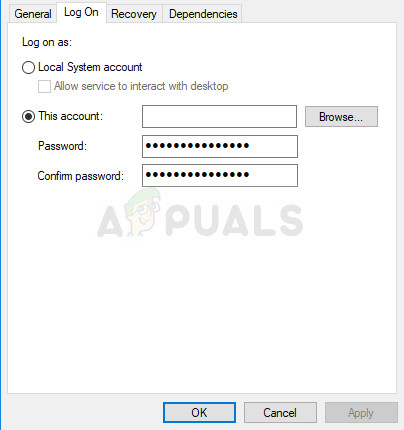
- Under the “Enter the object name to select” box, type in your computer’s name and click on Check Names and wait for the name to become authenticated.
- Click OK when you are done and type in the administrator password in the Password box when you are prompted with it.
Note: Another useful thing you can perform with the Windows Installer Service is to reregister it and check to see if that solved the problem. This will also take a minute and it can actually solve the problem.
- Click the Start menu and type in the following command in it before pressing Enter in order to run it:
%windir%\system32\msiexec /unregserver
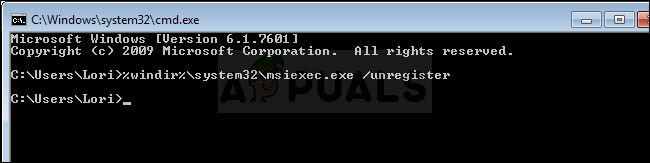
- Now you only need to repeat the same process only this time with the command below:
%windir%\system32\msiexec /regserver
- Make sure you provide any administrator permissions if prompted to do so. Check to see if the problem still appears.
Solution 2: Update Your Windows PC
Some users have reported that the problem was almost impossible to solve by any method they found on the Internet but simply installing the latest update helped them solve the problem. Keeping your PC up to date is very important and various bugs which appear on certain brands of computers are fixed with the latest ones.
Windows 10 updates itself automatically from time to time and the automatic update option is enabled by default. You can also check for updates by navigating to Settings >> Update & Security >> Update >> Check for updates. However, if you noticed that Windows is not updating regularly, follow the set of instructions below in order to fix this.
- Hold the Windows Key and press X in order to open this special context menu. You can also right-click on the Start menu. Choose Windows Powershell (Admin).
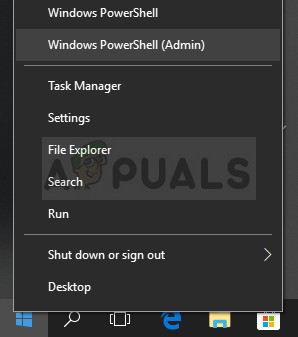
- In the Powershell console, type cmd and wait for Powershell to switch to the cmd-like environment.
- In the “cmd” console, type in the following command and make sure you click Enter afterwards:
wuauclt.exe /updatenow
- Let this command run for at least an hour and check back to see if any updates were found and/or installed successfully.
Solution 3: For Build 14279
The SFC tool is broken in this version of the Windows 10 operating system and users claimed that it didn’t work until a new version was released. However, if you are still stuck with this build of Windows and if you want to have access to SFC, you can use the workaround below in order to get it working.
Preparation: You will need to take ownership of the folders below so make sure you repeat this process for the two folders you are going to take ownership of. The first one is located here:
%SystemRoot%\winsxs ; and its name is amd64_microsoft-windows-servicingstack_31bf3856ad364e35_10.0.14279.1000_none_25a158fc7f85c69d
- Open File Explorer, and then locate the TrustedInstaller.exe file in the following location:
C:\WINDOWS\servicing\TrustedInstaller.exe
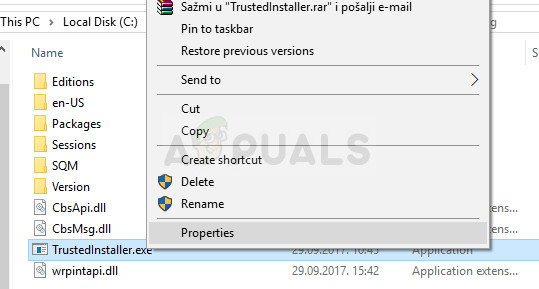
- Right-click the file, click Properties, and then click the Security tab. Click the Advanced button. The “Advanced Security Settings” window will appear. Here you need to change the Owner of the key.
- Click the Change link next to the “Owner:” label The Select User or Group window will appear.
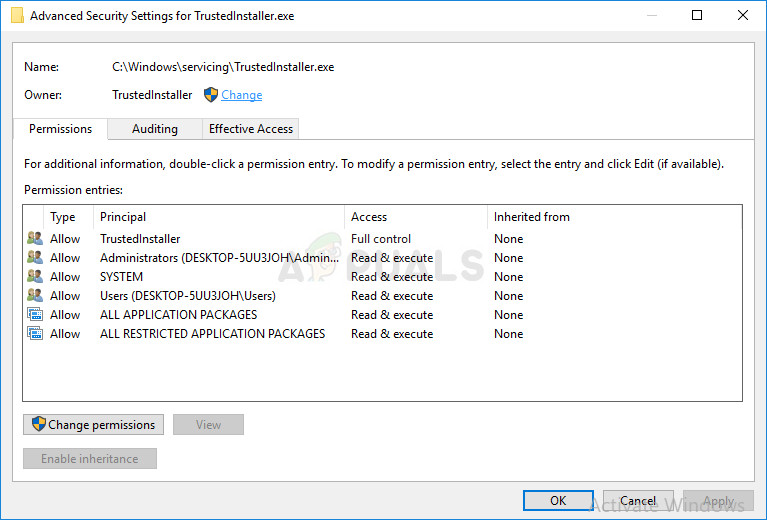
- Select the user account via the Advanced button or just type your user account in the area which says ‘Enter the object name to select’ and click OK. Add the Administrator account.
- Optionally, to change the owner of all subfolders and files inside the folder, select the check box “Replace owner on subcontainers and objects” in the “Advanced Security Settings” window. Click OK to change the ownership.
Make sure you repeat the same process for the folder located in %SystemRoot%\winsxs\ with the name of amd64_microsoft-windows-servicingstack-onecore_31bf3856ad364e35_10.0.14279.1000_none_5a92ee0dd788e433
- Navigate to the following folder. Make sure you have admin permissions and that you have enabled hidden files and folders. Click on the “View” tab on File Explorer’s menu and click on the “Hidden items” checkbox in the Show/hide section. File Explorer will show the hidden files and will remember this option until you change it again.
%SystemRoot%\winsxs\amd64_microsoft-windows-servicingstack_31bf3856ad364e35_10.0.14279.1000_none_25a158fc7f85c69d
- Check to see if you are able to find a file called wrpint.dll. If the file is not there, you will need to locate it elsewhere and paste it. Navigate to this folder and locate the wrpint.dll file. Right-click on it and choose copy.
%SystemRoot%\winsxs\amd64_microsoft-windows-servicingstack-onecore_31bf3856ad364e35_10.0.14279.1000_none_5a92ee0dd788e433
- Paste the wrpint.dll file in the first folder where the file was missing and check to see whether SFC will start working.
Solution 4: Add a Missing Registry Key
There is a problem with certain versions of the Windows operating system where you are missing a registry key related to the ID of the TrustedInstaller service. Fixing this problem is somewhat advanced and you should follow the instructions below in order to fix it.
Before proceeding with this solution, it’s recommended that you close all of your running programs and it’s advisable to create a backup of your registry just in case something goes terribly wrong while you edit it. Backup your registry by following the instructions in our article.
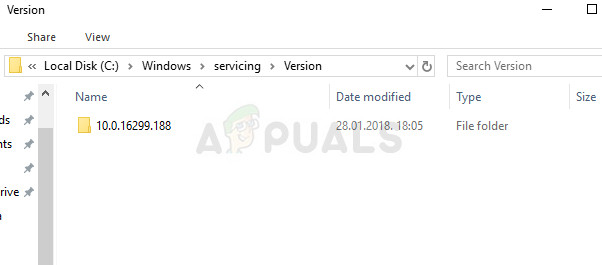
- Navigate to the folder below and check the name of a subfolder which should look something like 6.1.7600.16385. That is the TrustedInstaller ID so make sure you copy the name of this folder and paste it somewhere.
C:\Windows\Servicing\Version
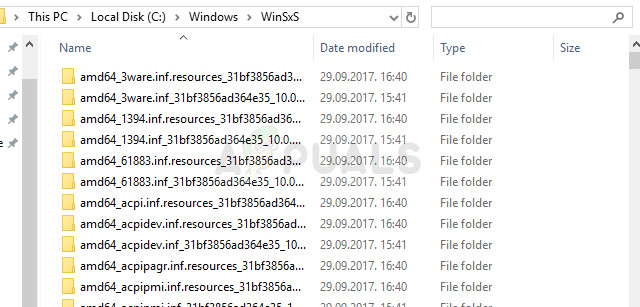
- Navigate to the C >> Windows >> WinSxS folder and find the folder whose name start with the following:
x86_microsoft-windows-servicingstack_31bf3856ad364e35_{TrustedInstaller ID} (32bit Windows)
amd64_microsoft-windows-servicingstack_31bf3856ad364e35_{TrustedInstaller ID} (64bit Windows)
- Copy the names of these folders and also keep them somewhere in a text file.
Before you proceed, you will need to take ownership of a certain registry key which can be performed quite easily if you follow the instructions below carefully.
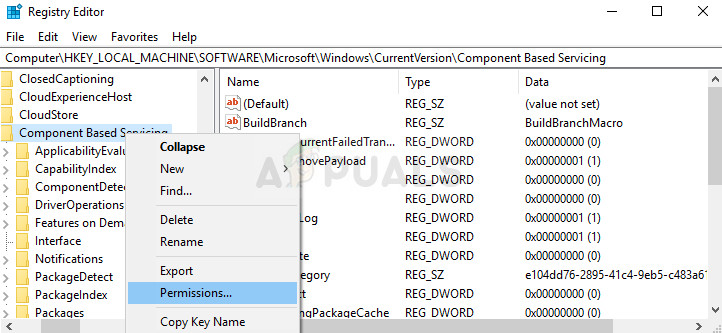
- Navigate to the following registry key, right-click on Component Based Servicing in the tree at the left side of the screen and click on Permissions.
HKLM\Software\Microsoft\Windows\CurrentVersion\Component Based Servicing
- After this window opens, click on Advanced and navigate to the Owner tab. Click on the Administrators entry under the Change owner to section and Apply the changes.
- After that, exit this window and the Advanced settings window as well and click on Administators under the Group or user names section in the Permissions window.
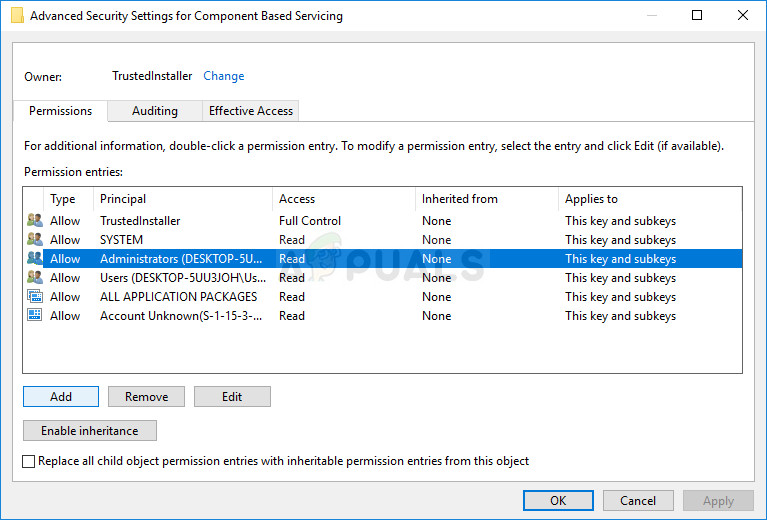
- Under the Permissions for Administrators section, click on Full Control and Apply the changes yet again.
Now it’s the time for the final part of the solution which really shouldn’t take a long time.
- Navigate to the following registry key, right-click anywhere at the right-side of the window and choose New >> Key. Name it Version.
HKLM\Software\Microsoft\Windows\CurrentVersion\Component Based Servicing
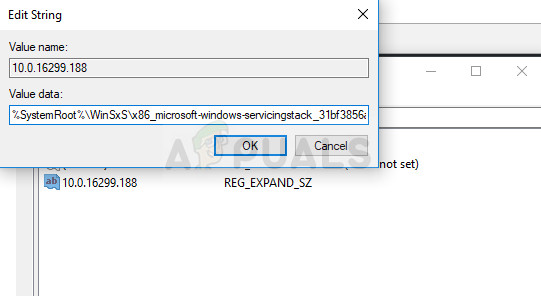
- In this Version key, you should create an Expendable String Value and set the TrustedInstalled ID at its name. Copy it from the place where you have kept it. Right-click on this Expendable String Value and choose the Modify option.
- The value should be the full path to the folder from the WinSxS. For example:
%SystemRoot%\WinSxS\x86_microsoft-windows-servicingstack_31bf3856ad364e35_{TrustedInstaller ID} (32bit Windows)
- Check to see if the problem is solved.
Solution 5: Running an Offline SFC Scan
This solution has only helped several people but it has helped them and the method is highly advised my Microsoft engineers and it’s quite easy to run it even if you are having issues with the SFC scan while running it normally.
- Search for “Command Prompt”, right-click on it, and select the “Run as administrator” option. Copy and paste the following command and make sure you click Enter afterwards:
sfc /SCANNOW /OFFBOOTDIR=c:\ /OFFWINDIR=c:\windows
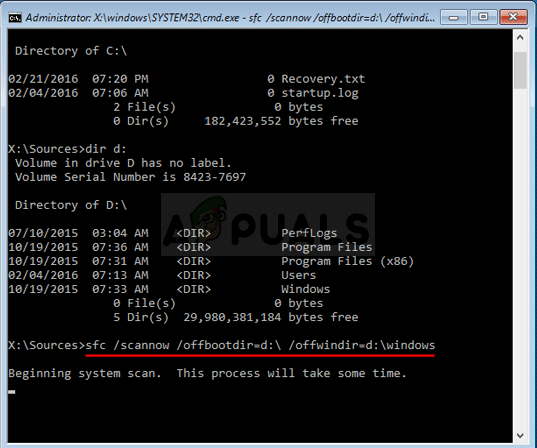
- If a message appears saying that the scan was successful, you have solved your problem. If the same error appears, please try other methods in this article.
Solution 6: Rename a File
Renaming this file is helpful in many cases but it’s important that you install all pending updates on your computer before you do so because the file contains many information about the current state of your computer and the updates which are pending. Renaming it might cause these updates to not install properly.
- Navigate to C >> Windows >> WinSxS and locate a file named pending.xml. Right-click on it and choose rename.
- Rename it to pending.old.xml and check to see if the problem is solved. If it’s not, make sure you revert the changes to the file.


