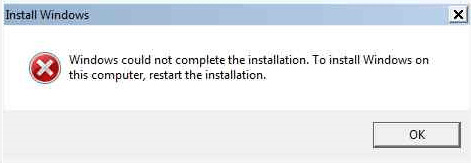
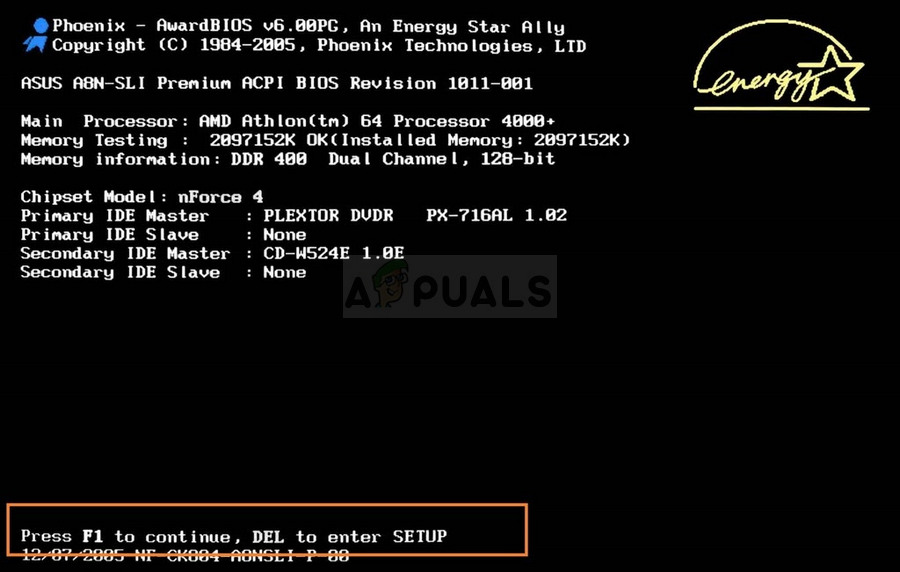
Fix: Windows Could Not Complete the Installation
Sometimes the installation of a new version of your current operating system or even an upgrade to a whole new one can’t go without various errors being thrown your way. One of these errors is definitely the Windows Could Not Complete the Installation error message.
It often occurs on Windows 10 PCs while users are trying to install updates manually but it also occurs when upgrading your computer from a previous version of Windows to Windows 10. There are several methods which can be used to solve this and they are presented in this article with extra attention to the most successful ones.
Solution 1: Working Around the Error
This issue is sometimes just caused by a bug and it can be avoided as simply as running the installer file without receiving the error message directly. This method is applicable to users who are using an external DVD or USB in order to install a new update or to upgrade their PC.
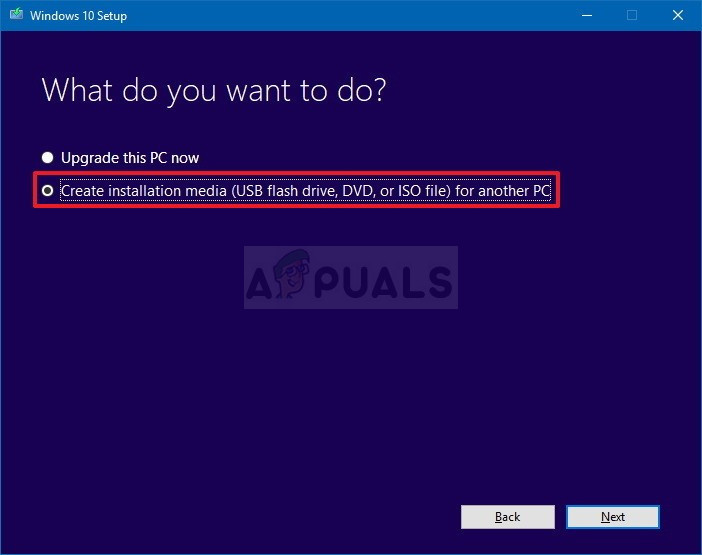
First of all, we will need to create a bootable USB or DVD with Windows 10 on it in order to recover your computer and install the latest updates and upgrades as well.
You can use the Media Creation Tool to create a USB bootable drive in no time that will boot on a device using UEFI.
- Download the Media Creation Tool from Microsoft’s official website. Double-click on the file called MediaCreationTool.exe which you just downloaded file in order to launch the tool. Tap Accept.
- Select the Create installation media (USB flash drive, DVD, or ISO file) for another PC option from the first screen which is displayed from the tool.
- The language, architecture, and edition of the bootable drive will be selected based on your computer configuration, but you can clear the Use the recommended options for this PC setting in order to select the appropriate settings if the computer you want to use the USB for is of different settings.
- Click Next and click on the USB flash drive option when prompted to choose between USB or DVD.

- Click Next and choose the removable drive from the list which displays the storage devices connected to your computer.
- Click Next and the Media Creation Tool will proceed to download the files needed to install Windows 10, and it’ll continue to create the bootable media, which should work on most devices which use legacy BIOS as well as on the newer ones using UEFI.
After you are done creating a bootable USB, you can proceed with booting your computer with it. The reason we chose a bootable USB over DVD is because the process is sort of easier and you won’t have to go through the hassle of purchasing a double layer DVD.
- Once you receive the error message on your PC while the external storage device is still connected to your computer, use the Shift + F10 key combination in order to bring up a Command Prompt window.
- After that, you can insert the DVD or the USB you used to create a portable Windows 10 storage media and wait for your computer to recognize it.
- Type D: [ENTER] in order to navigate to the D: partition of the hard drive and type “setup [ENTER] in order to run the update installer. Depending on your computer, the letter D: may be another letter which should correspond to your portable USB.
Solution 2: Advanced Startup Workaround
This method sounds a bit weird but it appears it tricks Windows into installing its components regularly. If you are struggling in order to install the latest update, you can always use this method and check to see if it works. Also, you have nothing to lose if it doesn’t work as you won’t be changing anything regarding your computer.
- Turn your computer off and on for about three times until you are prompted with a choice to open the Advanced Recovery options. From the Choose an option screen, click on Troubleshoot and choose the Reset your PC option.

- Choose the Keep my files option but click on Cancel at the next prompt and keep choosing Cancel until you find yourself at the Choose an option screen again, where you should now choose Continue.
- Check to see if you are still having issues with the same installation
Solution 3: For Windows 10 Version 1709 AMD Users
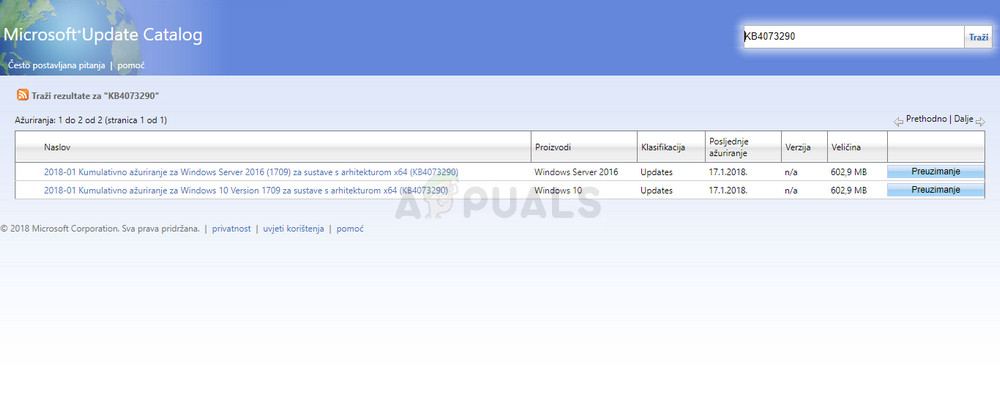
This was posted as an official response by Microsoft for AMD users with the above version of Windows 10 as these users were stuck either with this error when trying to install or with an infinite loop of trying to install updates. Plenty of users claim that simply installing the update provided by Microsoft for these specific cases was more than enough to solve the problem.
- What we are going to do is to install several updates from the Windows Update Catalog. This download bring several fixes to your computer and it’s quite easy to install them. Here is the KB number you will need to search for: KB4073290.
- Open the Microsoft Update Catalog and perform a search by clicking on the search button at the top right corner.
- Click on the Download button to the left and choose the architecture of your PC (32bit or 64bit). Make sure you know the architecture of your PC’s processor before choosing this option.
- Run the file you downloaded and follow the instructions on screen carefully in order to complete the updating process. Do the same for both files needed to be installed.
- After the update has finished, make sure you restart your computer and try to run the same installation which caused an error for you in the first place. Check to see if the same error occurs.
Solution 4: Update BIOS
BIOS is definitely a sensitive thing and you don’t want to have anything with it until you are forced to do some major troubleshooting which might include BIOS as well. Sometimes the error emerges on PCs whose BIOS is way out of date and Microsoft has suggested that everyone should update their BIOS firmware to the latest version before installing updates.
Updating BIOS can help you deal with certain issues regarding Windows Setup and users have reported that updating BIOS enabled them to follow through without seeing this particular error message.
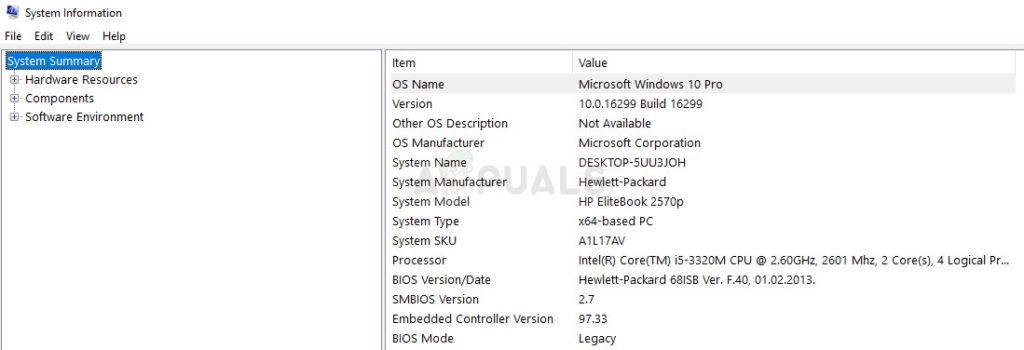
- Find out the current version of BIOS you have installed on your computer by typing msinfo in the Search bar in the Start menu.
- Locate the BIOS version just under your Processor model and copy or rewrite anything to a text file or a piece of paper.
- Find out whether your computer was bundled, pre-built or assembled manually by purchasing all components individually. This is important because you don’t want to use BIOS made for one component of your PC when it won’t apply to your other devices and you will overwrite BIOS with a wrong one, leading to major errors and system problems.
- Prepare your computer for the update. If you are updating your laptop, make sure its battery is fully charged and plug it in just in case. If you are updating a computer, it’s advisable to use an Uninterruptible Power Supply (UPS) to make sure your computer doesn’t turn off during the update because of a power outage.
- Follow the instructions we prepared for various desktop and laptop manufacturers such as Lenovo, Gateway, HP, Dell, and MSI.
Solution 5: Change Additional BIOS Settings
Even if your BIOS firmware is up to date, you may notice that the error is still unsolved. There are several reasons for this, but one of them is definitely the fact that there is a certain settings in BIOS which works great for older versions of Windows 7 but it’ bad for Windows 10 and it can often cause this error to occur. Follow the steps below in order to fix this.
- Turn off your computer by going to the Start Menu >> Power Button >> Shut down.
- Turn your PC on again and enter BIOS by pressing the BIOS key while the system starts. The BIOS key is typically displayed on the boot screen, saying “Press ___ to enter Setup.” Common BIOS keys are F1, F2, Del, Esc and F10. Note that you will have to be quick about it as the message disappears pretty fast.
- The SATA option which you will need to change is located under different tabs on BIOS firmware tools made by different manufacturers and these is no unique way to find it. It’s usually located under Onboard devices, Integrated Peripherals, or even simply under the Advanced tab. No matter what, the name of the option is SATA operation.
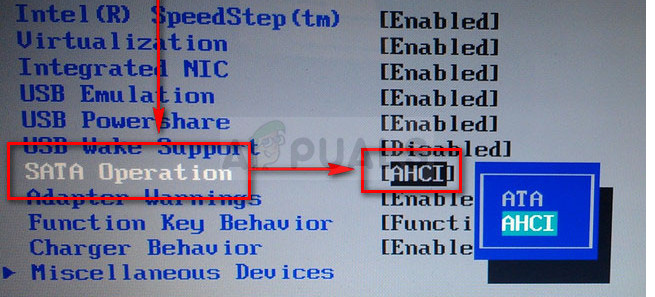
- Once you locate the option, change it from AHCI or RAID to ATA. ATA is the most reasonable option for the process of installing new updates or upgrading. Navigate to the Exit section and choose to Exit Saving Changes. This will proceed with the boot. Make sure you try to run the update again.
- Don’t forget to change the settings back to their original state after you have finished with the process.
Solution 6: Command Prompt and MMC Tweaks
The following solution was suggested by Microsoft officials who posted it in a forum which deals with these types of issues and users were thrilled to hear about it and it solved the problem for most of them. Check to see if this works for you as well.
- Once you receive the error message on your PC while the external storage device is still connected to your computer, use the Shift + F10 key combination in order to bring up a Command Prompt window.
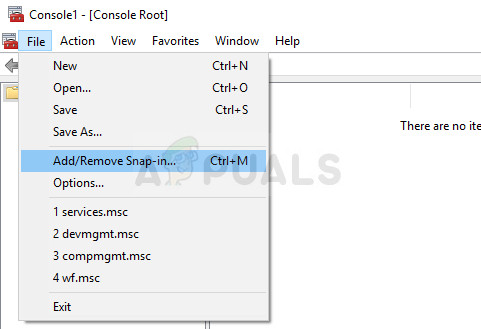
- Type in MMC in the Command Prompt window and click on File >> Add/Remove Snap-in… You can also use the CTRL + M key combination.
- Double click the Computer Management option and choose the Local computer option before clicking Finish.
- Click OK and double click the Computer Management (Local) option which should appear in the MMC window and navigate to System Tools >> Local Users and Groups >> Users.
- Double click on Administrator and uncheck the Account is disabled entry before clicking OK.
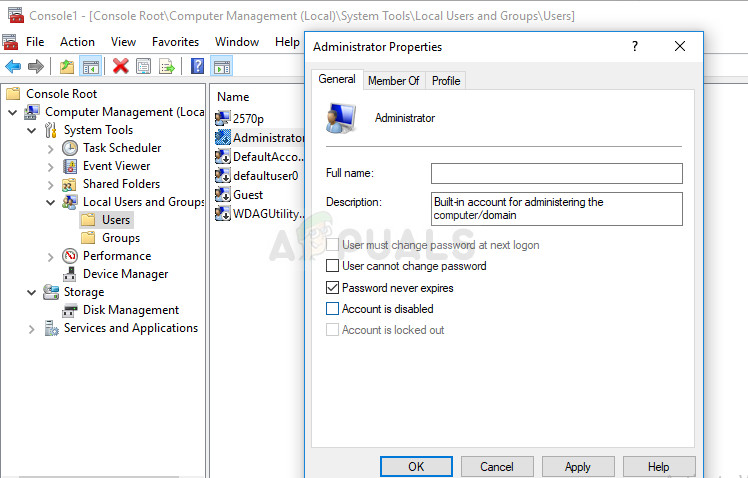
- Now right click on Administrator and click on Set Password. Choose a password you want to use and restart your computer. The problem should be solved now.
If the problem still isn’t solved, you can skip over to the second part of the solution which yet again relies on using command prompt to navigate from the install screen to the Command Prompt window.
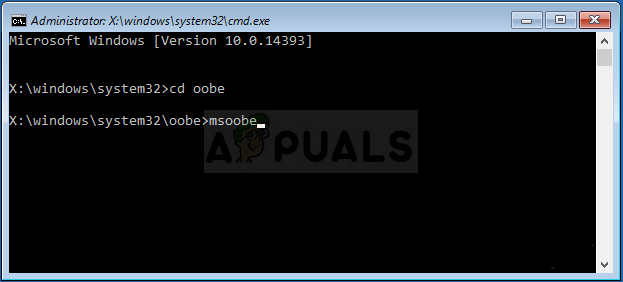
- Once you receive the error message on your PC while the external storage device is still connected to your computer, use the Shift + F10 key combination in order to bring up a Command Prompt window.
- Type in the following commands and make sure you click Enter after each one:
CD C:\windows\system32\oobe
msoobe
- Make a generic account and password before clicking finish (if it requests a product key and you have one, enter it now. If you are running a process which doesn’t require a key, you can just finish). Set the time and date settings properly and click on Finish. Restart your computer in order to check if the problem is solved.


