FIX: Windows Cannot Connect to the Printer
Sometimes doing a simple thing such as adding a network shared printer can become a hell of a task when Windows cannot connect to the printer error is returned. The issue is usually seen with windows 7 based 64 bit systems, however it is not limited to it and many, around 30% of users running 32-bit have also reported this. The most common reason for this to occur is if the print spooler service is stucked, has a document pending in the que locked, a corruption or update and improper installation of the print-driver, more specifically the incorrect installation pushes the printer and the system to look for files in a subfolder different then windows\system32 subfolder. The printer may still work on the source system where it is physically connected to.
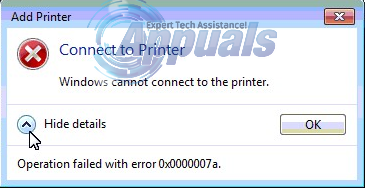
The error may have a different message then the one in the picture of which the most common is “Windows cannot connect to the printer 0x0000007e”
Solution 1: Create A New Local Port
Click Start and search for “Devices and Printers“.

Open Devices and Printers and then Click the Add a printer on top of the window. Make sure you have Administration rights for this step on the computer.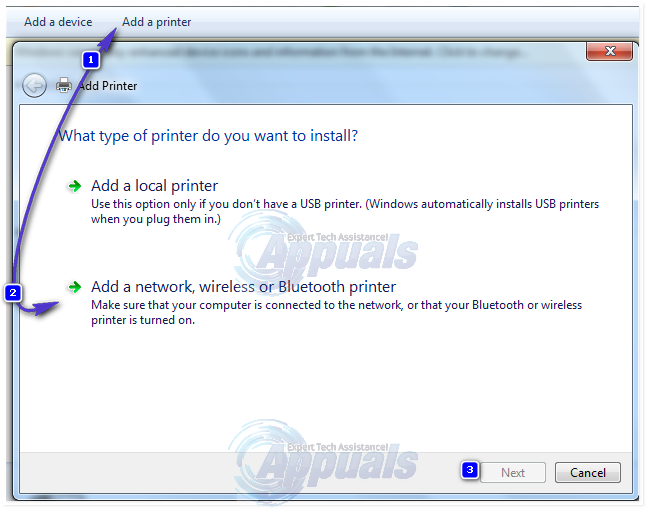
Select “Add a local printer” by clicking on it. Select “Create a new port” and make sure there is “Local Port” selected for “Type of port:”
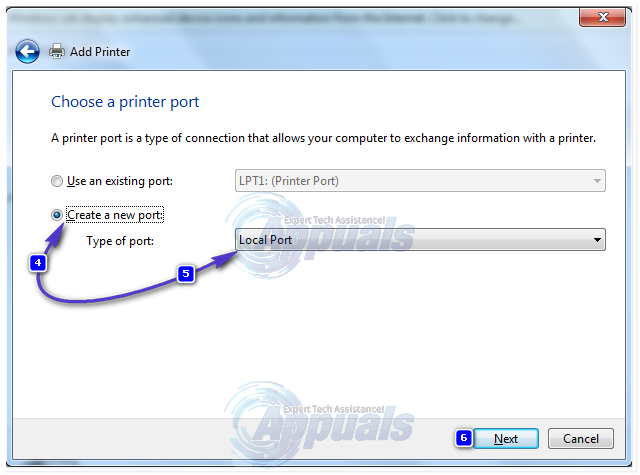
You will be asked for a port name in a new window. Type the printer’s address in the following format:
\\IP address or the Computer Name\Printer’s Name
For example, the printer’s name is HP LaserJet P2050 Series PCL 6, and IP address of the computer it’s attached with 192.168.1.130 so the port name will be
\\192.168.1.130\HP LaserJet P2050 Series PCL 6
Now click OK and Next.
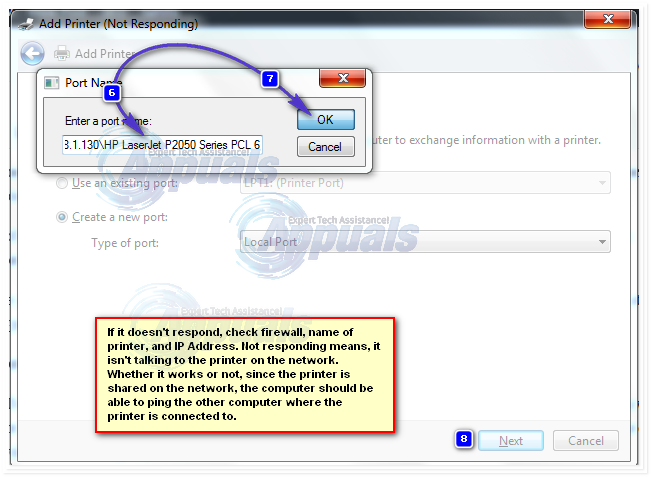
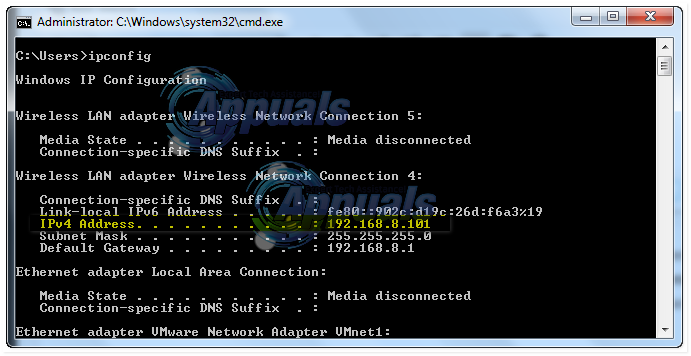
If you don’t know the IP Address of the computer where the printer is physically connected to and shared from, Hold Windows Key and Press R. Now type cmd in the run dialog and press enter. Type ipconfig in the black window and press enter. Look for IPv4 Address for the computer’s IP in the black window. Scroll up if you have to.
Select your printer model from the directory to install its drivers. Click Next. If you have a disk, insert the disk, click “Have Disk” and browse to the driver’s location in the disk. Click OK. Type in a name for your new printer. Click Next. Print a test page to check its connection. And click Finish. If it still won’t work, then run the hotfix from here before proceeding to Solution 2 and giving Solution 1 a try after applying the hotfix.
Solution 2: Copy mscms.dll manually
This mscms.dll is a color module which maybe failing to reach its destination folder. To copy it manually, press Windows Key + R. In the run dialog, type: Type system32 and press enter to open System32 folder.
Now type mscms.dll in the search bar. Copy the file exactly matching the name mscms.dll. (CTRL + C) to copy / (CTRL + V) to paste.
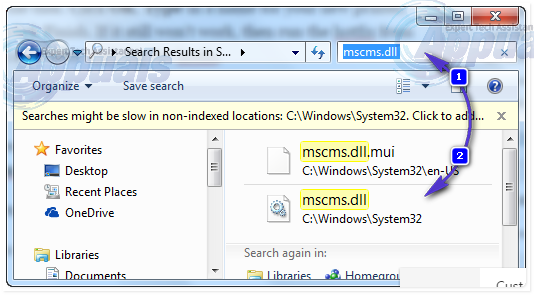
Now, if you have a 32 bit Windows installed, navigate to the following folder and paste the previously copied mscms.dll file in it:
C:\windows\system32\spool\drivers\w32x86\3\
And, If you have a 64 bit Windows installed, navigate to the following folder and paste the previously copied file in it:
C:\windows\system32\spool\drivers\x64\3\
Now try connecting to the printer. If it doesn’t connect, re-add the printer and test.
Solution 3: If this is an HP Printer
On the source maching where the printer is shared from, open Registry Editor and browse to the following registry path.
HKEY_LOCAL_MACHINE\SYSTEM\CurrentControlSet\Control\Print\Printers\PRINTERNAME\CopyFiles\BIDI
Locate the entry for
spool\DRIVERS\W32X86\3\hpcpn6de.dll
and delete it. Then, re-try connecting.
Solution 4: Remove Unnecessary Printer Drivers
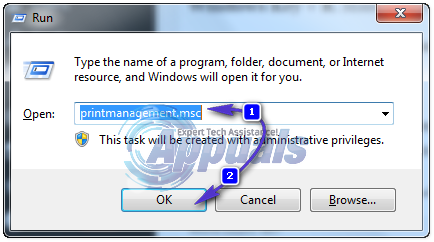
An installation of previous printer can prevent the printer spooler from adding new printers. To remove them, press Windows Key + R. Make sure you have Administration rights for this step on the computer. In the run window type printmanagement.msc and press enter.
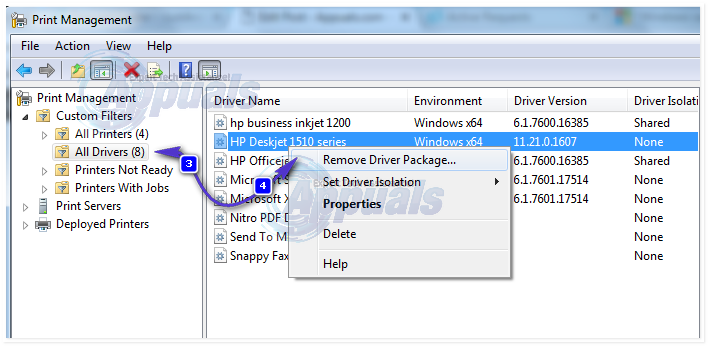
Double click on “All Drivers”. Now delete any printer’s driver that is unnecessary or questionable. To delete, right click on the driver and click on delete in the pop up menu.
After removing the drivers for the printer in question, re-add it normally, and if it still doesn’t work then re-add it using Solution 1. If it still won’t work, move to Solution 3.
Solution 5: Delete Pre-existing Driver Files From Registry
An already existing but corrupted driver file can be stopping the windows from connecting to the printer.
Press Windows Key + R. Type regedit and press enter. Make sure you have Administration rights for this step on the computer. Registry editor’s new window will appear. In the left pane, navigate to the following location by double clicking on the folders:
HKEY_LOCAL_MACHINE\SYSTEM\ControlSet001\Control\Print\Printers\*YOUR PRINTER’S NAME*\CopyFiles
Delete the “ICM” folder which is under the “CopyFiles” folder.
Now try connecting to the printer.
Solution 6: Run Microsoft’s Automated Printer Troubleshooter
Download the file from this link. Open the file with troubleshooting wizard.
Let the troubleshooter detect and fix the issues. Test it by clicking the Add new printer button. After the troubleshooting has finished, try re-adding the printer normally and if it still won’t work, then use Solution 1 again.
Solution 7: Resetting Printer Spooler
Follow the guide here to reset print spooler.