Fix: Windows 7 SP1 failed to install error 0x800f0826
This error usually prevents the successful installation of Windows 7 Service Pack (SP) 1. The system usually downloads and installs the Service Pack SP1 but reverts back to the previous version of the Windows because of this error. The error will be shown whether you install the Service Pack SP1 from the Windows Updates or from the Standalone Installer.
This error occurs because of tools like Driver Sweeper utility from Phyxion or DriverCleanerDotNet tool. Driver Sweeper Utility (or any other tool of that category) are used to remove the drivers from your Windows. These tools might also cause system file corruption which prevents your Windows to install Windows 7 SP1.
There are multiple ways to solve this problem. You can either reinstall the drivers using the same tools or you can perform a Windows Upgrade or you can simply use Windows Media to replace the drivers. Detailed steps for all these solutions are given below.
Quick Tips
- Make sure you have plenty of space in your HDD. You will see the error if the amount of space left in the HDD is less than the required space.
- Make sure there isn’t any antivirus on your system. Antiviruses are known to interfere with the Windows Updates. You don’t have to delete the antivirus, you can simply disable it for the time being. Once you are done with the update, you can enable the antivirus.
Method 1: Windows System Update Readiness tool
This tool is provided by Microsoft to check and solve any problems that you might have with your system files and system registries. It will give an error report at the end of the scan which will tell you about the problems it found and how many of those problems it solved.
Go here and download the Windows System Update Readiness tool if you have a 32-bit Windows
Go here and download the Windows System Update Readiness tool if you have a 64-bit Windows
Note: You can check whether your system is 32-bit or 64-bit by holding the Window Key and Pause button from the keyboard. A new window will appear where your system type will be mentioned under the System Type section.
Once you download the Windows System Update Readiness tool, run the downloaded file. Click Yes when it asks if you want to install the Software Update. It will take some time to install. The Windows System Update Readiness tool automatically scans and fixes any issues it might find during the installation so don’t have to do a manual scan. Once the installation is finished, close the window.
Now try to reinstall the Service Pack that was giving the error and check if the problem persists.
Sometimes the Windows Update Readiness tool might not be able to download and correct all the errors. The good thing is that you can manually download the corrupted files or packages to fix the errors. Follow the steps given below if you are comfortable in fixing the issues manually
The Microsoft’s Update Readiness Tool makes a log where you can find all the information about which package or file is corrupted or causing the issue
- Hold Windows key and press R
- Type %SYSTEMROOT%\Logs and press Enter
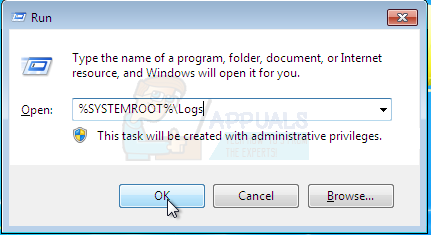
- This will open a folder in front of you. Locate and double click the folder named CBS
- Now open the log by double clicking it
- Scroll through it until u see something saying
Unavailable repair files:
servicing\packages\Package_for_KB958690_sc_0~31bf3856ad364e35~amd64~~6.0.1.6.mum
- You can see from the line that the Package name that wasn’t fixed is KB958690. You can manually download this package.
- Go here and enter the package name in the search bar located at the top right corner then click search.
- You will be able to see the package available in different versions. Click on the Download button for the version suitable for your Windows

- A new window will open. Click on the link given there.
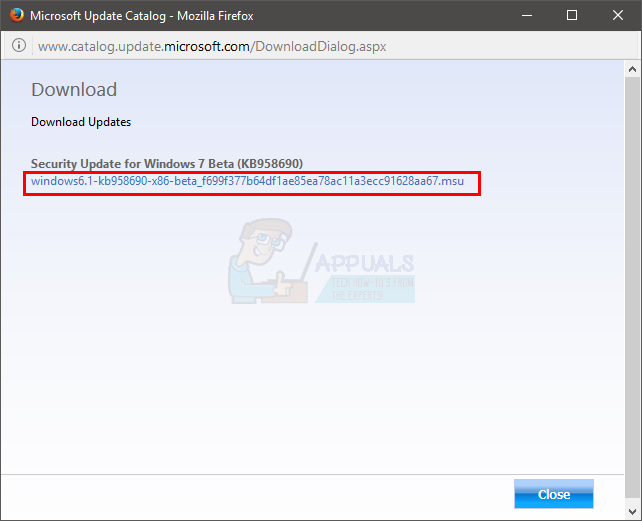
- Click ok if it asks to confirm the download
- Once the file is downloaded, go to the location where you downloaded the package
- Right click the downloaded file and click Copy
- Hold Windows key and press R
- Type %SYSTEMROOT%\Logs\CBS and press Enter

- Right click in the window and select New then click Folder
- Name this folder packages
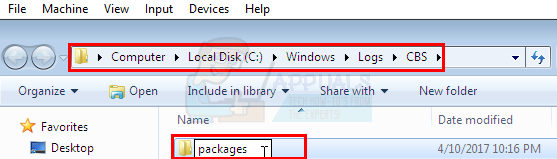
- Now double click packages
- Right click and select Paste
Now you have manually downloaded the missing or corrupted file/package. Repeat the above process to download all the not-fixed files found in the CheckSUR.log. Once you are done, rerun the Windows Update Readiness Tool and then check if the Windows Update problem is solved or not.
Method 2: Recover the Deleted Drivers
Since the problem is mainly caused because of the Driver Cleaning tool that you used in the past, using the same tool to recover those drivers solves the problem. Usually, these driver cleaning tools will have a backup copy that you can use to restore your drivers.
So go to the official site of the driver cleaning tool that you used and look for the information regarding restoring the deleted drivers. You can use their site, search their forums or contact them to get this information.
Once you restore the drivers, try to install the Service Pack again and the problem should be solved.
If, for some reason, you can’t recover the deleted drivers, you can always download the fresh copy of those drivers from their official site.
Method 3: DISM
DISM stands for Deployment Image Servicing and Management and can be used to fix any errors in System files and registries. Basically this tool will either use online files to repair the corrupted files or can use a mounted image of the Windows to repair the corrupted files. This tool comes pre-loaded in the Windows so you don’t have to worry about downloading it.
- Click Start button on your Desktop
- Type cmd in the Start Search box
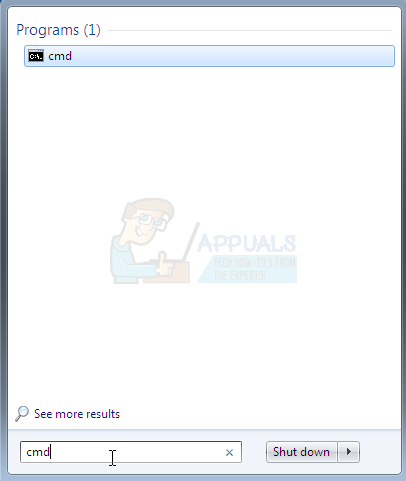
- Once the cmd appears in the results press CTRL, SHIFT and ENTER simultaneously (CTRL + SHIFT + ENTER)
- Type dism.exe /Online /Cleanup-image /Restorehealth and press Enter. This command will try to use Windows update to restore corrupted files. But if your update client is already broken then this won’t work. Try the next step
- Insert your Windows Installation Media USB or CD/DVD
- Type dism.exe /Online /Cleanup-Image /RestoreHealth /Source:C:\sources\install.wim /LimitAccess and press Enter. Replace “C:” with the drive letter of your mounted image.
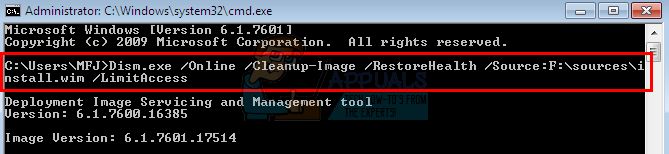
- Wait for it to complete as it might take 15-20 minutes
- Once it is done. Type sfc /scannow and press Enter. Wait for it to complete as well.
Now check whether or not the Update is working.
Method 3: Using Windows Installation Media (Check this because I couldn’t check it on my ISOs)
If you have access to Windows Installation media then you can use that to replace the files that are causing this issue.
- Make sure all the applications are closed
- Insert the Windows Installation media in your computer
- Locate the files given below in your Windows ISO folder
(x86 versions)
x86_atiilhag.inf.resources_31bf3856ad364e35_6.1.7600.16385_en-us_4c2c9aec5f3d44b5
x86_atiilhag.inf_31bf3856ad364e35_6.1.7600.16385_none_a574bbd4a69c292d
(amd64 versions)
amd64_atiilhag.inf_31bf3856ad364e35_6.1.7600.16385_none_019357585ef99a63
amd64_atiilhag.inf.resources_31bf3856ad364e35_6.1.7600.16385_en-us_a84b3670179ab5eb
- Right click on the files and select Copy
- Hold Windows key and press R
- Type %SYSTEMROOT%\winsxs and press Enter
- Right click (on empty place in the window) and select Paste
- Click yes if it asks to overwrite the files that are already present in that folder
Once you are finished, try to update the Windows again and it should be working now.
Method 4: In-Place Upgrade
Performing an In-Place Upgrade of your windows will also solve the problem. Follow the steps given below to perform an In-Place Upgrade
- Make sure all the applications are closed
- Insert the Windows Installation Media or DVD/CD
- A Setup Window should appear. Select Install Now. If the Setup Windows didn’t open, then perform the following steps
- Hold Windows Key and press E
- Open the drive of your Windows Installation Media
- Double click the Setup.exe
- Now click Install Now
- Click Go online to obtain the latest updates for installation (recommended)
- Type the Windows Product key if it asks
- Select your Operating System (Windows 7) in the Windows page
- Select Yes to Accept the license and terms
- Click Upgrade when it asks for Which type of installation do you want?
Wait for the installation to complete. Once it is finished, restart your computer.