Fix: Video Stuttering on Windows
For some Windows 10 users, updating from the previous operating system version introduced a new problem for them; they started having video problems. In this issue, some of the videos were not playing using any application and the videos inside any browser were experiencing stuttering or random delays.
In the modern world, everything is digitized and not being to see videos causes a lot of problems for anyone. This problem might be caused due to several reasons. Either the graphics card is an incorrect configuration or there is a problem with the flash player. Follow the solutions given below starting from the first one.
Solution 1: Updating your Display Drivers
We will start your computer in Safe Mode and delete the currently installed drivers of your display card. Upon the restart, the default display drivers would automatically be installed upon the detection of your display hardware.
- Follow the instructions on our article on how to boot your computer in safe mode.
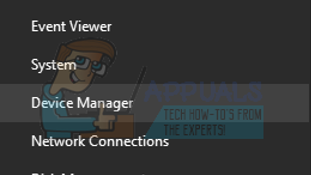
- Once booted in the safe mode, right click on Windows key and select Device Manager from the list of options available.
Another way to launch the device manager is by pressing Windows + R to launch the Run application and typing “devmgmt.msc”.
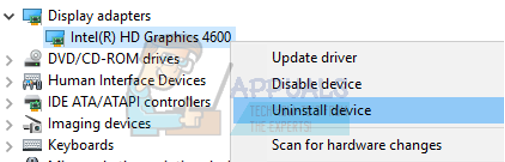
- Once in the device manager, expand the Display adapters section and right click on your display hardware. Select the option of Uninstall device. Windows will pop a dialogue box to confirm your actions, press Ok and proceed.
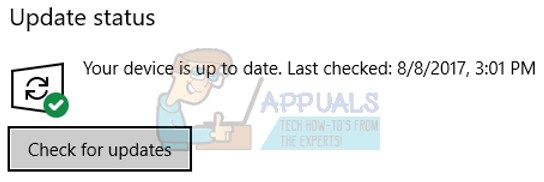
- Restart your PC. Press Windows + S button to launch your start menu’s search bar. In the dialogue box type “Windows update”. Click the first search result which comes forward.

- Once in the update settings, click on the button which says “Check for updates”. Now Windows will automatically check for updates available and install them. It may even prompt you for a restart.
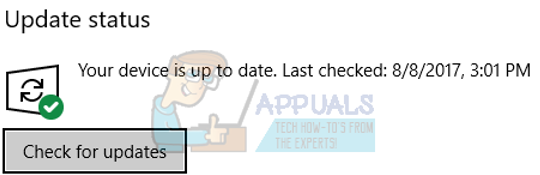
- After updating, check if your issue got fixed.
Windows Update always tries its best to deliver the latest drivers available for your hardware. But it also doesn’t mean that they are the latest ones available. Alternatively to the Windows Update, you can also head over to your graphics card’s manufacturer website and download the latest drivers manually.
If the latest drivers also don’t solve the problem in question, you can try downloading and installing an older driver for your hardware. Manufacturers have all the drivers listed according to date and you can try installing them manually. Follow the instructions below to install the drivers manually.
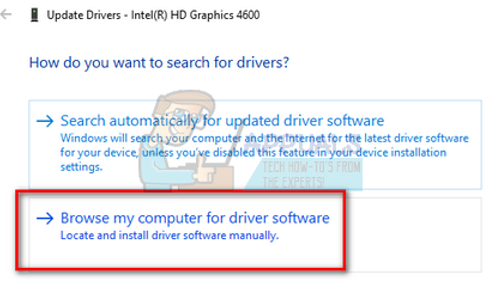
- Open your Device manager as explained above in the solution and right click on your driver and select “Update Driver”.

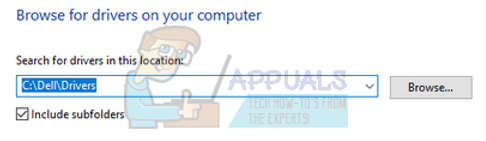
- Now a new window will pop up asking you to whether update the driver manually or automatically. Select “Browse my computer for driver software”.
- Now browse through the folders to where you downloaded the drivers. Select it and Windows will install the required drivers. Restart your computer and check if the problem got solved.
Note: You should also update your audio drivers (it is preferred that you update all of your drivers) and then check the quality of the video.
Solution 2: Checking your Power Management Settings
Every PC has a power plan available which directs it what to do. Your computer’s performance is linked to your power plan such as the clock rate etc. There are a lot of options which can be edited separately on each power plan. It is possible that due to incorrect settings of your power plan, you are not able to see videos correctly. We can try restoring all power settings to default and check if the problem at hand gets fixed.
- Right click on the battery icon present at the bottom right side of the screen and select Power Options.

You can also navigate to the power options by pressing Windows + R to launch the Run application and typing “control panel”. Once in the control panel, click on “power options” if your control panel is in icon mode or search for power options at the search bar present at the top right side of the screen. Open the first result which comes forward.
- Now one power plan will be selected from the three plans available. Click on “Change plan settings” button present in front of your current power plan.

- Now at the near bottom of the screen, you will see an option which says “Restore default settings for this plan”. Click it. Now Windows might ask for a confirmation before restoring the default settings. Click ok. Do this for all the power plans.
- Restart your PC and check if the problem at hand got fixed.
Note: Try changing your power plan and check the video output. Sometimes, many computers are set to high performance where the system gets heated. This causes bad performance as per Intel’s protocol to slow the processor down when the temperature rises to a limit. Play around with the power plans until you are completely sure that this won’t fix the issue.
Solution 3: Install the latest Windows updates
Windows roll out important updates targeting the bug fixes in the operating system. If you are holding back and not installing the Windows update, we strongly recommend that you do. Windows 10 is the latest Windows operating system and new operating systems take a lot of time to get perfect in every regard.
There are a lot of issues still pending with the OS and Microsoft rolls out frequent updates to target these issues.
- Press Windows + S button to launch your start menu’s search bar. In the dialogue box type “Windows update”. Click the first search result which comes forward.

- Once in the update settings, click on the button which says “Check for updates”. Now Windows will automatically check for updates available and install them. It may even prompt you for a restart.
- After updating, check if your issue got fixed.
Solution 4: Changing your preferences of Graphics Card
If you are having more than one graphics hardware installed in your computer (for example a NVIDIA/AMD and an Intel), this solution is for you. As you know, your system itself decides which graphics card to use on default by its own judgment. If you play a video in your browser, your computer might use the Intel graphics card whereas if you play a game, it might be using the dedicated graphics.
You can try changing the preferences by open the settings of your dedicated graphics and removing the option of “let my system decide what is best”. Choose your dedicated graphics as the default graphics card and check your videos if they still play. You can also do vice versa and check again. If this doesn’t solve the problem, feel free to revert the changes.
Other than changing the preference, you can also try disabling the Intel Graphics card and let your computer run on your dedicated graphics card and vice versa. This is more of a wild guess but we can check if it works.
- Press Windows + R to launch the Run application. Type “devmgmt.msc” in the dialogue box and press Enter. This will launch your computer’s device manager.
- Navigate to the Display adapters category and search for your Intel HD Graphics. This is for people who have two display adapters i.e. a dedicated graphics card (NVIDIA or AMD etc) and an inbuilt one. Don’t follow this solution if you have only Intel HD Graphics.
- Located Intel HD Graphics from the options, right-click it and select “Disable device”.
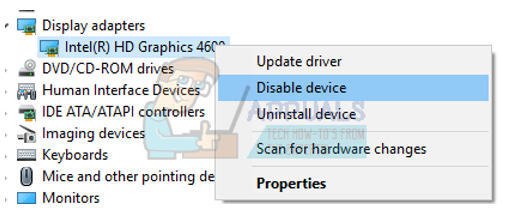
- Once you have disabled the device, restart your computer and check if it brings any improvement.
Note: You can also try doing the opposite; disabling your dedicated graphics and try running the video on your inbuilt Intel HD.
Solution 5: Changing Wallpaper Settings
There seems to be a bug in Windows 10 regarding changing of wallpapers. Whenever the wallpaper changes on your Desktop, the video you are watching skips a frame and adds to the problem. This primarily happens to users who are using the slideshow feature to change their wallpaper on a set time interval.
We can try changing the settings to either disable the slideshow completely or set the interval to a very long time. If these changes don’t bring any improvement to your situation, you can always revert the settings back.
- Press Windows + S to launch the start menu’s search bar. Type “wallpaper” in the dialogue box and click on the first result which comes forth.

- Navigate to the Background tab using the navigation pane present at the left side of the screen.

- Change the option of Background by either selecting Solid color or Picture.

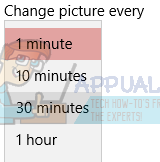
- You can also keep the slideshow option active but change the time interval for a very long time (such as 30 minutes). This will decrease the frequency of your wallpaper changing and this resolve the video problem.
- Restart your computer and check if the issue gets resolved.
Solution 6: Changing your Browser’s Settings
The video you play on your browser is powered by either hardware acceleration or by Adobe Flash. These two are known to cause problems while video streaming if they are not correctly configured on your computer or the processes.
Videos that you play on your browser don’t use the default video player on your machine. Instead, they use other tools such as a flash player or inbuilt applications to launch and stream the video. We can try disabling these features and check if this brings any improvement to your situation.
For Microsoft Edge, disabling Adobe Flash seems to do the trick. Of course, you can always switch it back on if things don’t get any better.
- Open Microsoft Edge and click on the Settings button (three dots) present at the top right side of the window.

- Once the drop-down menu has opened, click on Settings present at the near bottom of the menu.

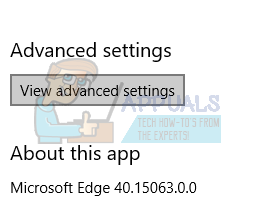
- Once you are in the Settings, scroll down until you find an option named as “View advanced settings”. Click it.
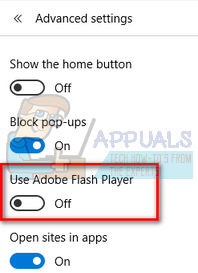
- Now uncheck the option which says “Use Adobe Flash Player”.
- Save changes and restart the browser for the changes to take effect. Now check if the video quality improved.
Google Chrome is the most popular browser nowadays. It has a lot of loyal followers because of its ease of access and usability. There is a feature known to cause problems with video streaming called “hardware acceleration”. We can try disabling it and then check if this brings an improvement to the video quality.
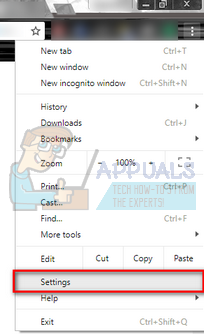
- Open Google Chrome and click on the menu icon (three vertical dots) present at the top right side of the screen.

- Once the drop-down menu has opened, click on Settings present at the near end of the menu.
- Once the Settings tab has opened, navigate to the very end and click on Advanced.

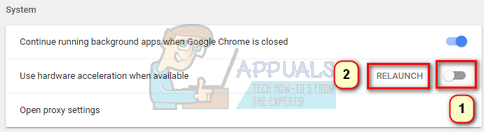
- Now navigate to the end of the tab again until you find the subheading named as “System”. Under it, uncheck the option which says “Use hardware acceleration when available”
- Once you have unchecked an option, a new option will appear right beside named as “RELAUNCH”. Click it to re-launch your browser and to implement the changes we did.
- Now check if the video quality got fixed. If it didn’t, you can always enable the hardware acceleration again.
Solution 7: Changing the number of Processors in Msconfig
Many users reported that limiting the number of processors in the boot-menu improved the video quality for them. As every computer is different, this solution might not work on all the machines but it is still worth a try. Please change the number of processors at your risk.
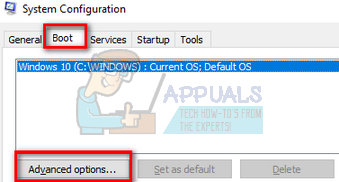
- Press Windows + R to launch the Run application. Type “msconfig” in the dialogue box and press Enter.
- Now navigate to the Boot tab and press Advanced options present at the near bottom of the screen.
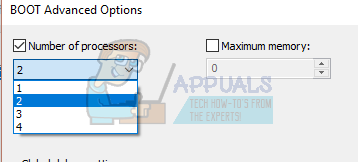
- Now limit the number of processors and restart your computer. Check if the problem gets resolved. You can also play around with the option and check the video quality on different options.
If this solution doesn’t work, you can always change setting back to default.
Solution 8: Changing your Sony Video Settings
If you have a Sony machine, you might have noticed that you have a feature named as “X-Reality”. It is an image processing technology which tries to refine the image quality. Many Sony users reported that changing the setting improved their video quality a lot.
- Open your VAIO Control Center and navigate to the tab of “Image Quality” using the navigation pane present at the left side of the screen.
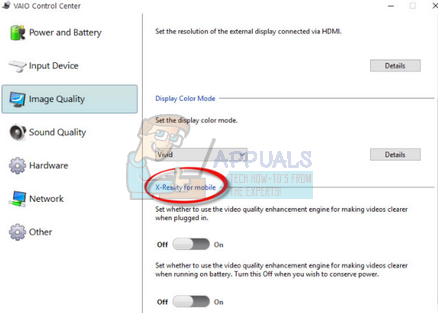
- At the right side of the screen, search for the subheading “X-Reality for mobile”. Disable all the options and restart your computer.
- Try running any video and check the problem gets solved.
Solution 9: Scanning for Hardware Changes
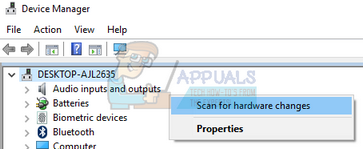
You should scan for hardware changes through the device manager. Many users reported that the drivers have a changed name and after scanning, they were able to install the drivers and thus, improving the video quality.
- Press Windows + R to launch the Run application and type “devmgmt.msc” in the dialogue box and press Enter. This will launch your computer’s device manager.
- Once in the device manager, right click on any empty space and select “Scan for hardware changes”.
Solution 10: Increasing your Virtual RAM
Many users reported that the problem was in their virtual RAM allocation. Virtual RAM is used in many aspects and services and it is very necessary for ensuring a smooth process. You can try increasing your virtual RAM to somewhere above 1908 and check if the video quality gets any better.
Solution 11: Updating WideVine Component (Chrome Users Only)
In some cases, an outdated WideVine component might be the reason due to which the error is being triggered. Therefore, in this step, we will be manually triggering an update for the component. For that:
- Open Chrome and launch a new tab.
- Press “Ctrl” + “Shift” + “Del” simultaneously to delete the browsers cache/cookies.
- Click on the “Clear Data” button to remove the cache.
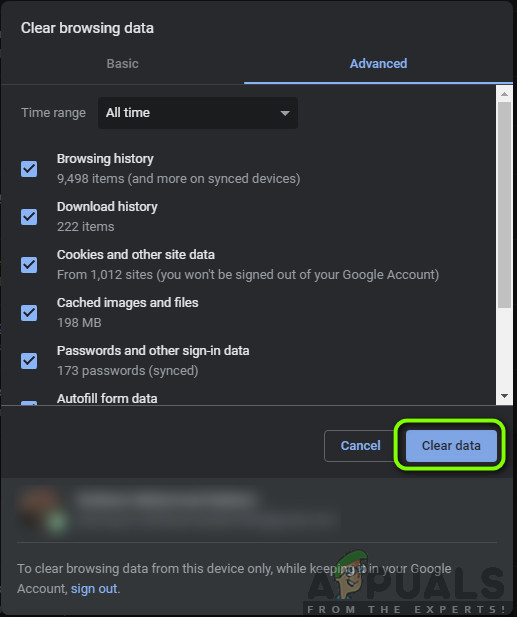
Clearing Browsing Data – Chrome - Close Chrome completely.
- Press “Windows” + “R” simultaneously to open the Run prompt.
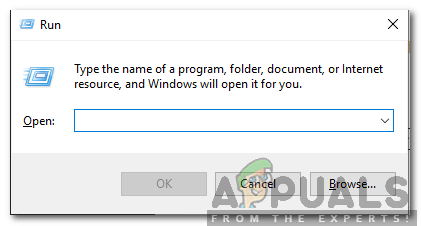
Opening Run Prompt - Type in the following address and press “Enter”
C:/Program Files (x86)/Google/Chrome/Application
- Double click on the “Numbered Folder” inside the location.
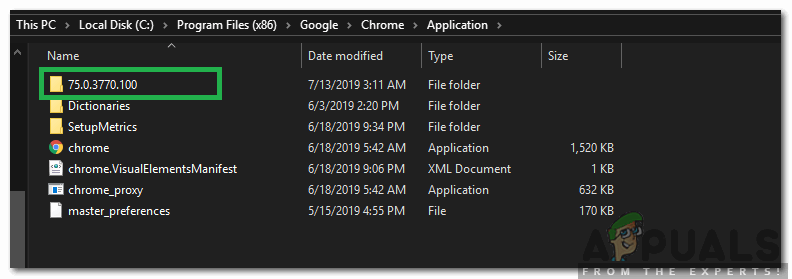
Opening Numbered Folder Note: The folder will indicate the version of the application.
- Delete the “WideVineCDM” Folder located inside the directory.
- Navigate back to the desktop and press “Windows” + “R” buttons again.
Opening Run Prompt - Type in the following address and press “Enter”.
C:\Users\(Your Username)\AppData\Local\Google\Chrome\User Data
- Delete the “WideVineCdm” folder inside this location as well.
- Open Chrome and launch a new tab.
- Type in the following address in the address bar and press “Enter”.
chrome://components
- Click on the “Check for Updates” button below the “Wide Vine Content Decryption Module” heading.
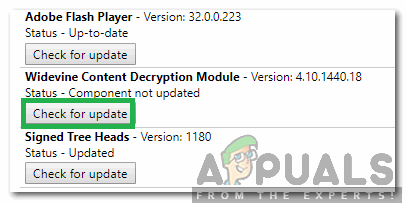
Clicking on the Check for Update Option - Wait for the process to be completed and completely close Google Chrome.
- Navigate back to the desktop and press “Windows” + “R” buttons.
- Type in the following address and press “Enter“.
C:\Users\(Your Username)\AppData\Local\Google\Chrome\User Data
- Open the “WideVineCdm” folder and rename the folder inside to “4.10.1196.0“.
- Start Chrome and check to see if the issue persists.