Fix: USB Device Not Recognized on Windows 10
Windows 10 is the latest release by Microsoft. It is one of the most elegant desktop operating systems out there. Microsoft had to take some steps in order to improve user experience and maintain its reputation in the market. So, they introduced a completely unique version of Windows this year, i.e., Windows 10. In fact, Microsoft has included many new features to make it stand tall.
However, problems still persist, haunting users in various ways. Many people experience difficulties with USB usage in Windows 10. A plethora of issues are associated with USB connections. Some individuals report being unable to use any external USB devices with their PCs or laptop ports. According to others, rebooting the system with an external USB device attached results in a failure, and the device goes unrecognized.
So, these kinds of issues aren’t a good deal for computer users, as it is a daily task to attach external media to the computer for the file transfer process.
Reasons Behind the Windows 10 USB Problem:
There might be some glitches with the USB drivers installed on the PC. These USB drivers may be outdated or there could be some conflicts causing this problem to occur.
Solutions to Fix the Windows USB Problem:
There are numerous solutions that can help you eliminate this issue. You can follow the methods mentioned below.
Method 1: Reinstalling/Updating USB Device Drivers
This is a pretty straightforward method to fix the USB-related problems. All you need to do is reinstall or update the USB device drivers. For this purpose, it is recommended that you boot your PC in Safe Mode. Follow the steps below.
1. Enter your PC in Safe Mode to uninstall or update USB device drivers. This is better because it prevents conflicts with other software while in Safe Mode. Here is a brief guide on how to start Windows 10 in Safe Mode. Follow the steps mentioned in this guide accordingly.
2. After entering safe mode, navigate to Device Manager by right-clicking on the Start menu icon and selecting it from the list.
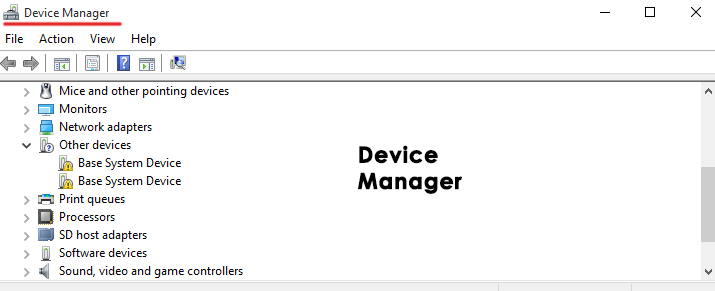
3. Inside the Device Manager, scroll down to see the USB devices attached to the system. If you cannot find a device, scroll down to the end to locate an option labeled “Universal Serial Bus controller.” Expand that option to view a list of USB devices connected to the system.

4. Now, you need to find the malfunctioning USB device from the list. In some cases, you will also see a yellow sign on a particular USB device. In that specific case, you will be required to update the drivers. To update, right-click on the USB device and select Update Driver Software. From the next window, click on Search automatically for updated driver software if you want to let Windows search for it. On the other hand, if you have USB drivers saved on your hard drive, click on the second option and browse for the drivers. After the process is finished, check for problems.
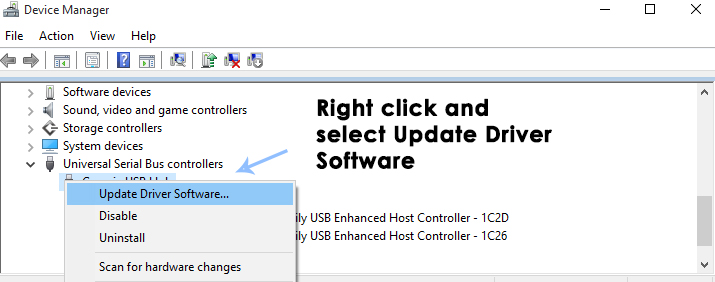
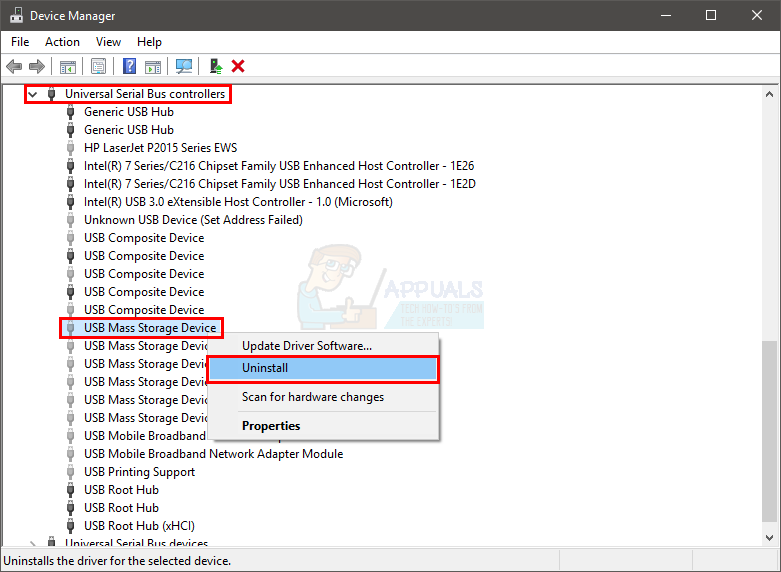
5.To uninstall the drivers, select the USB device and right-click on it to choose ‘Uninstall‘. Next, you will need to confirm by checking the box labeled ‘Delete the driver software for this device‘. Click ‘OK‘ afterwards.

6. After the uninstallation is complete, you must unplug the USB device and restart the PC. When you are back in Windows, plug the USB device in again to allow Windows to install the drivers automatically. You can also manually install the drivers if Windows is unable to do so automatically.
Method 2: Fixing the “USB Device Not Recognized” Error
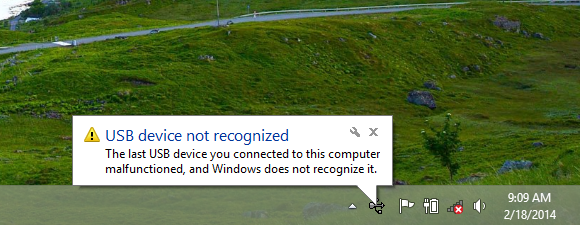
If you receive a pop-up message stating ‘USB Device Not Recognized‘ after connecting the USB to your PC, follow the steps outlined below to resolve this issue.
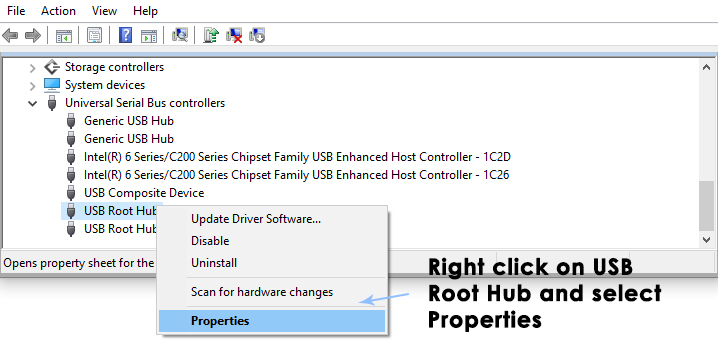
1. Open the Device Manager and scroll down to expand the Universal Serial Bus controller. From here, select the USB Root Hub, and right-click on it to select Properties.
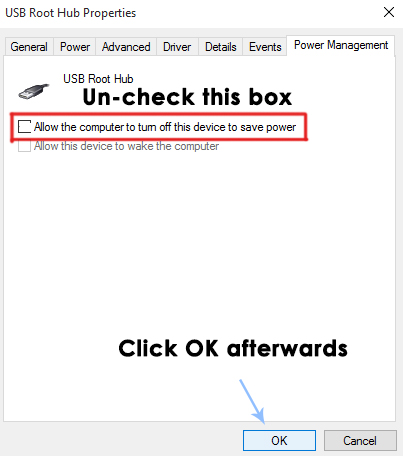
2. Inside the Properties, navigate to the Power Management tab at the top and uncheck the option ‘Allow the computer to turn off this device to save power.’ Then, click ‘OK.’ Check again to see if the problem with the USB device has been resolved or not.
Sometimes, all you have to do is tell the system to check for any hardware changes to recognize the USB. Follow these steps to do so:
- Hold the Windows key and press R.
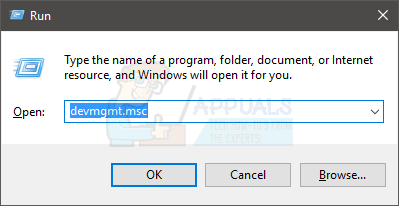
- Type “devmgmt.msc” and press Enter.
- Click the action button.
- Select ‘Scan for Hardware Changes‘.
Make sure that your USB is directly plugged into your computer. If you are using a hub or anything else, that might be causing the issue. Therefore, connect your USB directly to your computer’s port and check whether the issue persists.
Method 3: Turn Off Fast Settings.
Turning off the ‘Turn on Fast Settings’ resolves the USB not being recognized issue. You can turn off the fast settings by following the steps given below.
- Hold the Windows key and press R.
- Type “powercfg.cpl” and press “Enter.
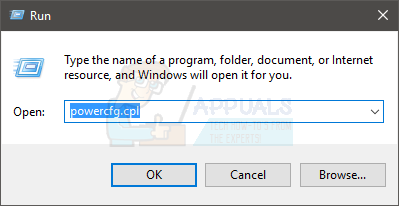
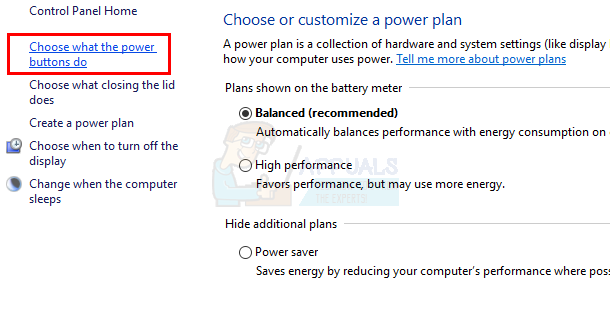
- Select “Choose What the Power Buttons Do.
- Select “Change settings that are currently unavailable.
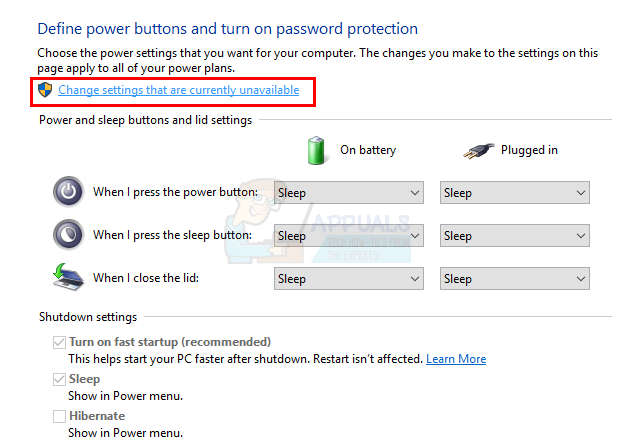
- Uncheck the option “Turn on Fast Settings (Recommended).
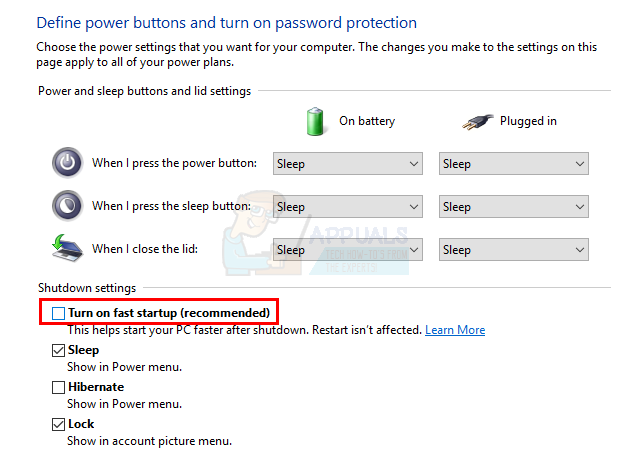
- Click “Save Changes.
- Restart your system.
Once the system has rebooted, plug in your USB and check whether the problem still exists or not.
Note: If this solution doesn’t work, please repeat the steps provided above and revert the settings back to their previous state.
Method 4: USB Select Suspend Settings
Disabling the USB Select Suspend Settings for both Battery and Plugged In has solved the problem for many users. Follow the instructions below, and then try inserting your USB to check whether the problem has been resolved or not.
- Hold the Windows key and press R.
- Type “powercfg.cpl” and press Enter.
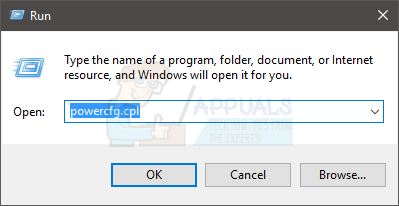
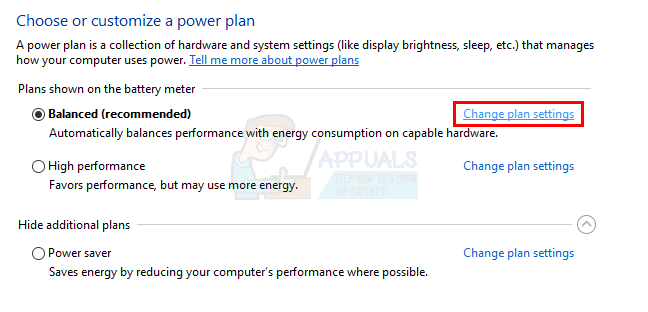
- Click “Change Plan Settings” of your selected plan.
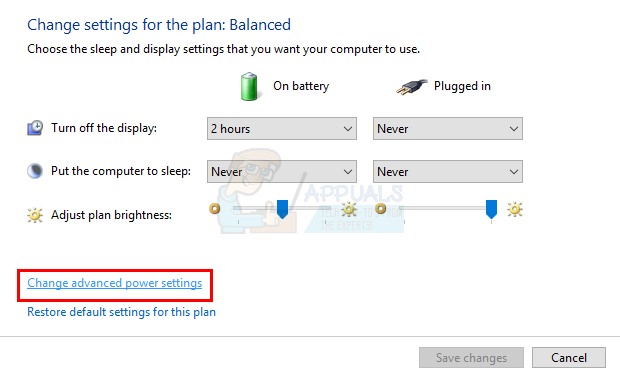
- Select ‘Change Advanced Power Settings.’
- Double-click USB settings.
- Double-click the USB selective suspend setting.
- Select “Disabled” from the drop-down menu in both the “Unplugged” and “Battery” sections.
- Select “Apply” and then click “OK.
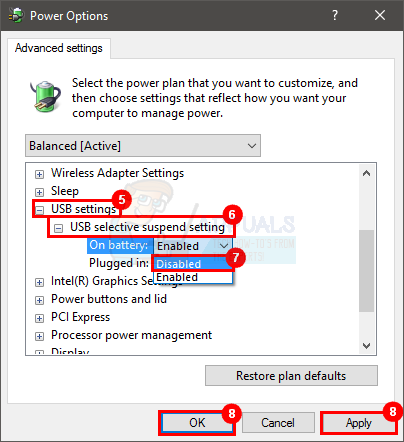
Now check if the problem persists or not.
Method 5: Uninstalling Hidden Devices.
Sometimes, older devices are still installed on the computer but do not appear in the Device Manager. This is mainly because the Device Manager only displays devices that are connected at that time. Therefore, if a device was installed previously but not uninstalled, it will remain on the computer but will not appear in the Device Manager. This can create conflicts with the current USB device, which might be causing the issue. That is why it is crucial to find these hidden devices and uninstall them.
- Press the Windows key once.
- Please type “command prompt” in the Start Search.
- Right-click the Command Prompt in the search results and select “Run as Administrator.
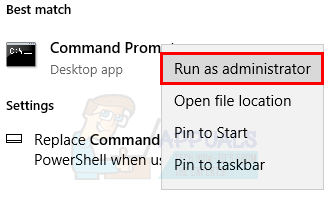
- Type “set DEVMGR_SHOW_DETAILS=1” and press Enter.
- Type “set DEVMGR_SHOW_NONPRESENT_DEVICES=1” and press Enter.
- Type “start devmgmt.msc” and press Enter.
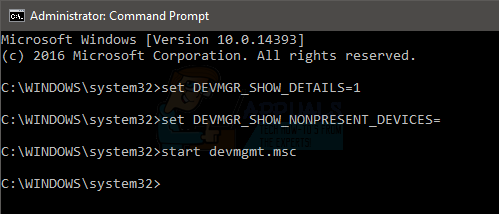
- Select “View,” then choose “Show Hidden Devices.
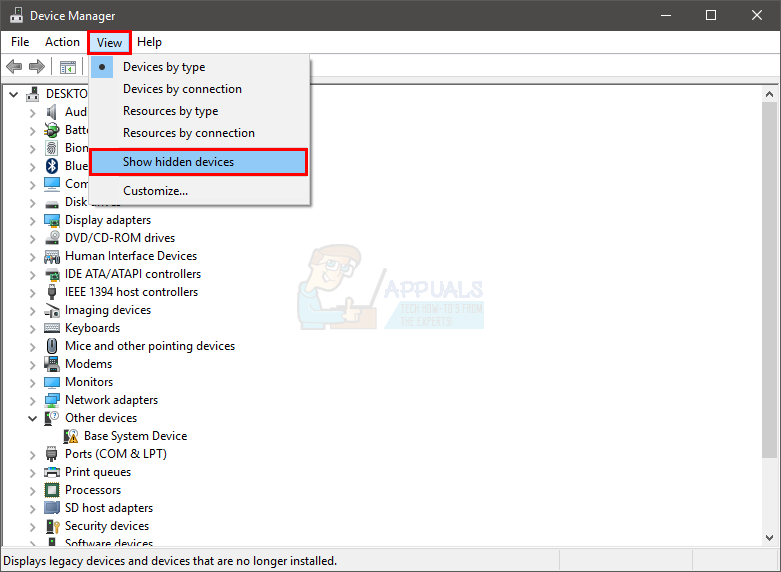
- Now, expand Imaging Devices, Universal Serial Bus Controllers, and Unknown Devices by double-clicking them.
- Make sure there aren’t any grayed-out devices under them. Right-click and select ‘Uninstall‘ for any grayed-out devices you see.
Once you are done, try connecting your device again, and you should be fine.
Method 6: Installing the Generic USB Hub Driver.
Installing the Generic USB Hub Driver may work for you, especially if you see an Unknown Device in the Device Manager.
- Hold the Windows key and press R.
- Type “devmgmt.msc” and press “Enter.
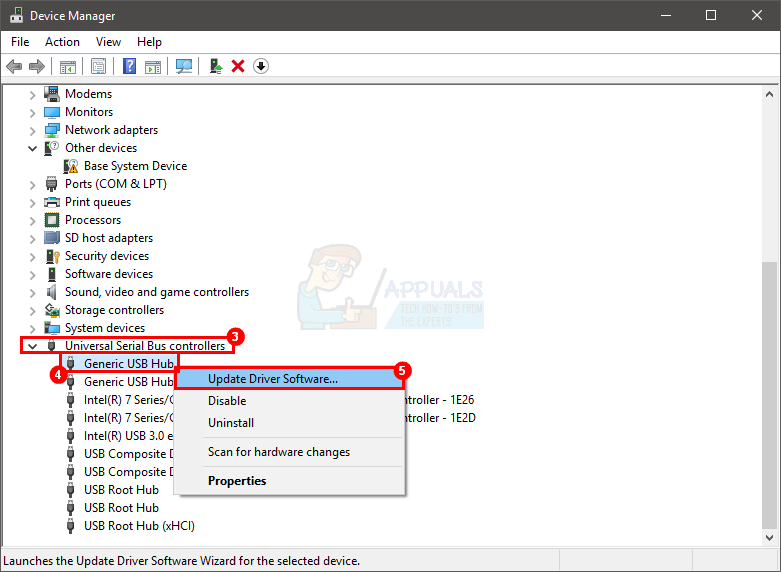
- Expand the Universal Serial Bus Controller by double-clicking it.
- You might see one or more Generic USB Hubs under the Universal Serial Bus Controller.
- Right-click the first Generic USB Hub (or the one with a yellow warning sign), and select ‘Update Driver Software…’.
- Select ‘Browse my computer for driver software.’
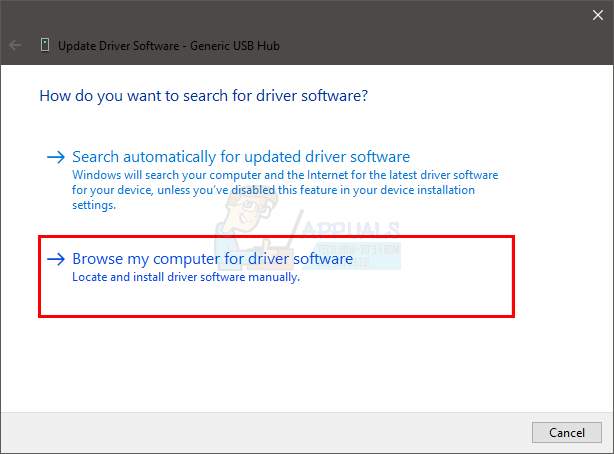
- Select ‘Let me pick from a list of device drivers on my computer‘.
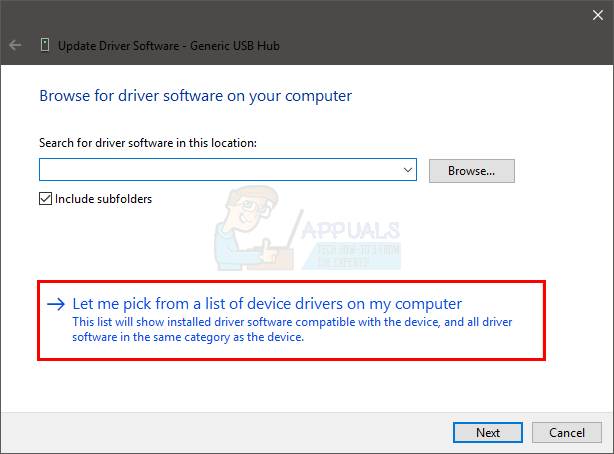
- Select ‘Generic USB Hub‘ from the list and click ‘Next‘.
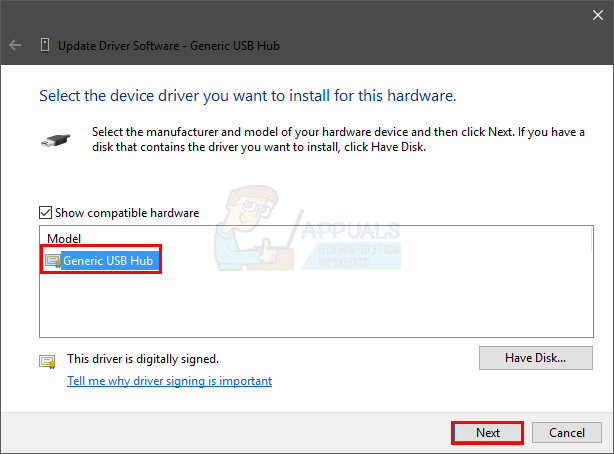
- Click “Close” when the installation is finished.
Now, check if the USB problem is resolved or not. If it isn’t, then repeat the aforementioned process for each Generic USB Hub listed under the Universal Serial Bus Controller.