Fix: The Remote Computer requires network level authentication
When trying to connect to a remote computer using Remote Desktop Protocol (RDP), you might encounter the error “The remote computer requires Network Level Authentication.” This error means that the remote computer is configured to only allow connections from devices that support Network Level Authentication (NLA).
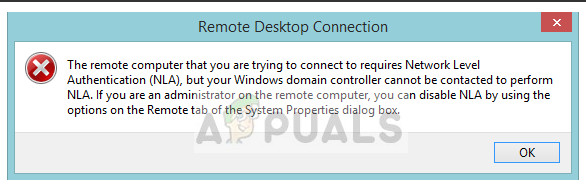
Common causes of this issue include the user’s system or network being unable to authenticate using NLA, the remote computer being unable to contact the necessary domain controller for authentication, outdated Windows versions, or misconfigurations in RDP settings.
In this article, we will discuss solutions to solve this problem.
1. Disable NLA using Properties
Turning off Network Level Authentication (NLA) in System Properties can fix connection problems by allowing remote desktop access without needing NLA. This skips the extra authentication step that might be causing issues, especially if your device or network doesn’t fully support NLA.
Note: Turning off NLA also makes the remote connection less secure, as it no longer checks the user before starting the session.
- Press Windows + R, type “sysdm.cpl” and press Enter. You will be in the system properties.
- Click on the Remote tab and uncheck “Allow connections only from computers running Remote Desktop with Network Level Authentication (recommended).”
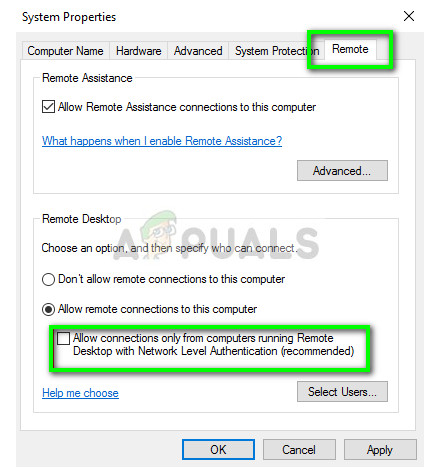
- Press Apply to save the changes and exit. Now try logging into the remote computer again to see if the problem is resolved.
2. Disable NLA Using Registry
This issue can be resolved by disabling Network Level Authentication (NLA) through the Windows registry. When you edit specific registry keys, you’re instructing the system to skip the NLA requirement, allowing you to connect remotely even when the system can’t authenticate with the domain controller. This is useful in cases where outdated RDP clients or network issues cause the authentication failure.
- Press Windows + R, type “regedit” in the dialogue box, and press Enter to open the registry editor.
- In the registry editor, click File > Connect Network Registry. Enter the details of the remote computer and try connecting.
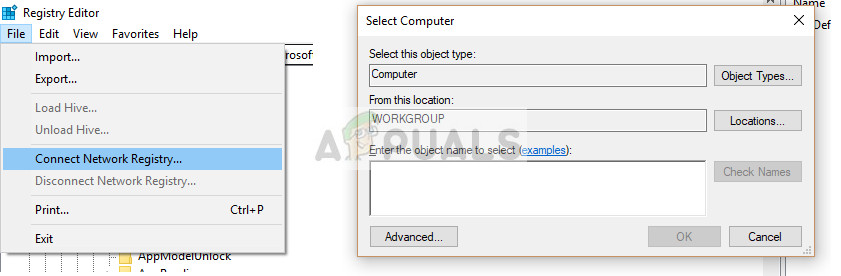
- Once connected, navigate to the following file path:
HKLM > SYSTEM > CurrentControlSet > Control > Terminal Server > WinStations > RDP-Tcp
- Change the following values to 0:
SecurityLayer

UserAuthentication
- Now restart your computer and check to see if the problem persists.
3. Disable NLA Using PowerShell
Using PowerShell to disable Network Level Authentication (NLA) offers a quick and direct way to bypass the issue. By running specific commands like SetUserAuthenticationRequired(0), you change the system’s settings for remote desktop authentication. This removes the NLA requirement, allowing any RDP client, even those that do not support NLA, to connect.
- Launch PowerShell by pressing Windows + S, type “powershell” in the dialogue box, right-click the result, and select “Run as administrator”.
- Execute the following command in PowerShell:
$TargetMachine = “Target-Machine-Name”

(Get-WmiObject -class “Win32_TSGeneralSetting” -Namespace root\cimv2\terminalservices -ComputerName $TargetMachine -Filter “TerminalName=’RDP-tcp'”).SetUserAuthenticationRequired(0)
Here, the “Target-Machine-Name” is the name of the machine you are targeting.
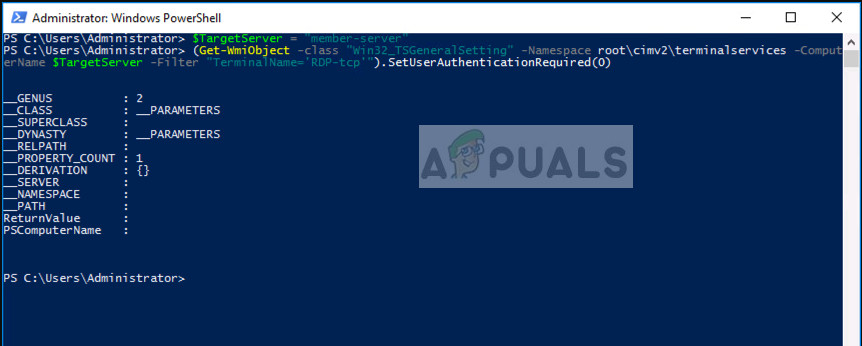
In the example above, the name of the server is “member-server”.
4. Using Group Policy Editor
Addressing the NLA issue through Group Policy Editor changes how Remote Desktop handles user authentication. By turning off the NLA requirement, you allow connections without this security check, useful when network or domain issues cause authentication failures. This adjustment bypasses the NLA barrier, enabling remote sessions without typical NLA-related errors.
- Press Windows + R, type “gpedit.msc” in the dialogue box, and press Enter.
- In the Group Policy Editor, navigate to the following path:
Computer Configuration > Administrative Templates > Windows Components > Remote Desktop Services > Remote Desktop Session Host > Security
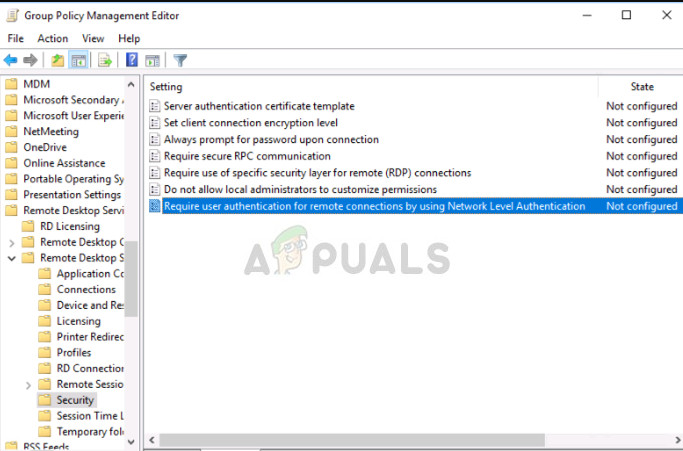
- Find ‘Require user authentication for remote connections by using Network Level Authentication’ and set it to Disabled.
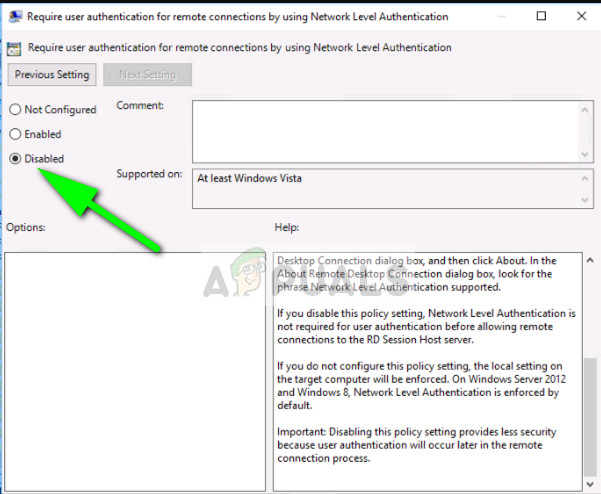
- Check if the error is resolved.
Note: If even after all these steps you are unable to connect, you can try removing the machine from your domain and then re-adding it. This will reinitialize all the configurations and get it right for you.


Hi so we had this issue also, user could not RDP into a server, since our security team doesn’t allow unchecking or disabling NLA we had to dig a bit. We found the certificate had expired so regenerated a new cert and corrected the issue