Fix: The Disk You Inserted Was Not Readable by This Computer
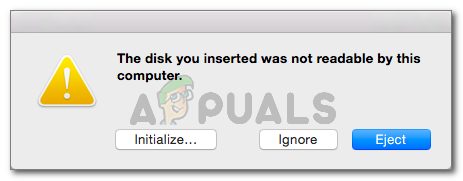
Some users are seeing the “the disk you inserted was not readable by this computer” error as soon as they connect an external drive. Some affected users report that the issue occurs with every USB device that they connect while others say that the prompt only appears with one drive. Most of the time, the issue is reported to occur with MacOS High Sierra, but there are reports of it occurring on different Mac OS X versions.
What cause the Disk to be non-readable?
We investigated this particular issue by looking at various user reports and the repair strategies that they used to get the issue resolved. We also managed to replicate the issue to a small extent on our testing machines. Based on what we gathered, there are several fairly common scenarios that will trigger this particular error message:
- Disk failure – It’s possible that either the drive itself or just its USB interface has failed. In this case, a data recovery solution is advisable.
- The disk is unformatted – This particular error can also occur if the disk you’ve just inserted is not formatted or is formatted with a file system not supported by Mac OS.
- WD software bug – The issue might occur with WD hard drives due to a race condition on the 1394 bus that causes the table of contents of the VCD to be corrupted by another bus reset.
- The disk is not formatted to a supported MAC OS X format – If you previously used the same external drive to a Windows computer, chances are it’s formatted to a file system format unsupported by the Mac computer.
Method 1: Eliminating the possibility of a faulty external drive (if applicable)
To save you from trying out a lot of potential fixes for nothing, we encourage you to start by ensuring that you’re not dealing with a faulty drive.
You can exclude the possibility of a faulty drive just by plugging in a different external hard drive into your Mac computer. It can be anything from a flash drive to another external drive, just make sure the second drive has the same file system like the one showing the error.
If you don’t get the same error with the other drive and it appears inside the Finder app normally, you can conclude that the problem is not caused by your MAC. You’re probably dealing with an issue that is specific to the external drive that is showing the error.
In the event that you’re only encountering the same error message with every external drive that you plug in, jump straight to Method 4 (if applicable). In case you only see the prompt with one particular drive, continue with the next method below.
Method 2: Repairing the unreadable drive with Disk Utility
If you see this error message as soon as you insert your USB drive / external hard drive / SD card into your Mac computer, you should be able to repair it using Disk Utility. This isn’t guaranteed to work, but some users encountering the same error message have reported that the issue was resolved after performing the steps below.
Here’s what you need to do:
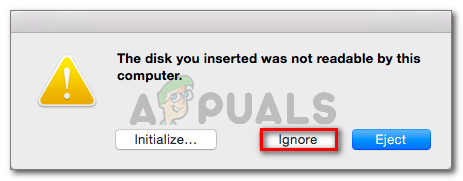
- When the initial prompt appears, click Ignore to dismiss it.
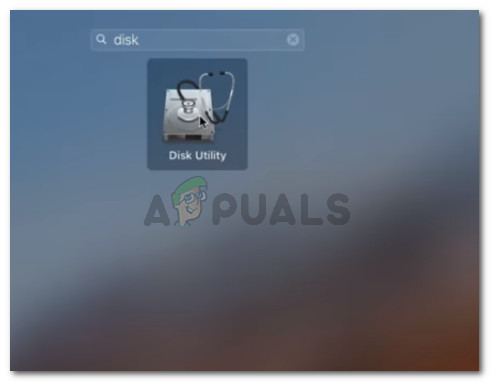
Dismissing the error prompt - Once the error has been dismissed, click on the Launchpad and search for ‘disk“, then click on Disk Utility.
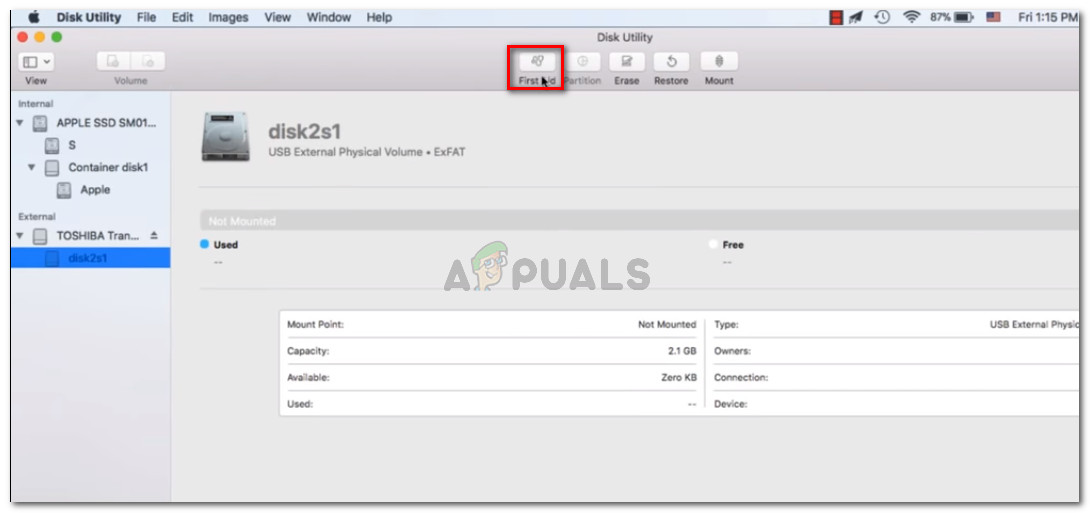
Opening Disk Utility - Inside Disk Utility, select the disk that is showing the error and click the First Aid button from the ribbon at the top.
Applying First Aid to the unreachable drive - Wait until the procedure is complete. If you get returned a message saying that the procedure was successful, restart your machine and see if the disk becomes available at the next startup.
Note: If another message pops up saying that the “First Aid process has failed”, jump directly to Method 2.
Method 3: Reformatting to Fat32
Another common reason why you might end up seeing the “the disk you inserted was not readable by this computer” error is because of the file system that is formatted in NTFS.
A lot of users have been encountering this particular error message with external drives formatted with the NTFS format because OS X will not work with NTFS. If that’s the case, you will most likely be able to resolve the issue by converting the file system format to FAT32.
This situation is fairly common if the external drive was previously used on a Windows computer.
Warning: Keep in mind that any operation of this kind (disk formatting), will end up erasing all data present on the disk.
If you are prepared to go through with it, follow the steps below to re-format the disk that is showing the “the disk you inserted was not readable by this computer” error to Fat32:
- Once the error has been dismissed, click on the Launchpad and search for ‘disk“, then click on Disk Utility.
Opening Disk Utility - Inside Disk Utility, select the drive that is showing the error message, then click on Partition from the ribbon bar. Next, select the number of partitions you want using the Partition drop-down menu (under Volume Scheme), then click on Format (under Volume Information) and click on MS-DOS (FAT).
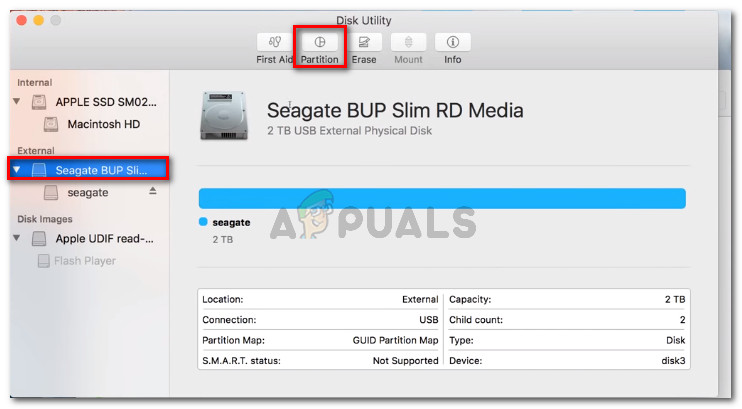
Re-formatting the external drive with Disk Utility - To confirm the process, click Apply and then click on Partition to initiate the process.
- Wait until the process is finished. Once it is, see if the external drive has become visible.
If it didn’t or it’s showing the same error message, move down to the next method below.
Method 4: Resolving the MacOS High Sierra – clover Bootloader bug (if applicable)
If you’re encountering the “the disk you inserted was not readable by this computer” error while running Hackintosh MacOS 10.13.x High Sierra coupled with the Clover Bootloader, you’re just dealing with an extremely popular bug that a lot of other users have faced.
A lot of users using the same Mac version have reported that the issue was resolved after they applied a patch capable of resolving the bug. But keep in mind that it was developed by independent developers in no way associated with Apple.
Warning: This bug will only occur if you’re using Hackintosh MacOS 10.13.x High Sierra with the Clover Bootloader. If you’re encountering this issue on a different (clean) of MacOS, do not follow the steps below as they won’t be applicable to your current situation.
- Visit this link (here) and download the patch.
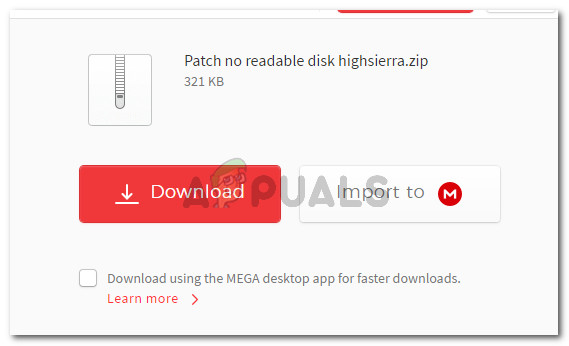
Downloading the patch - Once the patch has been downloaded, open the finder application and navigate to the following location: MacOS > System > Extensions. Once you get there, simply drag and drop the .kext file present in the patch folder inside the Extensions folder.
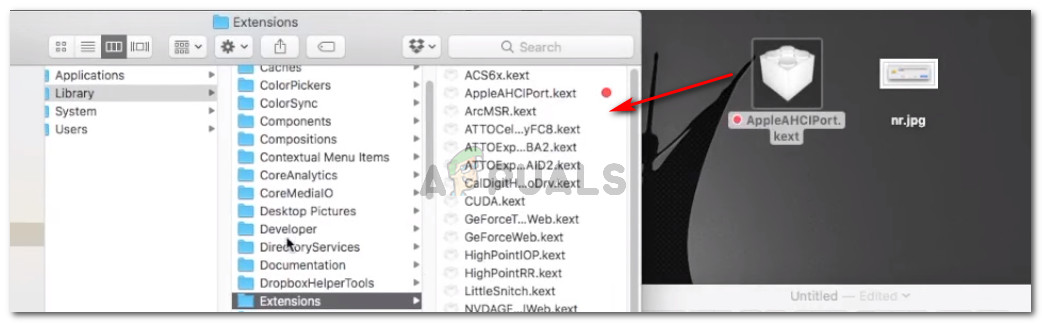
Dragging & dropping the patch file - Once the extension has been replaced, use the Search function to find and open the Terminal application.
- Inside the terminal, run the following command:
sudo chown -R 0:0 /Library/Extensions/AppleAHCIPort.kext && sudo chmod -R 755 /Library/Extensions/AppleAHCIPort.kext
sudo touch /System/Library/Extensions && sudo kextcache -u /
- After the command runs successfully, restart your machine and see if the issue is resolved at the next startup.
If none of the methods above have helped you to resolve the issue, it’s very likely that you’re dealing with a failed drive. If that’s the case you should start looking for a recovery solution if you have any important data on that drive.


THANKS A LOT !
Got this error yesterday & was absolutely horrified that my 2TB hdd was not mounting on my macbook air.
For me The 2nd method worked perfectly well. The first aid method. Saved my day. Thanks again
– Kedar Bhat