Fix: PS3 Media Server Windows Problems
PS3 Media Server is a DLNA-compliant UPnP media server. It was originally developed to support the PlayStation but has been expanded so it can support various other consoles (Xbox 360, Philips, Samsung televisions etc.). It is developed in Java programming language and is able to transcode and stream many different media formats.
The PS3 Media Server needs to be connected via the network to a device in order to access it and provide all the functionalities. There are numerous cases where you are not able to access the device you want to connect to. We have listed down a number of different workarounds to target this issue. Start with the first one and work your way down.
Solution 1: Checking Permissions and Selecting Device using Mac Address
It isn’t necessary for your computer to enable File and Printer sharing and Network Discovery by default. There are some cases where these options are turned off especially if you have labeled the network as public. We will first check if the required options are enabled. Then we will use the Mac address of the device to identify and connect.
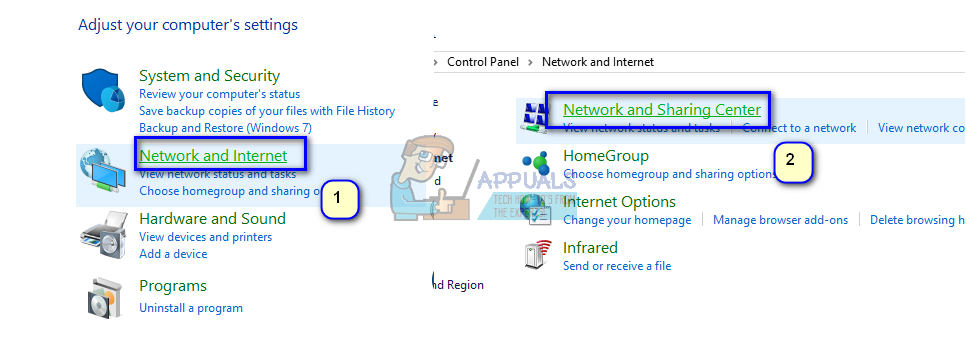
- Press Windows + R, type “control panel” in the dialogue box and press Enter.
- Once in control panel, select “Network and Internet” from the categories listed and then click “Network and Sharing Center”.
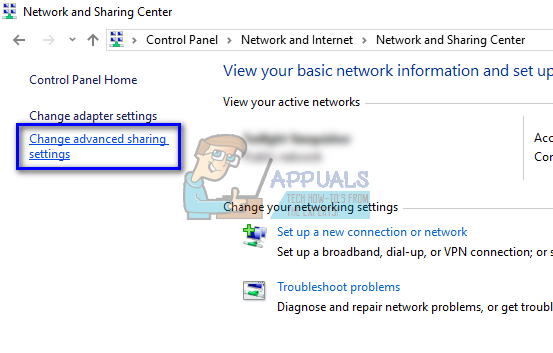
- Click “Change advanced sharing settings” present at the left side of the window.
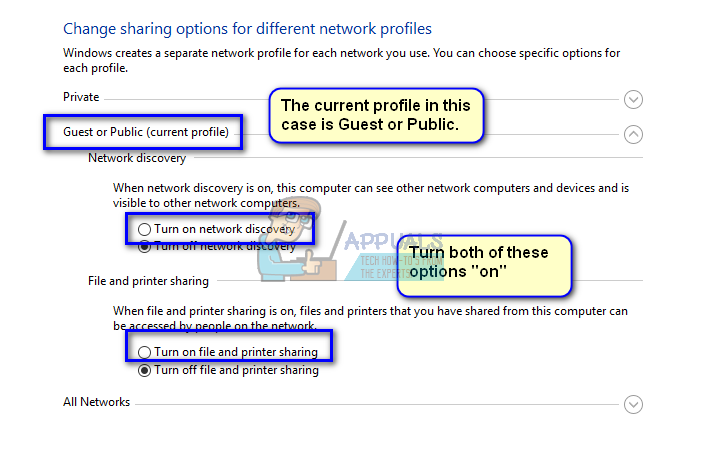
- See which type of network is your current profile. Make sure both of these options are toggled: “Turn on network discovery” and “Turn on file and printer sharing”. They are by default disabled in Guest or Public profiles.
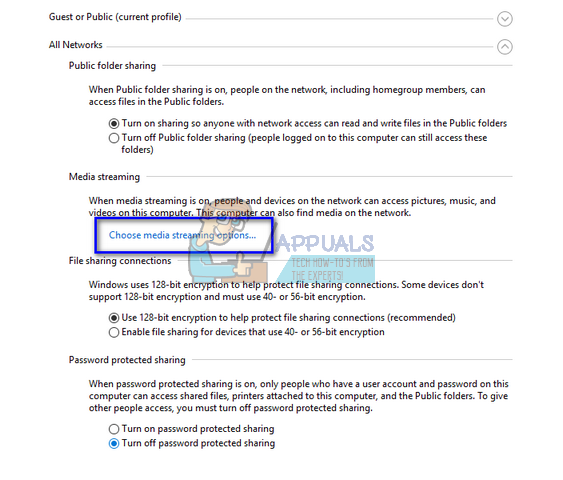
- After making the necessary changes to all the profiles, expand “All Networks” and click “Choose media streaming options…”.
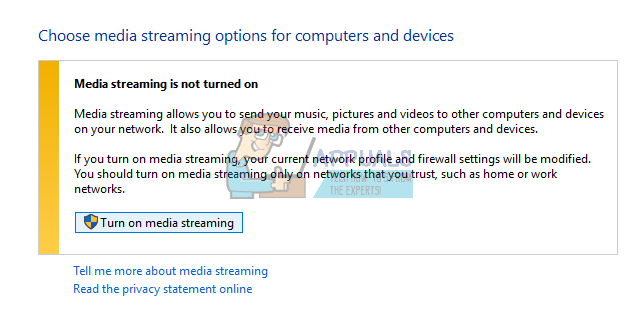
- If media streaming is disabled, you will see an option like this. Click on “Turn on media streaming”. Do note that you might require administrator privileges to complete this action.
- Make sure that the option “All networks” is enabled in front of “Show devices on:”.
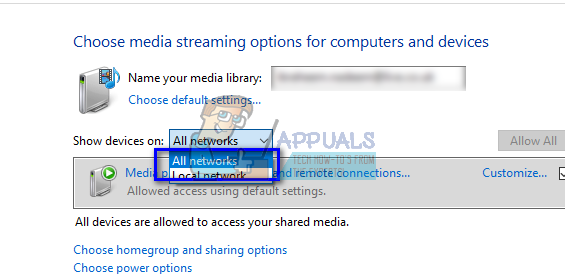
- A number of different unknown devices will show up. Note and compare the Mac address of the device you want to connect to. After you have determined the correct device, allow that device for media sharing.
- Restart your computer after making the necessary changes and check if the problem at hand got solved.
Solution 2: Disabling Firewall
Another workaround which worked for many people was disabling Firewall applications (including Windows Firewall, Windows Defender, and other Antivirus applications). Firewall is known to provide security to your computer over any network (public, private etc.). We can try disabling the firewall temporarily and see if you can make a successful connection. Also, disable all your antivirus application on your computer.
- Turn off all firewall/antivirus applications. You check our article on how to disable Windows Firewall.
- Once all the applications are closed, try discovering the device you want to connect. You can also try using the first method and see if there are any unknown devices on the network. Match the Mac address of the unknown device and try connecting to it.
Note: Make sure that you enable the Firewall again if the method doesn’t work.
Solution 3: Restarting Windows Media Network Sharing Service
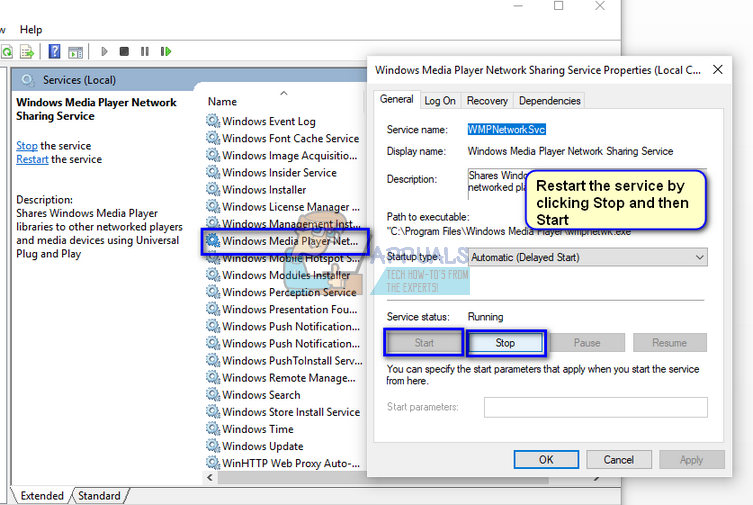
The main service responsible for sharing media across two devices is “Windows Media Network Sharing Service”. It is started automatically once you enable the media server on your computer. If both the above methods don’t seem to do the trick, you can try restarting the service and see if it produces any luck. Do note that you might require an administrator account to follow this solution.
- Press Windows + R, type “services.msc” in the dialogue box and press Enter.
- Once in the services tab, locate the service “Windows Media Network Sharing”. Right-click it and select “Properties”.
- Make sure that the start type is to “Automatic (Delayed Start)”. Click on Stop and then Start to restart the service.
- After restarting the service, check if you can connect properly without any difficulties.
Solution 4: Running Applications as an Administrator
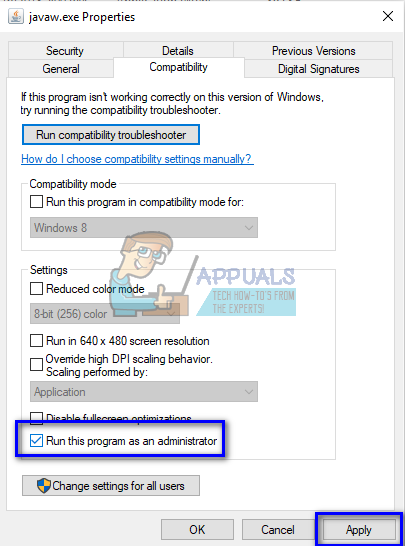
It is a well-known fact that Windows has a security mechanism through which it doesn’t allow all the applications to have network access on your computer. Only applications with administrator privileges might be able to access everything they need to perform their basic functionalities. We will make sure that all the modules involved run with administrative privileges and see if this makes any difference. Do note that in order to run these applications in an elevated state, you yourself must be logged in with an administrator account.
- First, make sure that you have the latest version of Java installed on your computer. Like we explained earlier, PS3 Media Server is coded in Java language and it is necessary that you have it installed on your computer.
Navigate to the following directory (this is the default directory where you have installed java. You can navigate to any other location if you have changed the destination installation folder).
C:\Program Files\Java\jre7\bin
The file located will be different for systems running the 64-bit version of Windows:
C:\Program Files (x86)\Java\jre1.8.0_161\bin
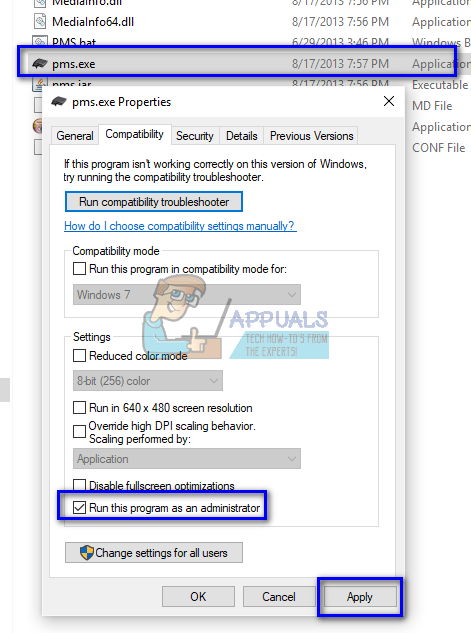
Right-click on “javaw.exe” and click Properties. Now click on Compatibility tab and check the box “Run as administrator”.
- Now perform the same steps (granting administrator privileges) to the following executables related to PS3 Media Server. Navigate to the following directory and grant administrator access to “pms.exe”.
C:\Program Files (x86)\PS3 Media Server
Or
C:\Program Files\PS3 Media Server
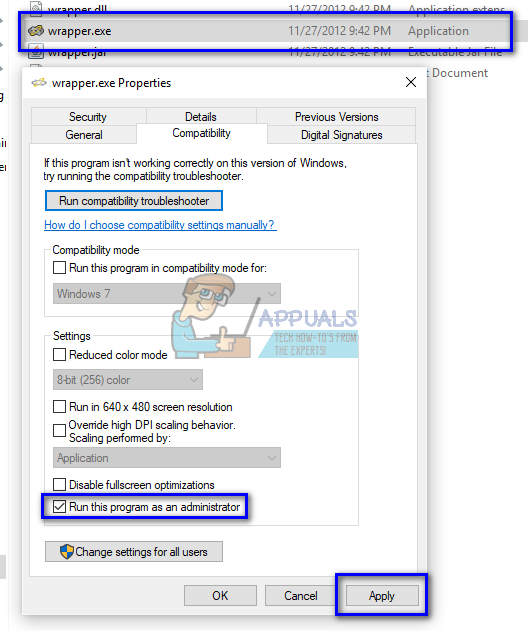
- Perform the same steps to “wrapper.exe” located in:
C:\Program Files (x86)\PS3 Media Server\win32\service
Or
C:\Program Files\PS3 Media Server\win32\service
- After making the necessary changes, restart your computer and check if the problem at hand got solved.
Solution 5: Selecting the Correct Networking Interface
PS3 Media Server selects a single network interface on your computer through which it can operate. However, you might face problems if it selects an interface which isn’t even connected or isn’t active on your computer. We will make sure that the interface selected is working and amend its settings if it isn’t. This method is known to work for Windows 8.1 but you can test it on your operating system.
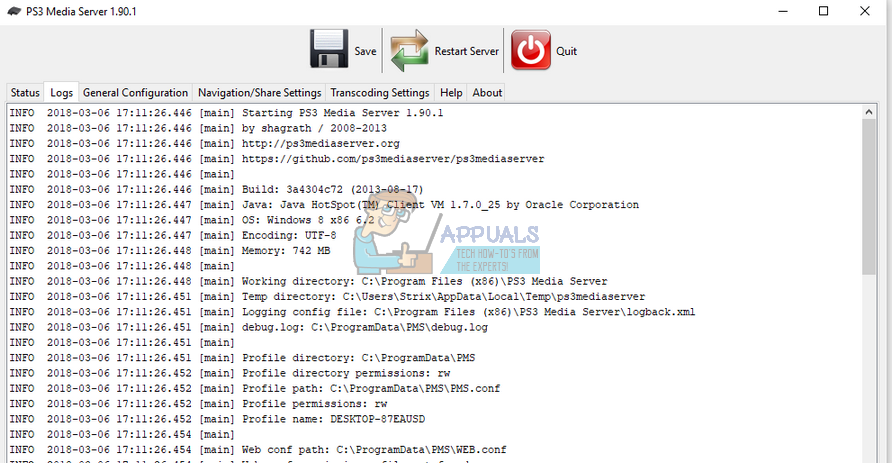
- Launch PS3 Media Server and click on the “Logs” tab. You are to search for the string “Created Socket:” in your log. If the log is lengthy and proving to be troublesome, you can copy it (Ctrl + C), paste it in Notepad (Ctrl + V), and search for the string with ease.
- Press Windows + R, type “control panel” in the dialogue box and press Enter.
- Once in control panel, select “Network and Internet” from the categories listed and then click “Network and Sharing Center”.
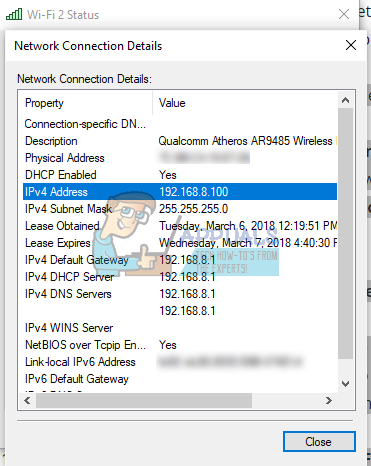
- Now see the active connection on your computer with the access type “Internet”. Click on the network in front of “Connections” and select “Details” from the small window which pops up.
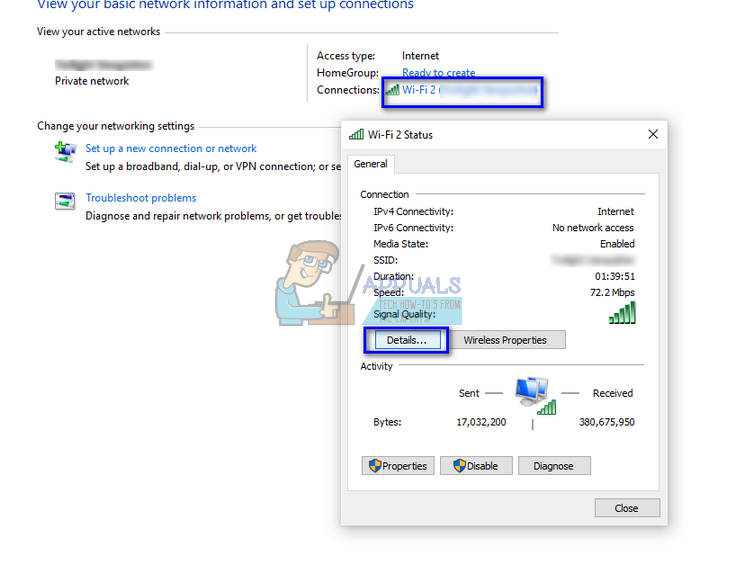
- Note the IPv4 address in the network details. For PS3 Media Server to work, the IP address which you extracted in step 1 on the media server should correspond to the physical network interface your PC is using to connect to the Local Area Network your DLNA client devices are usually on. If the IP address doesn’t match, follow the steps below.
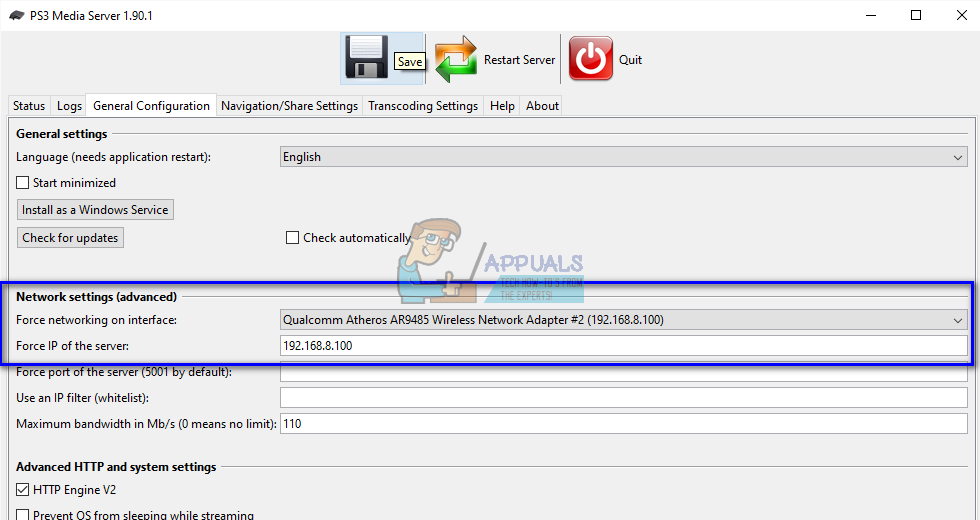
- Open the PS3 Media Service window again and open the General Configuration tab. Underneath the heading “Network settings (advanced)”, click the drop-down “Force networking on interface” and select the networking interface your computer is using.
- Type the IP address into the field “Force IP of the server”.
- Click on Save and Quit the application. Now launch it again and check if the problem at hand got solved.
Solution 6: Confirming that both Devices are on the Same Network
In order to use PS3 Media Server, you must make sure that both the devices are on the same network and file sharing is actually enabled. Your router must have Universal Plug and Play (UPnP) enabled, otherwise, the application will not run as expected and you will not be able to see your PS3.
If both the devices are using the same router, they are essentially on the same network. However, the network settings should be enabled in such a way that they allow the follow of traffic. You must set the network on your computer to the correct settings to ensure that there are no conflicts.
Another workaround you can try is making sure that both the devices are connected to the router via a wireless connection. There have been many cases where the router is connected to a wired connection to the computer but the PS3 is accessing it using wireless signals. In this case, you can use a USB Wireless dongle to enable wireless signals on your PC and connect wirelessly to the router.
To sum up, make sure that both the device are connected to the same network with all the required configuration settings. You can also try checking the router settings and see if access is granted for all types of devices. Once you have made the necessary changes, restart your computer and see if this fixes anything.