Fix: Note 4 Battery Drains Fast
Some flagships somehow manage to remain popular years after the initial release and Samsung Galaxy Note 4 is one of them. With solid specs like 3GB of RAM, Snapdragon 805 processor, and an excellent Super AMOLED display, Note 4 continues to bring Samsung a steady stream of revenue.
Samsung continues to support its popular smartphone with constant software updates aimed at optimizing the user experience. But despite this, Note 4 still has some underlying issue related to excessive battery draining. The odd thing is the device ships with a 3220mAh battery, which in theory should provide a satisfactory battery life. But that’s often not the case since a lot of Note 4 users have reported battery issues just weeks after they’ve purchased the device.
While causes for excessive battery draining can be quite diverse, some culprits are common occurrences:
- Faulty battery
- OS versions that are inefficient with battery management
- Apps and services that use a lot of power
- Corrupt sectors on the SD card that force the phone to constantly try and fetch data resulting in excessive battery consumption
In an attempt to help you pinpoint the cause of the excessive draining on your Note’s 4 battery, I have created a collection of useful methods that will help you identify leaks and act accordingly to increase your battery life cycle.
Method 1: Identifying battery drainers
A critical aspect of a healthy battery management is keeping an eye out for third-party applications that consume a lot of battery. Once identified, we will take steps to manage them efficiently.
Some apps continuously stress your battery, even if you don’t actively use them. This is the case with instant messaging apps, news apps or any other 3rd party software that runs background processes even when you lock your phone. Here’s what you can do:
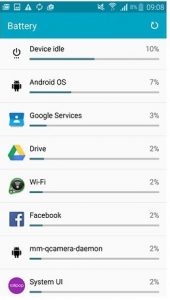
- Go to Settings > Device > Battery and browse through the usage patterns.
- If you spot an app with a high draining percentage, tap on it to see options of optimizing it. Depending on how often you use it, you might choose to disable it during lock mode or even uninstall it.
- Also, make sure you restart your phone periodically in order to prevent background processes from piling up.
- If you have an SD card, do a complete wipe on it. There’s a chance it might hold corrupt sectors that trick your Android OS to continuously ask for data, resulting in excessive battery draining.
Method 2: Disabling Background Sync
Background synchronization has the potential of draining a lot of battery in idle mode. The downside is you’ll probably miss some notifications and app updates. A good practice is to disable Background Sync when you know you don’t expect an important email or Facebook message.
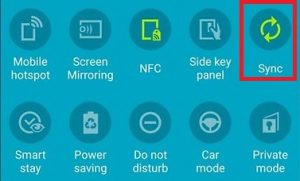
You can disable syncing by pulling down the quick settings menu and tap on Sync to disable it.
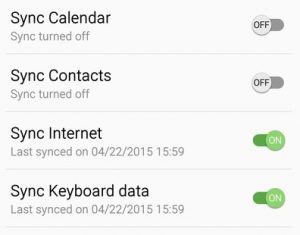
A more customizable way to do it is to do it is to go to Settings > Accounts > Sync Settings and disable syncing for the apps you don’t use.
Method 3: Disabling Location, Bluetooth, NFC, and Wi-Fi
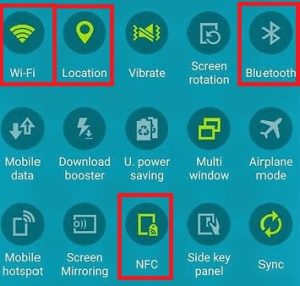
Bluetooth, location tracking, NFC, and Wi-Fi are features you don’t use all the time. Try to form a habit of disabling them whenever you don’t put them to use. You can do this easily by pulling down the quick setting menu and tap on each one to disable it.
Method 4: Modifying GPS Settings
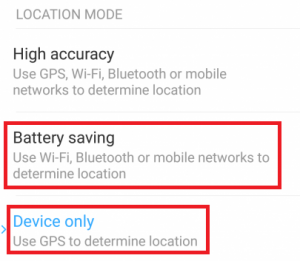
If you rely a lot on your phone’s GPS, turning location off is not something you afford to do. If your GPS is set to High Accuracy mode, it will eat a huge chunk of your battery. It uses GPS, Wi-Fi, and your mobile network to determine your exact location.
If you’re not using it for navigation purposes, there are few reasons why you would want your device to constantly fetch your exact location. Note 4 is pretty decent in determining the location just by using onboard GPS. Here’s what you need to do:
- Go to Settings > Location > Mode.
- If the mode is set to High Accuracy either change it to Device Only or Battery Saving.
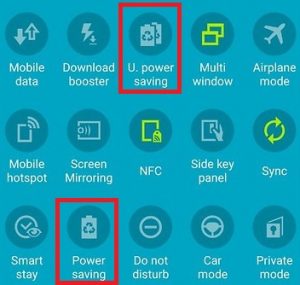
Method 5: Using Power-Saving Modes
Note 4 has an efficient power saving software that will automate a lot of the things we discussed in the previous methods. Samsung’s power saving mode is divided into two modes:
- Power saving mode – Changes various settings that save battery without affecting the user experience too much.
- Ultra power saving mode – Extends standby time by reducing background processes and taking other aggressive measures that will limit the device’s functions.
You can easily switch between the two by pulling down the status bar from the top of the screen with two fingers. Tap on either Power Saving or U. power saving to enable them.
Method 6: Using a Black Wallpaper
Note 4 uses Samsung’s Super AMOLED display. Since it doesn’t have a back light like regular screens do, reducing the pixels you have on your screen during regular use can have a noticeable impact on your battery life. Here’s how to do it:
- Since Note 4 doesn’t come with a default black wallpaper, you’ll need to download one yourself. Search online for one and download it to your device.
- Go to Settings > Wallpaper > Home and Lock Screens > More Images and search for the black wallpaper you’ve just downloaded.
- You can take it even further by downloading a custom dark theme that uses a lot of black.
Method 7: Optimising your battery life with Greenify
If you don’t have time to constantly monitor usage statistics, why not let an efficient 3rd party app do it for you? Google Play is filled with apps claiming to do this, but you need to be careful which one you choose because it might end draining more battery than it saves.
Greenify saves battery by pushing apps into hibernation mode – it keeps them from running background processes that drain your battery. I know it sounds like a glorified task killer, but Greenify does things a little different. Instead of killing all processes by default, you get to choose which apps you allow to enter into hibernation mode.
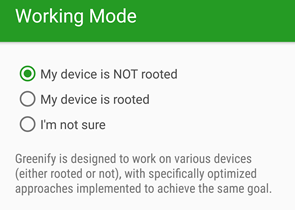
It’s also worth noting that if you have a rooted Note 4 battery management will be a little more efficient and will require even less initial setup steps. In any case, here’s how to install and configure Greenify:
- Download and install Greenify from Google Play Store.
- Hit Next to begin the initial set up and select the working mode. Make sure you specify if your device is rooted or not.
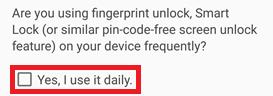
- If you’re using some sort of smart unlock like fingerprint or voice-unlock make sure you tick the appropriate box.
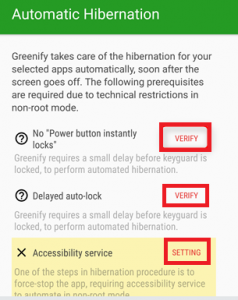
- Depending on your phone model, this next step might look different on your screen. Make sure you Tap the Verify/Setting button on each prerequisite and make the required modifications. This will give Greenify the time to perform hibernation chores whenever you lock your device.
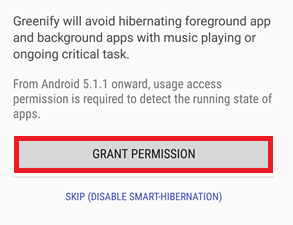
- Now you need to grant Greenify permission to your Usage patterns. Tap on “Grant Permission” and switch the Permit usage access toggle to On.
- Now that the initial setup is out of the way, let’s start Greenifying apps. Tap the floating “+” button.

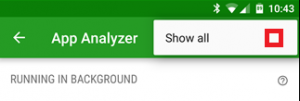
- While in the App Analyzer menu, tap the three-dot icon and tick Show all. This will ensure you see all the apps installed on your system, not just the ones that are currently running.
- Go through the whole list of apps and tap on the ones that you’d like to hibernate. Once you’re finished with your selection, tap the floating icon again to close the app analyzer.
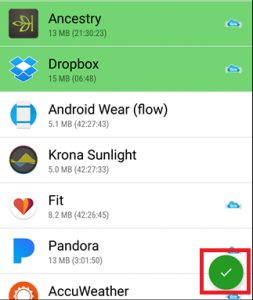
Note: Did you notice the cloud-like icon next to some entries? It signals an app that uses GCM (Google Cloud Messaging) for receiving notifications. If you hibernate an app that uses GCM, you won’t receive any notifications from it. If you rely on an app heavily, it’s best that you avoid putting it into hibernation mode - Now Greenify is ready to extend your battery life. You can close the app or leave it running in the background.
- You can also tap the floating action button to hibernate apps on the spot.
Method 8: Recalibrating the Battery
If you went through all the methods above and your battery life is still draining fast, you seriously need to consider buying a new battery. Li Po batteries usually last about 600 – 800 full recharges before their capacity falls under 80%. If you’ve had your device for more than a year without ever replacing the battery, chances are it’s dying out.
Common signs that you’re dealing with a faulty battery are :
- The phone shuts down when you’re trying to take a picture or do another battery-demanding activity.
- The screen flickers when you set your phone to maximum brightness.
- The phone alerts you of low charge and shuts down almost immediately.
Android keeps track of the battery status through a process called Battery Stats. But over time, it tends to display data that isn’t real, causing your phone to shut off before reaching 0%. Although you won’t restore your battery to previous capabilities, you can attempt to recalibrate it in order to display the correct status. Here’s how:
- Let your Note 4 discharge until it turns OFF.
- Keep forcing it to turn ON until it has no juice left to power its components.
- Plug it into a charger and let it reach 100% charge without turning it ON.
- Unplug the charger and turn it ON again.
- Chances are it won’t say it’s at 100% charge. Plug it in the charger again and wait until it reaches 100%.
- Unplug your phone again and do a restart. If it still doesn’t display 100%, plug the charge back in.
- Repeat steps 5 and 6 until displays 100% charge after booting up.
- Let it discharge all the way down to 0% until it turns off by itself.
- Do one last full recharge with the phone turned off and you should get a correct battery percentage reading.