Fix: “No Speakers or Headphones are Plugged In” Error on Windows
No speakers or headphones problem might occur in Windows mainly due to bad sound driver or corrupt system files. The drivers’ issues range from an incompatible driver (after an update) to a corrupt sound driver. The issue arises (mainly after an OS or driver update) when there is no sound output from your system and when you check on the volume icon in the system tray which sometimes shows a red cross, you are shown no speakers or headphones message. The issue is not limited to a particular brand of sound cards or PCs.
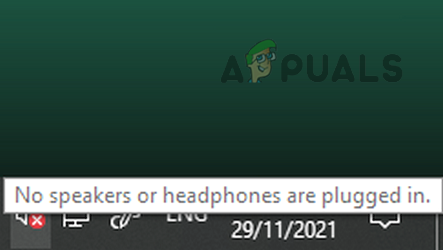
There may be many reasons for which your system’s speakers or headphones might not work but the following can be easily considered as the main factors to cause the sound issue:
- Outdated, Incompatible, Corrupt Sound Driver: The system may show no speakers or headphones if its sound driver is not compatible after the last update with your system, is outdated, or corrupt and as a result, the OS fails to load its sound driver.
- Outdated PC’s OS: If your system’s OS is not updated to its latest build, then it may become incompatible with the sound driver and thus may fail to load the sound driver, resulting in the issue under discussion.
- Conflicting Applications: The audio problem may arise if another application on your PC is interfering with the execution of the sound driver and thus cause the error at hand.
- Outdated System BIOS: If your PC’s BIOS is outdated, then that may stop the sound devices from working as the system devices fail to properly communicate with each other, resulting in the audio problem.
1. Roll Back the Sound Driver in the Device Manager
If the updated system’s sound driver is not compatible with your PC, then that could result in the issue at hand as the OS may fail to load the incompatible driver. In such a case, rolling back the system’s sound driver may clear the audio issue. Before moving on, check if trying another cable for the speakers (if the issue is occurring on the external speakers) clears the error. Also, check if your system’s audio works fine when booted through another OS USB like a live Ubuntu USB (if possible).
- Right-click Windows Start Menu Icon and Click Device Manager.

Open Device Manager Through the Quick Access Menu - Now expand the Sound, Video, and Game Controllers tab and double-click on your sound device like Realtek High Definition Audio.

Open Properties of the Sound Device in the Device Manager - Then head to its Driver tab and click on Roll Back Driver.

Roll Back the System’s Sound Driver - Now confirm to roll back the system’s sound driver and once done, restart your PC.
- Upon restart, check if the speakers or headphones are working normally. If so, then you may disable further updating of the driver, till the issue resolves.
- If that did not work, open Device Manager and expand the System Devices tab.
- Now check if rolling back the drivers (for those devices for which it is possible) of all the sound-related devices (like Intel SST) clears the issue.

Roll Back the Driver of the Sound-Related Devices in the System Devices Tab of the Device Manager
2. Update the PC’s Windows to the Latest Build
The system may show no speakers or headphones issue if the PC’s OS is outdated as it can make the OS incompatible with other essential modules (like the sound driver) and as a result, the OS fails to load the driver. Here, updating the PC’s Windows to the latest build may solve the sound problem.
- Click Windows Start Menu Icon, search for Check for Updates, and open the System Setting of Check for Updates.

Open Check for Updates on Windows - Now, in the right half of the window shown, click on Check for Updates, and if updates are available, download and install the updates.

Check for Windows Updates and Open Advanced Options - Once installed, restart your PC, and upon restart, open Windows Update in the PC’s Settings.
- Then open Advanced Options and select Optional Updates.

Open Optional Updates in the Windows Update - Now install all the optional updates as well and once done, restart your PC.
- Upon restart, check if the speakers or headphones are working fine.
3. Try the Windows Built-in Troubleshooter
A temporary glitch in the OS’s modules could result in the non-working of speakers or headphones and cause the issue at hand. In such a case, trying the Windows Built-in troubleshooter may solve the problem.
- Right-click Windows Start Menu Icon and select Settings.

Open Windows Settings Through the Quick Access Menu - Now, in the right pane of the System tab, select Troubleshoot and open Other Troubleshooters.
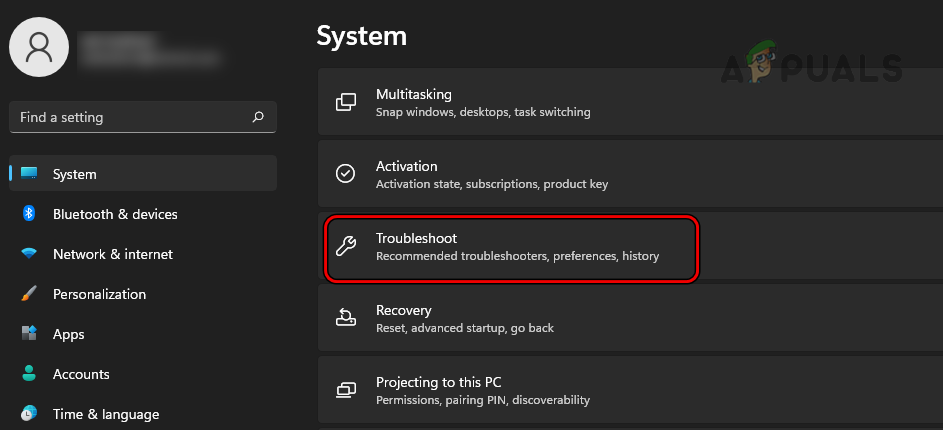
Open Troubleshoot in the Windows Settings - Then locate the Playing Audio troubleshooter and click on Run.

Open Other Troubleshooters in the Windows Settings - Now follow the prompts on the screen to complete the troubleshoot process and then apply the changes recommended by the troubleshooter.

Run the Playing Audio Troubleshooter in the Windows Settings - Then check if the system’s audio is working fine.
4. Set the Speakers or Headphones as the Default Output Device
If the speakers or headphones are not set as the default output device on your system, then the system might try to route the audio signal to the default output device (that is not present), thus causing the issue. In this scenario, setting the speakers or headphones as the default output device of the system may solve the problem.
- Right-click Windows Start Menu Icon and open Settings.
- Now, in the right pane of the System tab, open Sound and scroll down till the end.
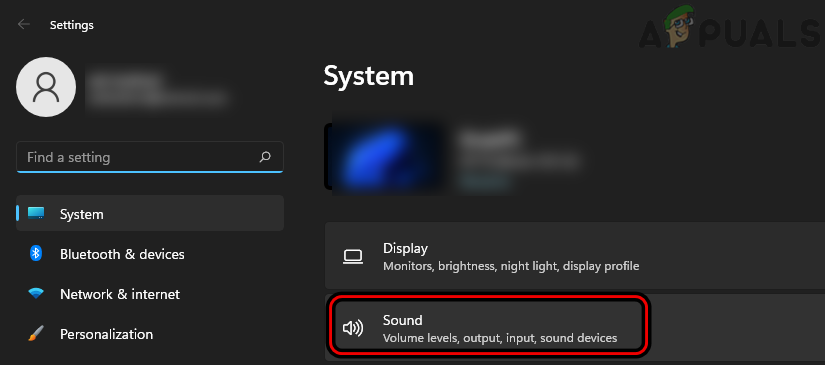
Open Sound in the System Tab of Windows Settings - Then open More Sound Settings and in the Sound Control Panel window, head to its Playback tab.

Open More Sound Settings in the Windows Settings - Now right-click on your speakers or headphones and select Set as Default Device.
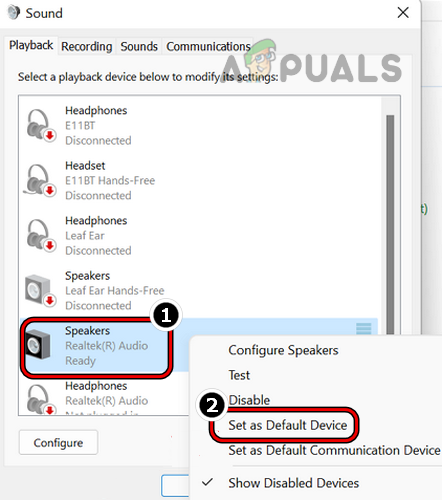
Set the Speakers as the Default Device - Then apply the changes made and restart your system.
- Upon restart, check if the speakers or headphones are working fine.
5. Disable the Front Jack Detection in the OEM’s Utility (If Applicable)
If an OEM utility like Realtek HD Audio Manager is overriding Windows’ capability to detect a headphone or speaker to the system, then that could result in the no speakers or headphones issue at hand. In this case, disabling the Front Jack Detection in the OEM utility may clear the problem. For elucidation, we will discuss the process of disabling the Front Jack Detection in the Realtek HD Audio Manager.
- Launch the Realtek HD Audio Manager and head to its Speakers tab.
- Now, in the Speaker Configuration tab, click on the folder icon (under the Device Advanced Settings).
- Then, in the Connector Settings dialogue box, checkmark Disable Front Jack Detection and click on OK.

Disable Front Panel Jack Detection in the Realtek HD Audio Manager - Now restart your PC and upon restart, check if the speakers or headphones issue is cleared.
If the issue persists, check if inserting the speakers or headphones into another port or jack resolves the issue. If the system has only one jack, check if re-plugging the audio device (make sure the connector is properly seated, you may wiggle the connector a bit) clears the error.
6. Disable and Enable the System’s Audio Device
A temporary glitch in the system’s modules could stop the audio device from working and cause the issue at hand. Here, disabling and enabling the system’s audio device may solve the problem.
- Right-click Windows Start Menu Icon and open Settings.
- Now, in the left pane, head to the System tab, and then, in the right pane, open Sound.
- Then, scroll down to the bottom and click on More Sound Settings.
- Now, in the Playback tab of the Sound control panel, right-click on the speakers or headphones and select Disable.
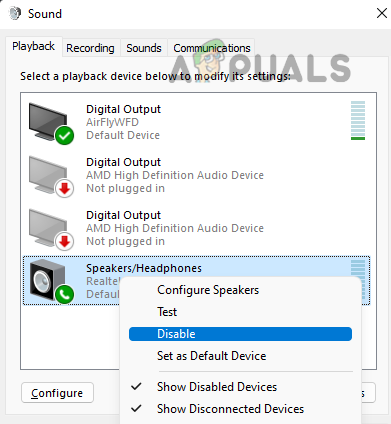
Disable the Speakers or Headphones in the Sound Control Panel - Then restart your PC and upon restart, enable the speakers or headphones in the Sound Control Panel and check if the issue is resolved.
- If that did not work, right-click Windows and open Device Manager.
- Now expand the Sound, Video, and Game Controllers tab and right-click on your sound device.
- Then select Disable Device and restart your PC.

Disable the Sound Device in the Device Manager - Upon restart, enable the sound device in the system’s device manager and click on the Scan for Changes button.

Enable the System’s Sound Card in the Device Manager and Click on Scan for Hardware Changes - Afterward, check if the system’s sound has started to work fine.
- If not, check if disabling all devices (like HDMI) except the speakers or headphones in the Playback tab of the system’s Sound Control Panel resolves the issue.
- If that did not work, boot your system into the BIOS and head to the Advanced tab.
- Now open Onboard Devices Configurations and disable the audio device like Realtek HD Audio Controller.

Open Onboard Devices Configuration in the System’s BIOS - Then save your changes and boot your PC into Windows.

Disable HD Audio Controller in the System’s BIOS - Afterward, boot your PC into BIOS and enable the audio device.
- Now boot your PC into Windows and check if its audio issue is cleared.
7. Update the System’s Drivers to the Latest Builds
You may also encounter the sound issue under discussion if the system’s drivers are outdated as the sound driver becomes incompatible with the OS and fails to load with the OS. In this context, updating the system’s drivers (especially, the sound driver) to the latest build may solve the problem.
- Right-click on Windows Start Menu Icon and select Device Manager.
- Now expand the Sound, Video, and Game Controllers tab and right-click on your sound device.

Update the Driver of the Sound Device in the Device Manager - Then select Update Driver and select Search Automatically for Drivers.

Search Automatically for Drivers of the Sound Device - If a sound driver update is available, let it install.
- Now repeat the same to update all the other drivers as well (especially, sound-related devices in the System Devices tab).
- Once the system drivers are updated, restart your PC and upon restart, check if no speakers or headphones issue is resolved.
- If not, launch a web browser and head to the OEM website (like Dell or Nvidia).
- Now download the sound driver as per your system specs and then install it as an administrator.
- Once done, restart your system and upon restart, check if the speakers or headphones problem is solved.
- If the issue persists and your OEM (PC or sound device) has a driver management utility (like Dell Support Assistant), check if updating the system drivers through that utility resolves the issue.
- If that did not work, then open Device Manager and expand the Sound, Video, and Game Controllers tab.
- Now right-click on the sound device and select Update Driver.
- Then click on Browse My Computer for Drivers and select Let Me Pick from a List of Available Drivers on My Computer.

Open Browse My Computer for Drivers for the Sound Device - Now select another driver (except the current driver) e.g., High Definition Audio Device and click Next.

Open Let Me Pick from a List of Available Drivers on My Computer for the Sound Device - Then wait till the process completes and afterward, restart your PC.

Try Another Driver for the Sound Device - Upon restart, check if the sound issue is resolved.
- If not, then repeat the above steps but with a different driver at step 14 and keep repeating (do not forget to restart your system after each try), till the issue is resolved or no other driver is left to try.
- If the issue persists, then repeat steps 11 to 17 but for the sound-related devices in the System Devices tab of the Device Manager and check if any of the drivers for those devices resolves the issue.
8. Perform the Clean Boot of the System and Uninstall Conflicting Applications
The sound problem under discussion may arise if another application on the system is interfering with the system’s sound driver and not letting it execute. In this scenario, performing a clean boot of the system and uninstalling the conflicting application may solve the problem.
- Perform a clean boot of the system but make sure the sound-related services are not disabled during the process.

Clean Boot the Windows 10 PC - Then check if the system’s audio issue is resolved.
- If so, then one by one enable all the services/processes that were disabled earlier to find out the problematic application.
- Once the problematic application is found, you may keep it disabled at the system boot (if essential), otherwise may uninstall it.
The Realtek Audio Manager is a reported utility to cause the problem and if you have installed it (or a similar utility), then check if uninstalling it resolves the issue. For illustration, we will discuss the process of uninstalling the Realtek Audio Manager.
- Right-click Windows and open Apps & Features.

Open Apps & Features - Now locate the Realtek Audio Manager and expand its options.

Uninstall the Realtek Audio Manager - Then click on Uninstall and afterward, confirm to uninstall Realtek Audio Manager.
- Now follow the prompts on the screen to complete the uninstallation of the Realtek Audio Manager and once done, restart your system.
- Upon restart, check if the speakers or headphones are operating normally.
9. Enable the System Services Through the Command Prompt
If the services essential for the operation of the audio device are not enabled, then that could result in the problem at hand. In this case, enabling the system services through the Command Prompt may solve the problem.
- Click Windows Start Menu Icon, search for Command Prompt, right-click on the result of the Command Prompt, and in the sub-menu, select Run as Administrator.

Open Command Prompt as Administrator - Now enter the following and hit the Enter key:
net localgroup Administrators /add networkservice
- Then enter the following and hit the Enter key:
net localgroup Administrators /add localservice

Enable the Sound Related Services Through the Command Prompt - Now close the Command Prompt window and restart your PC.
- Upon restart, check if the system’s sound issue is resolved.
10. Update the PC’s BIOS to the Latest Build
You may encounter the speakers or headphones issue if the PC’s BIOS is outdated as it can make the different system devices incompatible with each other. In this context, updating the PC’s BIOS to the latest build may clear the audio issue.
Warning:
Advance at your own risk and with extreme caution as editing the PC’s BIOS settings or updating the BIOS is a skilled job. If not done properly or something goes wrong (like a sudden power failure during the BIOS update process), you may brick your system and the data may be lost.
- Update the PC’s BIOS as per the manufacturer:
- Once the PC’s BIOS is updated, check if the speakers or headphones are functioning properly.
11. Reinstall the Sound Driver
The no speaker or headphones issue might emerge if the system’s sound driver is corrupt and has become incompatible with the OS. In this case, reinstalling the system’s sound driver may solve the problem.
- Firstly, download the latest sound driver from the OEM website (like Dell).
- Now, right-click Windows and open Device Manager.
- Then expand the Sound, Video, and Game Controllers tab and right-click on your audio device.

Uninstall the Audio Device from the Device Manager - Now select Uninstall Device and checkmark Attempt to Remove the Driver of This Device.

Checkmark Attempt to Remove the Driver of This Device and Click on Uninstall - Then click on Uninstall and once uninstalled, restart your PC.
- Upon restart, if the PC’s windows try to install a generic sound driver, let it install and then check if the sound issue is resolved.
- If not, launch the downloaded sound driver as an administrator and follow the prompts on your screen to install the driver.
- Once installed, restart your PC, and upon restart, check if the system’s speakers or headphones are working fine.
- If that did not work, check if reinstalling the 64-bit version of the sound driver resolves the issue.
- If the issue persists, check if reinstalling the sound driver in the compatibility mode solves the problem.
12. Edit the System’s Registry to Allow the User Full Control Over the Audio Service
If none of the above worked for you, then editing the system’s registry to allow the user full control over the audio service (especially, on a domain-joined computer) may solve the problem. Before proceeding, do not forget to backup your system’s registry (just in case…).
Warning:
Proceed at your own risk and with utmost care as editing your system’s registry is a skillful job. If not done properly, you may cause undying damage to the system, OS, and, data.
- Click Windows Start Menu Icon, search for Registry Editor, right-click on the result of the Registry Editor, and select Run as Administrator.

Open Registry Editor as Administrator - Then navigate to the following path:
Computer\HKEY_LOCAL_MACHINE\SOFTWARE\Microsoft\Windows\CurrentVersion\MMDevices
- Now, in the left pane, right-click on the MMDevices and select Permissions.

Open Permissions of the MMDevices Registry Key - Then, in the Group or User Names, select Audiosrv, and in the Permissions of Audiosrv box, checkmark the Full Control box.

Allow the Users Full Control Over the Audiosrv - Now click on Apply/OK and restart your PC.
- Upon restart, check if the system’s audio is operating normally.
13. Remove the Conflicting Windows Update
If the PC’s latest Windows Update is conflicting with your system’s sound hardware, then that could also result in the audio issue under discussion. Here, removing the conflicting Windows update may solve the problem.
- Right-click Windows and open Settings.
- Now, in the left pane, head to the Windows Update tab, and the right pane, open Update History.

Open Update History in the Windows Update Tab - Then scroll down to the bottom and under Related Settings, open Uninstall Updates.

Open Uninstall Updates in the Windows Settings - Now select the latest Windows Update (you can find it through the Installed On column) and click on Uninstall.

Uninstall the Conflicting Windows Update - Then follow the prompts on the screen to uninstall the latest Windows update and afterward, restart your PC.
- Upon restart, check if the system’s audio is working fine. If so, then may defer the problematic update.
14. Perform an In-Place Upgrade of the System
The speakers or headphones issue might also occur if the system’s Windows is corrupt and due to this corruption, the OS fails to load the sound driver. Here, performing an In-place upgrade of the system may solve the problem.
Before proceeding, do not forget to back up the system and create a restore point. Also, ensure the system drive has enough free space to complete the installation (for 64-bit: 32 GB and 32-bit: 20GB). If the system gets interrupted during the upgrade process, then you may remove any 3rd party security application (at your own risk) and disable the BIOS’s Secure Boot.
- Launch a browser and steer to the Windows 10 ISO download page or Windows 11 ISO download page (if the PC’s hardware is compatible).

Click Download Now under Create Windows 11 Installation Media - Then scroll down and in the create Windows Installation Media (ISO) section, click on the Download Tool Now.
- Once downloaded, launch its setup file as administrator and follow the prompts on your screen to complete the process. Make sure to select the option of Keep Windows Settings, Personal Files, and Apps.

Keep Windows Settings, Personal Files, and Apps - Once done, reboot your system and upon reboot, hopefully, the speakers or headphones would be working fine.
If the issue persists, then check if performing a system restore resolves the audio issue. If that did not work or is not an option, then you may reset your PC to the factory defaults or perform a clean installation of Windows on your system to clear the sound problem. If that did not work, then the sound card might be faulty and you may need a new sound card.