Fix: Lenovo Yoga 3 Pro Usb Ports Not Working
A lot of Lenovo Yoga 3 Pro users have reported that all their USB ports have stopped working simultaneously after they installed a particular Windows update. Apparently, the ports appear correctly in Device Manager but they don’t seem to function at all.
This is a huge inconvenience since users are prevented from using any kind of peripherals like a keyboard a mouse and printers.
What causes the Lenovo Yoga 3 Pro USB Ports Not Working error?
After investigating the issue and looking at various reports, we have managed to compile a list of culprits that are most likely creating this particular problem:
- Driver incompatibility with Windows 10 – This used to be much worse when Windows 10 came out. Since then, Lenovo has released a lot of compatibility updates but this issue might still occur if you don’t have the latest updates installed.
- Power capacitors need draining – Due to a hardware flaw, the power capacitors might need to be drained. This will allow the power to reach the USB ports that are refusing to work.
- Outdated BIOS version – A lot of users have managed to resolve the issue after updating their BIOS to the latest version.
- USB Root Hub (xHCl) is deactivated – On newer models, a virus or third party software might end up disabling USB Root Hub (xHCl) which will cut the power to all USB 3.0 ports.
How to fix the Lenovo Yoga 3 Pro USB Ports Not Working error?
If you’re currently struggling to resolve this issue, this article will provide you with the most effective troubleshooting steps. Below you have a collection of methods that other users in a similar situation have used to get the issue resolved.
For the best results, please follow the methods in order and work your way down until you find a method that resolves the problem in your particular scenario.
Method 1: Updating hidden devices drivers via Device Manager
Some users have managed to resolve the issue by updating the driver of every hidden device present in Device Manager. This might seem like it’s an extremely unfocused approach, but a lot of users have managed to restore the normal functionality of their USB ports using this.
Update: Many users report that this fix is only temporary as the issue might return at the next Windows update. Even if this method resolves the problem, consider following Method 3 to make sure that the issue doesn’t return.
Here’s a quick guide on fixing the Yoga 3 USB issue by updating the Hidden Devices drivers via Device Manager:
- Press Windows key + R to open up a Run box. Then, type “devmgmt.msc” and hit Enter to open up Device Manager.

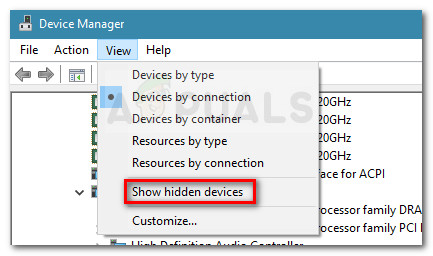
- Inside Device Manager, access the View option from the ribbon at the top and choose View Devices By Connection.
- Then, click on Show Hidden Devices.
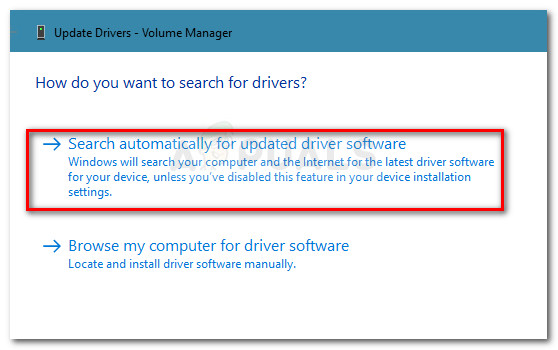
- Right-click on each hidden device that has appeared and choose Update driver. Then from the next screen, click on Search automatically for updated driver software.
- Once every hidden driver has been updated, reboot your computer and check if the issue has been resolved at the next startup.
If you’re still experiencing the same behavior, continue down with the next method below.
Method 2: Draining the capacitors
Another popular fix (but also temporary) is to hold the Power button for 30 seconds after you shut your machine down. This is done in order to drain the power capacitors and make them discard the electricity that they’re currently holding.
However, regardless of the issue is software related or a hardware problem, the issue will most likely return in a short while. If you decide to stick with this method, you might need to repeat this procedure several times per day.
If this method wasn’t effective or you’re looking for a more permanent fix, continue down with the next method.
Method 3: Updating BIOS to the latest version
Some users have discovered that the USB issue is automatically resolved if you upgrade to the latest available BIOS version. Furthermore, users that were already on the latest BIOS version managed to fix the issue by temporarily downgrading to an older BIOS version and then upgrading back up to the latest.
If you’re afraid of messing with your BIOS version, don’t be. Lenovo makes it extremely easy to upgrade or downgrade your BIOS. Follow the guide down below for steps on resolving the USB issue on Lenovo Yoga 3 by updating or downgrading your BIOS version:
- Visit this link (here) and download the BIOS Update executable from the Download section. Make sure that you have this exact model. If your model is different, punch in your serial number in the search box and download the required BIOS update associated with your mode.
 Note: If you already have the latest version, look for an older version first to downgrade.
 - Before you open the executable, make sure that the power adapter is securely plugged in. Any interruption during the upgrading process of your BIOS can damage your machine.
- Double-click on the executable and choose Ok. In a short while, your computer will automatically reboot and start flashing the new BIOS version. Needless to say, you should not turn off your computer during this stage.
- Once the process is complete, your computer will boot up again and the changes will take effect. See if the issue has been resolved by checking if your USB ports are working.
If this didn’t solve your problem, continue with the next method below.
Method 4: Activating USB Root Hub (xHCl)
As some users have reported, one Windows 10 security update ends up disabling the USB Root Hub (xHCl), which causes all USB 3.0 ports to stop working.
Fortunately, the solution is as simple as using Device Manager to re-activate USB Root Hub (xHCl). This should be enough to revert your machine’s USB ports to the default behavior. Here’s a quick guide on how to do this:
- Press Windows key + R to open up a Run window. Then, type “devmgmt.msc” and hit Enter to open Device Manager.
- Inside Device Manager, expand the Universal Serial Bus controllers drop-down menu.
- Right-click on USB Root Hub (xHCl) and choose Enable device.
- Restart your computer and see if the issue has been resolved.
If your USB ports are still unresponsive, continue with the next method below.
Method 5: Checking your hardware
This particular model is known for having a design flaw that might lead to USB not working + battery drain and charging problems. If the methods above didn’t allow you to restore the normal functionality of your USB ports, you might want to inspect your hardware.
As per a lot of users reports, there’s a high chance that your adapter is malfunctioning and it’s causing the issue. If this is true, it’s quite possible that this did some harm to your motherboard. If you don’t have the skills yourself, take the computer to a professional to see if the issue is related to a hardware problem.


When the internet is amazing…thanks so much for this post!!