FIX: Error Code 0x80072efe When Syncing in the Windows 10 Mail App
Microsoft worked pretty hard to deliver a highly functional and complete desktop email client to Windows 10 users in the form of the Mail app, and while the Mail app is a pretty decent email client, it is not entirely free of problems/issues. One of the problems related to the Windows 10 Mail app that is currently being reported by many users is an error message containing error code 0x80072efe being displayed every time they try to sync the Windows 10 Mail app with their email accounts to retrieve their messages.
The error message displayed to affected users may or may not state that the cause of the problem is internet connectivity issues, even if their internet connection is perfectly fine. If an affected user runs the official Microsoft troubleshooter for the Windows 10 Mail app, the troubleshooter fails to fix the problem and suggests that it may be caused by the Windows Store cache being damaged.
Some of the users affected by this problem who have more than one email account connected to their Windows 10 Mail app have reported all of their email accounts being affected, whereas others see that only some of their email accounts are affected by the issue. In almost all cases, deleting an affected email account from the Mail app, re-registering it and then trying to sync email messages does not yield a positive result, although you should definitely try doing so if you haven’t already. The following are the most effective solutions that you can use to try and fix this problem:
Solution 1: Clear the Windows Store cache
When a user affected by this problem runs the Microsoft troubleshooter for the Mail app, the troubleshooter, while unable to directly fix the problem, suggests that a damaged Windows Store cache may be the culprit. That being the case, it is pretty obvious that clearing your computer’s Windows Store cache is the best course of action. In order to do so, you need to:
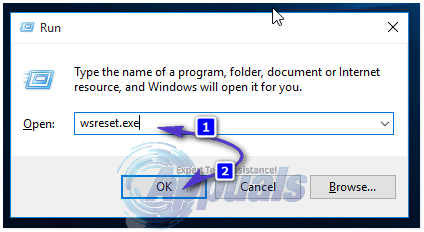
- Hold the Windows Key and Press R.
- Type wsreset.exe and Click OK
Solution 2: Enable TLS 1.0
- Open the Start Menu
- Search for “internet options”.
- Click on the search result titled Internet Options
- Navigate to the Advanced
- Under Settings, scroll down the list and locate the Use TLS 1.0
- When you locate the Use TSL 1.0 option, enable it by checking the box beside it.
- Click on Apply.
- Click on OK.
- Restart your computer and check to see if the issue persists when it boots up.
Solution 3: Re-register all of your computer’s stock Windows apps
- Open the Start Menu.
- Search for “powershell”.
- Right-click on the search result titled Windows PowerShell and click on Run as administrator.
Note: If asked by UAC to provide your password or confirm the action, do whatever is required of you.
- Type the following into the elevated instance of Windows PowerShell and press Enter:
Get-AppXPackage | Foreach {Add-AppxPackage -DisableDevelopmentMode -Register “$($_.InstallLocation)\AppXManifest.xml”}
- Wait for the command to be executed.
- Once the command has been executed, close Windows PowerShell.
- Restart your computer. When the computer boots up, check to see whether or not the issue has been resolved.