Fix: Error Code 0146 on Dell Systems
The ePSA diagnostics (also known as system diagnostics), which stands for enhanced Pre-boot System Assessment, performs a complete check of the hardware you have connected to your computer. The ePSA is embedded with the BIOS and it can be launched by bios internally.
ePSA can be launched in the Diagnostics option at the startup and if can show the error code 0146 which can be seen above. It’s usually related to hard drive having bad sectors or other general issues related to it. The error is also associated with system freezes and applications not responding.
We have gathered several solutions which can be applied to this problem and all of them were confirmed as working by users online.
Preparation and a Warning – Error Code 0146
Before you begin troubleshooting this problem, you should know that this error is often associated with serious hard disk problems which eventually lead to it being completely destroyed with very few or no ways of recovering data from it.
If your files are not backed up, you might have serious issues recovering it and that belongs to a whole new question. You should also know that the error may be impossible to fix without completely replacing your hard drive.
Still, you should be able to fix the problem without drastic measures but our sincere recommendation is to backup all of your data as soon as you are able to boot into Windows as you never know when the problem might re-appear.
Next, the methods below are almost impossible to solve without a recovery DVD related to the operating system you have installed on your computer. For versions of Windows older than Windows 10, it’s usually the DVD you used to install the operating system on your computer, but you should be able to borrow one if you don’t have it with yourself at the moment.
However, with Windows 10, you are able to create your own recovery Windows 10 ISO DVD or USB and you can use it for troubleshooting. Follow the steps below in order to do so.
- Download the Media Creation Tool from Microsoft’s website and wait for the download to finish. Double-click on the downloaded file in your Downloads folder called MediaCreationTool.exe in order to open the setup. Tap Accept at the initial screen.
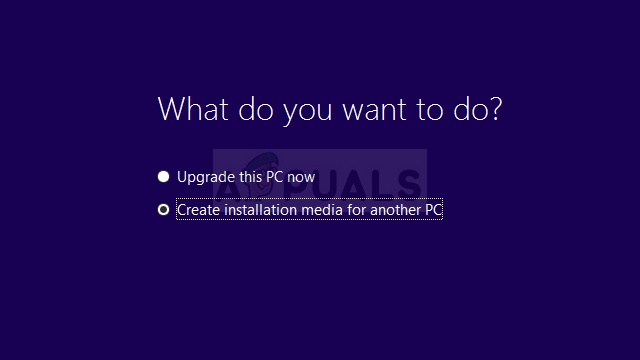
- Select the “Create installation media (USB flash drive, DVD, or ISO file) for another PC” option from the initial screen.

- The language, architecture, and other important settings of the bootable drive will be chosen based on the computer you are doing this on, but you should uncheck the “Use the recommended options for this PC” option in order to select the correct settings for the PC you want to troubleshoot.
- Click Next and click on the “USB flash drive” or “DVD” option when asked to choose between these two types of removable storage, depending on which device you want to use.
- Click Next and choose the drive from the list which will display the storage devices connected to your PC at the moment. Connect your storage device if you still haven’t done so.
- Click Next and the Media Creation Tool will proceed to download the files necessary to install create the installation device. Wait for it to finish and take out the recovery media you have created.
Solution 1: Use CHKDSK on Boot
CHKDSK is a utility used to check drives for errors, bad sectors, and damaged files. It can be run via an administrative Command Prompt window which can only be accessed with the recovery DVD as you are probably not able to boot into your operating system. It has helped several users to fix their problem and boot into Windows normally.
- Insert the installation drive you own or which you have just created and turn on your computer. Our goal is to open a Command Prompt window but the process will slightly differ from one operating system to another so make sure you follow the right set of steps.
- WINDOWS XP, VISTA, 7: Windows Setup should open right after you computer starts, prompting you to enter the preferred language and other important settings. Enter them carefully and click on the Repair your computer option at the bottom of the Setup’s window. Keep the first radio button selected when prompted with Use recovery tools or Restore your computer and click on the Next button. Click on Command Prompt when prompted with the Choose a recovery tool list.
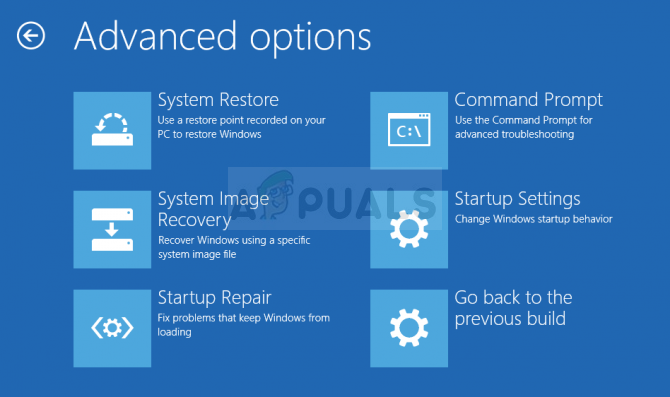
- WINDOWS 8, 8.1, 10: You will see a Choose your keyboard layout window as soon as your computer starts so choose the one you want to use. The Choose an option screen will appear immediately so navigate to Troubleshoot >> Advanced Options >> Command Prompt.
- Once the Command Prompt opens, enter the command displayed below and click Enter afterwards:
CHKDSK /R C:
- You might see a message saying that all handles will be invalid. If you do, simply click the Y letter on your keyboard followed by an Enter in order to continue. Boot into your computer by typing “exit” in Command Prompt and check to see if the process goes smoothly
Solution 2: Try Booting into Safe Mode
Users who were not able to boot properly and who receive the 0146 error when they run diagnostics were able to boot into safe mode properly and use their computers normally. The real question is: what to do when you boot normally.
Our suggestion is to uninstall everything that you think might be causing the issue such as newly installed programs, downloaded files, etc. You can also use various anti-malware tools to scan for viruses, etc. However, the most important thing you can do is backup your files in case you really need to replace your hard drive and reinstall your Windows operating system.
- Insert the installation drive you own or which you have just created and turn on your computer and follow the same steps as above; only this time you should navigate to Troubleshoot >> Advanced Options >> Startup Settings >> Restart.
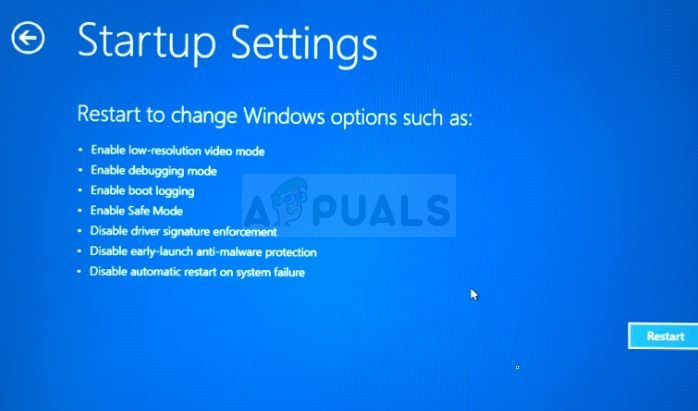
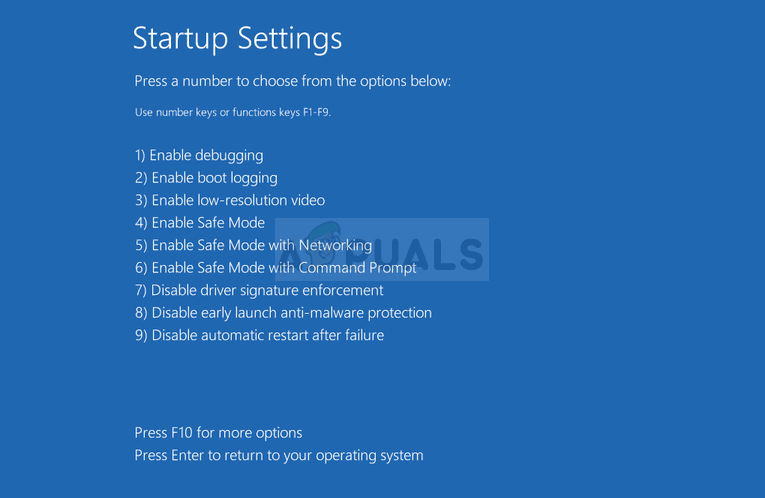
- After you computer restarts, you should be prompted with a list of various startup options. The ones we care about are under the numbers 4, 5, and 6. Number 4 includes Safe Boot with minimal options, 5 will include networking so that you can connect to the Internet, and 6 includes Command Prompt.
- We suggest you try Safe Mode with Networking first and see if your computer can boot using this option. This will enable you to download malware scanners or other helpful tools such Backups, etc. You can do so by clicking either 5 or F5 on your keyboard.
- Wait for your computer to boot and try performing the necessary operations. Uninstall everything suspicious and try booting normally.
Solution 3: Load Defaults in BIOS
Users who are lucky enough to blame the whole error on faulty BIOS settings can hope to solve the problem simply by loading the default settings in BIOS. If can be checked if your hard drive can be connected to another computer and used without problems. If that is the case, the hard disk is not faulty and it makes sense to go through with this solution. Good luck!
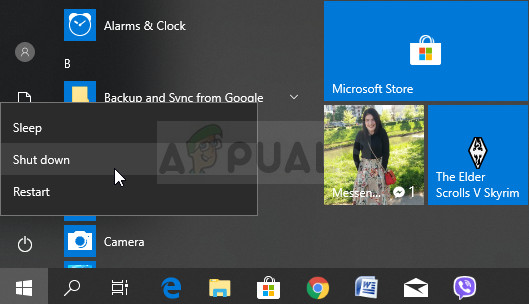
- Shut down your PC or laptop by navigating to the Start Menu >> Power Button >> Shut down.
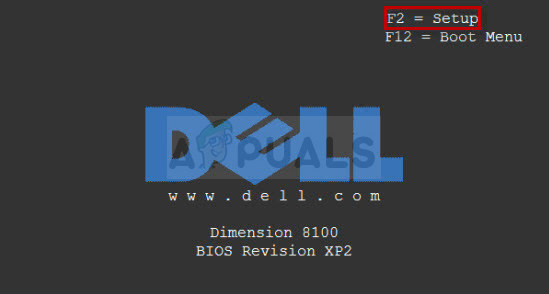
- Turn your PC on again and try to enter BIOS settings by pressing the BIOS key on your computer during the Dell logo screen. The default button for entering into BIOS for Dell computers is F2 so make sure you click it fast enough.
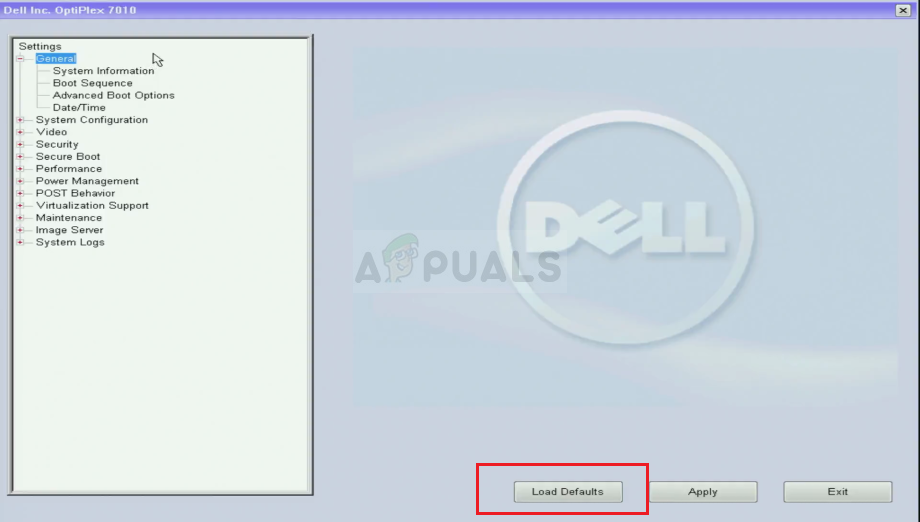
- The Load Default option can be present under two different places in the BIOS screen depending on the version of the BIOS on your Dell computer.
- At the initial screen of BIOS settings, if you see a Restore Settings button at the bottom, next to the Exit button, click on it and make sure you choose BIOS defaults before clicking OK. Click Exit and your computer will restart.
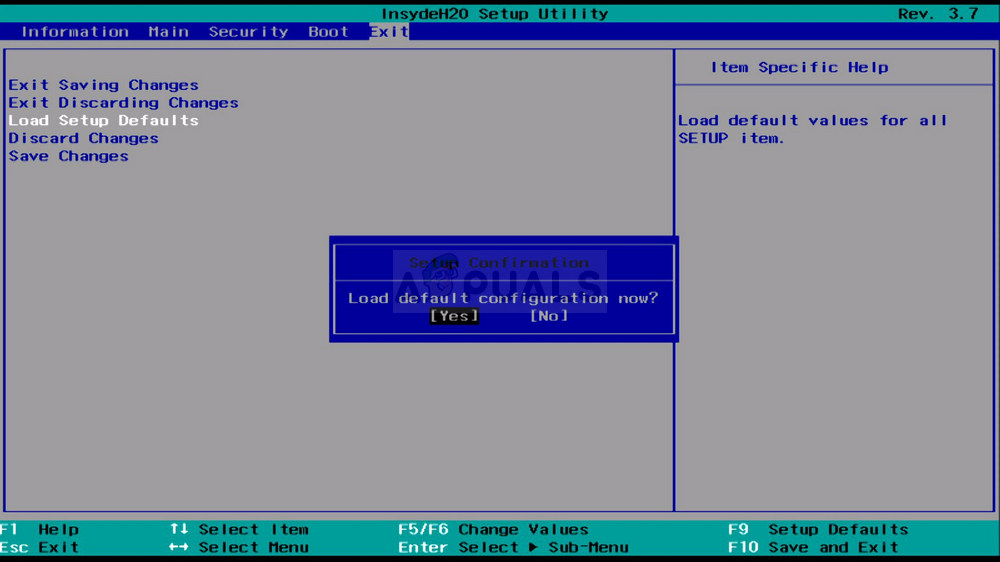
- If there is now such button, you may want to navigate to the Exit tab at the initial BIOS screen by clicking the Right Arrow on your keyboard until you reach it. Click the Down Arrow key until you reach the Restore Defaults (or Load Optimal Defaults) option and click the Enter key.
- Click the Enter key once again when prompted to Load Optimal Defaults and wait for your computer to restart. Check to see if the problem is gone now.
Solution 4: Start Your Computer Without a Hard Drive
This last solution is probably your last resort. A user who had exactly the same issue with his hard drive was able to fix the problem regarding the drive by removing it from his computer and starting it without the hard drive.
Your options will be limited and you will only be able to boot by inserting the recovery media but you fortunately won’t need to do much if everything goes as planned. We still recommend you backup your data and replace the hard drive to prevent the problem from happening again.
- The exact process of removing the hard drive depends on various factors such as the type of your computer (PC or laptop) and its exact model. For that, you should consult manuals on your manufacturer’s website or the ones which came with your computer. Note that you might void the warranty by performing these steps so make sure you read about the terms regarding this.
- After you have removed your hard drive, insert the recovery media into your computer and turn it on. After the drive is opened, you can wait for a bit before turning off your computer completely and reinstalling the hard drive.
- Check to see if you are able to boot now.


