Fix: Error 0xc000014C on Windows 7, 8 and 10
The error 0xc000014c is signaling that a part of the Registry is corrupt. When one or more file structures that contain registry data become corrupted and Windows encounters an error at the first booting sector, the error 0xc000014c will be displayed. The 0xc000014c error code is essentially stating that important booting information is either missing or corrupted in the area of the HDD.
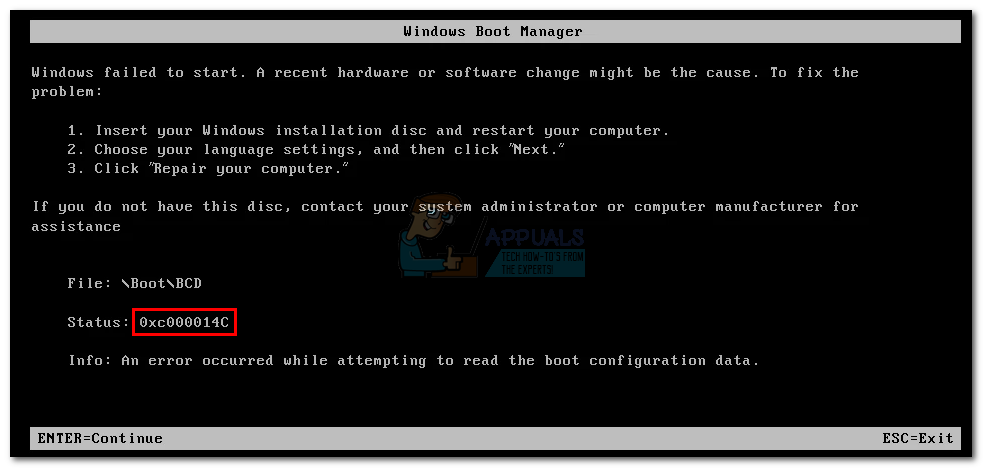
The error 0xc000014c is spotted after an unexpected system reboot/shutdown. Depending on the Windows version, users will either see this error message on a blue screen or inside Windows Boot Manager. The 0xc000014C error will occur on Windows XP, Vista, 7, 8, 8.1 and 10.
There are two main causes that will trigger the 0xc000014c error:
- BCD (Boot Configuration Data) is corrupted – The BCD file is prone to break when the system is turned off in the middle of modifying data files in the boot sector. This is typically caused by power outages but one should not exclude boot sector viruses, which will trigger the same behavior.
- System Files are compromised – Most critical system errors appear if the machine suffers an unexpected shutdown when writing system files on the disk. This is also caused by the deletion of critical system files or other dependent software.
Below you have a collection of methods that have successfully helped Windows users to get past the 0xc000014c error. Please follow each method in order until you encounter a fix that works for your situation.
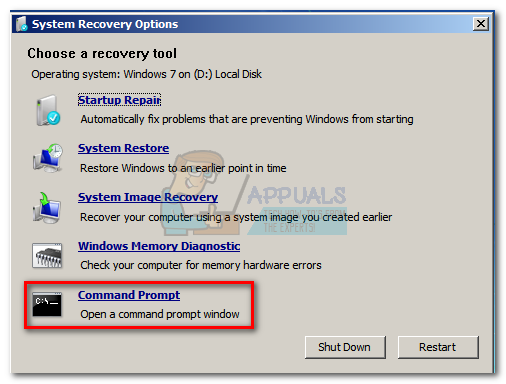
Method 1: Using a System Restore point
Let’s start by doing a system restore to a previous point in time. Chances are your system has previously saved a restore point back when the system was running without problems. If you have a restore point in place, this method will allow you to restore your machine to a working state.
Depending on your Windows version, the steps of accessing the System Restore menu will be different. But regardless if you’re on Windows 7 or Windows 10, you’ll likely need the installation media to access the System Recovery Options.
Note: Some older laptops will have a dedicated shortcut for the System Recovery Options. Usually, the menu can be accessed by repeatedly pressing F10 or F11 at system startup. This shortcut will allow you to access the Repair menu without using the Windows installation media. If you can make use of this shortcut, go straight to step 3 (in Windows 7 guide) or step 2 (in Windows 10 guide).
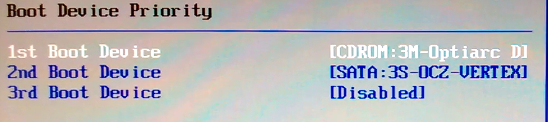
If you don’t have the Windows installation media, follow this guide for Windows 7 bootable windows 7 usb or this guide for Windows 10 windows 10 bootable usb to create a bootable DVD or USB with the Windows installation media. Then, make sure your system is configured to boot from the installation media first.
If your system doesn’t prompt you to press a key in order to boot from the installation media, you’ll need to follow the on-screen prompts to enter the boot setup. Additionally, you can enter your BIOS settings and change the boot order so that the instalation media is first. The exact settings of changing the boot priority in BIOS will vary from manufacturer to manufacturer.
After you successfully boot from the installation media, follow the steps below according to your Windows version:
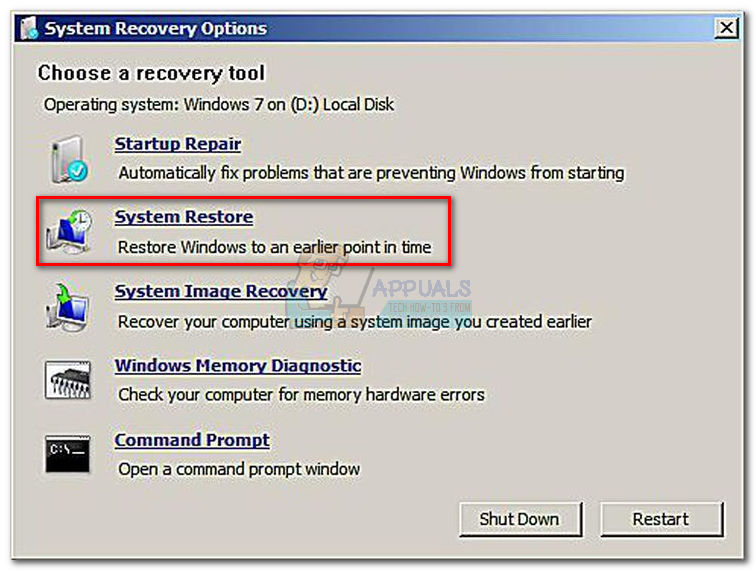
For Windows 7 users
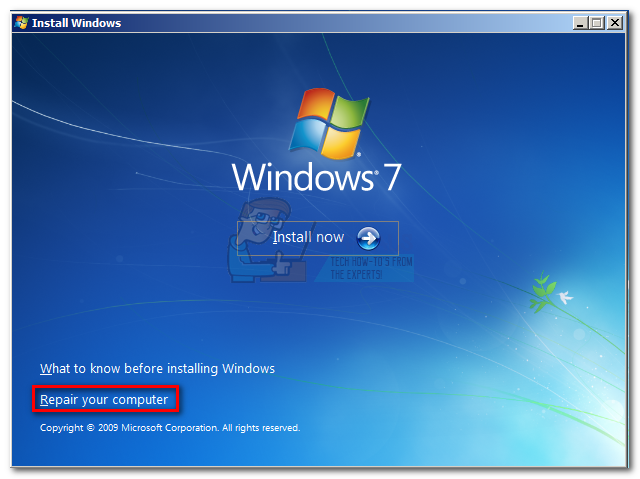
- When you see the Install Windows screen, click Next, then click on Repair your computer.
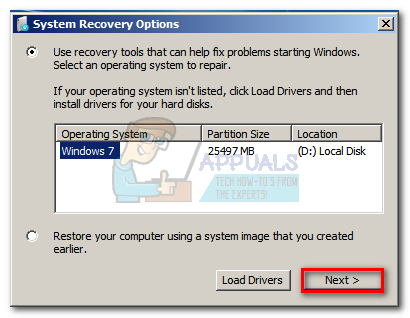
- Make sure your operating system is selected and hit Next.
- Wait until Startup Repair performs a scan on your OS. Click the Restore button if prompted to do so.
 Note: You can force your system to take you to the Startup Repair screen by force shutting your machine at startup 3 times (when displaying the Windows logo screen). After 3 consecutive startup interruptions, your system should automatically take you to the Startup Repair screen.
 - The repair tool might attempt additional repair strategies at this point. Even if it takes a while, do not restart or shut down your machine during this phase.

- After a while, the System Restore wizard should pop up. However, if you are presented with the System Recovery Options window, click on System Restore.
- In the System Restore screen, check the box next to Show more restore points and select a restore point from when your system was functioning properly. Click Next, then Finish.
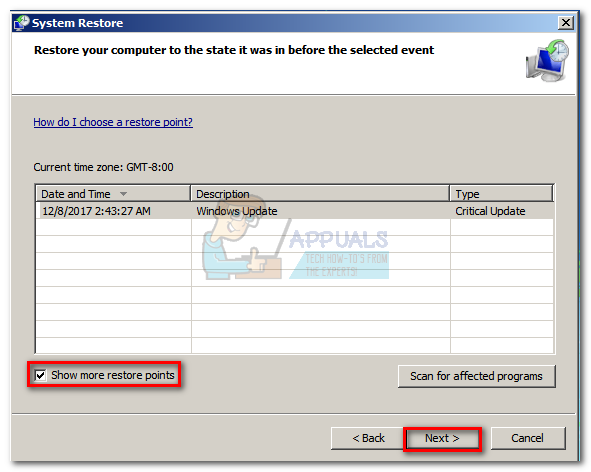
- Finally, click Yes and wait for fo the repair tool to restore your system to a previous version.

For Windows 10 users
- When you see the Windows Setup screen, click Next, then click on Repair your computer.
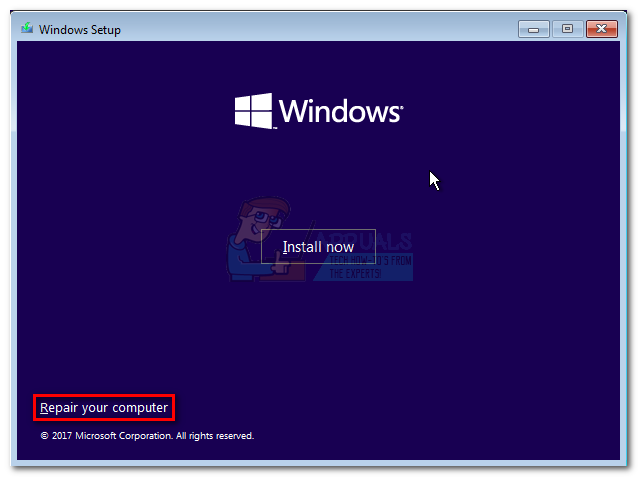
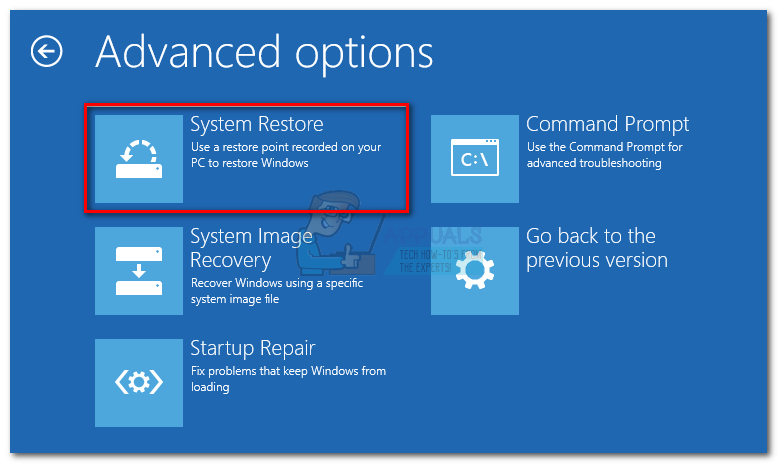
- Next, go to Troubleshoot and click on System Restore, then select your operating system.
 Note: You can also force your system to take you to this screen by force shutting your machine at startup 3 times (when displaying the Windows logo screen). After 3 consecutive startup interruptions, your system should automatically take you to the repair menu.
 - When the System Restore window pops up, click Next. Then, select a restore point from when your system was functioning properly and hit Next once again.

- Finally, hit Finish, confirm that you wish to use the restore point and wait for your device to go back in time and revert to a working state.
Method 2: Rebuilding the BCD files
There are many reasons why your Boot Configuration Data can misbehave. However, in every scenario, the most effective way of fixing the 0xc000014c error is to repair the BCD file with a series of Command Prompt commands.
Before you start following the guides below, make sure you own the proper Windows installation media for your operating system. This could either be a DVD or a USB flash drive. If you don’t have the installation media, follow this guide for Windows 7 bootable windows 7 usb or this guide for Windows 10 windows 10 bootable usb.
Once you successfully manage to boot from the installation media, follow the guides below according to your Windows version:
For Windows 7 Users
- When you see the Install Windows screen, click Next, then click on Repair your computer.
- Make sure your operating system is selected and hit Next.
- The repair wizard will perform aditional scans at this point. If it asks you whether you want to use System Restore, click No. Then, click On Command Prompt.
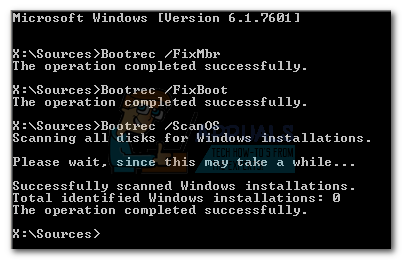
- Next, insert the following commands into Command Prompt and press Enter after each one.
Bootrec /FixMbr
Bootrec /FixBoot
Bootrec /ScanOS
Bootrec /RebuildBcd
- Once the commands have been successfully processed and executed, type chkdsk /f /r and press Enter. This will scan for bad sectors on your hard drive and automatically repair them.
Note: Keep in mind that if bad sectors are found during this stage, you might end up losing some data present on your HDD.Your computer should restart once the process is complete. At the next startup, make sure Windows is booting from your hard drive and see whether the error 0xc000014c is gone.
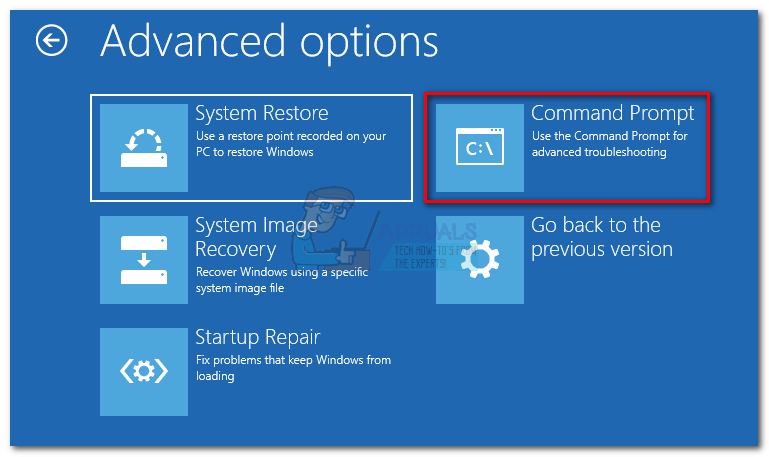
For Windows 10 Users
- When you see the Windows Setup screen, click Next, then click on Repair your computer.
- Click on Troubleshoot, then click on Command Prompt.
- Next, insert the following commands into Command Prompt and press Enter after each one.
Bootrec /FixMbr
Bootrec /FixBoot
Bootrec /ScanOS
Bootrec /RebuildBcd
- Once the commands have been successfully processed and executed, type chkdsk /f /r and press Enter. This will scan for bad sectors on your hard drive and automatically repair them.
Note: Keep in mind that if bad sectors are found during this stage, you might end up losing some data present on your HDD.Your computer should restart once the process is complete. At the next startup, make sure Windows is booting from your hard drive and see whether the error 0xc000014c is gone.
Method 3: Restoring the registry files from the RegBack folder
If you followed all of the above methods without success, you can try one last trick. But keep in mind that you will need physically remove your HDD and connect it to a different PC.
All Windows versions will store a copy of your most vital registry files in a folder called RegBack. If the issue is indeed related to an underlying registry issue, copying the folder from the backup folder to the regular directory will remove the 0xc000014c error. The steps are the same in every Windows version. Here’s what you need to do:
- Remove the hard drive accommodating the Windows files from the PC displaying the 0xc000014c error and connect it to a working PC as a secondary drive.
Note: Make sure the working PC boots from the healthy Windows and not from the one displaying the 0xc000014c error. - From the other PC, access the HDD that you’ve just connected and navigate to /Windows / system32 / config / RegBack
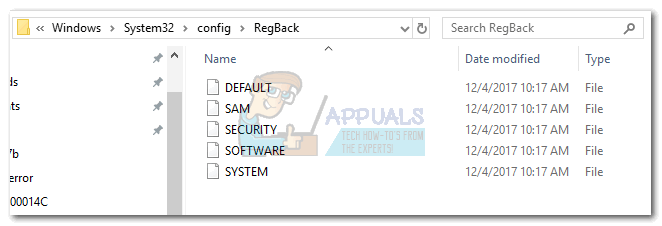
- Copy the contents of the Regback folder and backtrack one layer to the config folder.
- Paste the contents of the RegBack folder over the files in config. When asked if you want to override the files in config, hit Yes to All.

- Power off the PC, disconnect the HDD and move it back to the PC that’s displaying the 0xc000014c error. Allow it to boot up from the HDD, and see if it’s now able to boot up normally.
If you followed the methods above without any results, you have little choice but to use a Windows installation media and reinstall your OS. You will lose any data stored on the Windows partition, but any corrupted files or damaged system files will be overwritten. This also the preferred approach when dealing with boot sector viruses that will trigger the 0xc000014c error.
You are my savior! I had tried many methods but none fixed my problem. At first, I stumbled through instructions from many places to fix the boot record for a conventional system (whatever it is called) to no avail until I realized that my Windows 8 uses uefi with esp disk system (whatever that is). I had to start again with that fact in mind and everything seemed to go well as the instructions described, except that my Windows still wouldn’t start. Just when I stopped hoping and prepared myself to reset my PC and install all the programs again (some of which I have no idea where I keep the installation discs), your very last method of restoring the registry worked its most stunning magic! Thank you!