Fix: DXGI_ERROR_DEVICE_HUNG Error on Windows
This error means that the application’s device failed due to badly formed commands sent by the application, as stated by Microsoft’s official documentation available online. This is a design-time issue that should be investigated and fixed. The error often appears in the middle of various video games and it causes them to crash almost instantly while displaying this error on the screen.
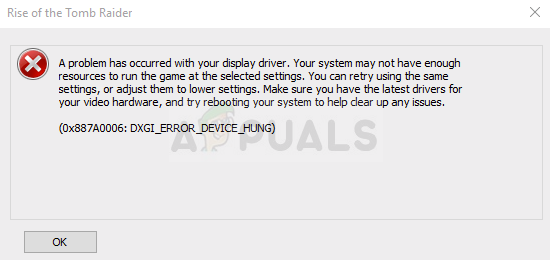
How to Fix DXGI_ERROR_DEVICE_HUNG
Throughout the vast area of online forums, several users have presented the methods that have worked for them the best and we have decided to gather them all in an article. Good luck with the methods below!
Solution 1: Update Your Graphics Card Driver
This is one of the most basic troubleshooting steps when it comes to solving video game-related problems. However, several users were able to solve the problem using this method only and it has saved them days and days of troubleshooting. Also, nothing wrong can go out of it and you will still end the day with the latest video card driver installed on your computer.
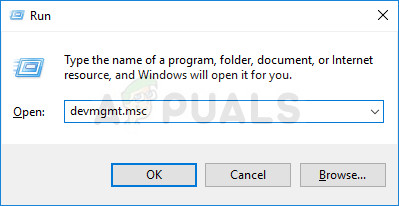
- Click on the Start menu button, type in Device Manager, and select it from the list of results by simply clicking on the first result. You can also use the Windows Key + R key combination in order to open the Run dialog box. Type in “devmgmt.msc” in the box and click OK in order to run it.
- Expand one of the categories in the Device Manager window to find the name of the device you want to update, then right-click on it, and select Uninstall Device. Since we want to update the graphics card, expand the Display adapters category, right click on your video card and select the Uninstall Device option.
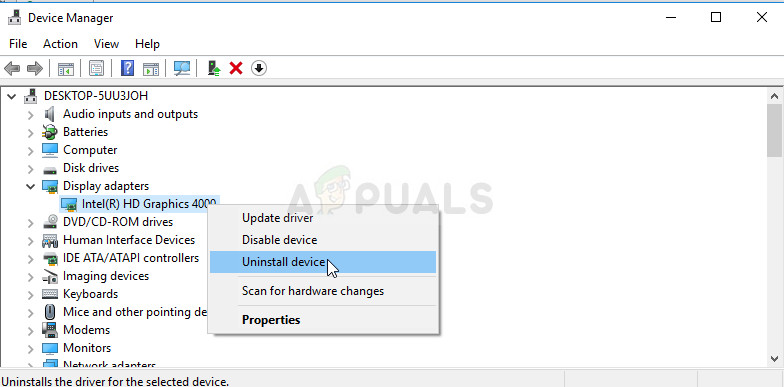
- Confirm any dialogues which may ask you to confirm your choice and wait for the process to finish.
- Look for your graphics card driver on the card’s manufacturer’s website and follow their instructions which should be available on the site. Save the installation file on your computer and run it from there. Your computer may restart several times during the installation.
Nvidia Drivers — Click Here!
AMD Drivers — Click Here!
Note: If the steps above failed to produce the wanted result, there is a script you might want to run in order to solve the problem as the games fails to administer the newly installed driver. The script consists of basic commands which can be run more easily via a .bat file. Good luck!
- Open a new text document by right-clicking on your Desktop and choosing New >> Text Document from the context menu.
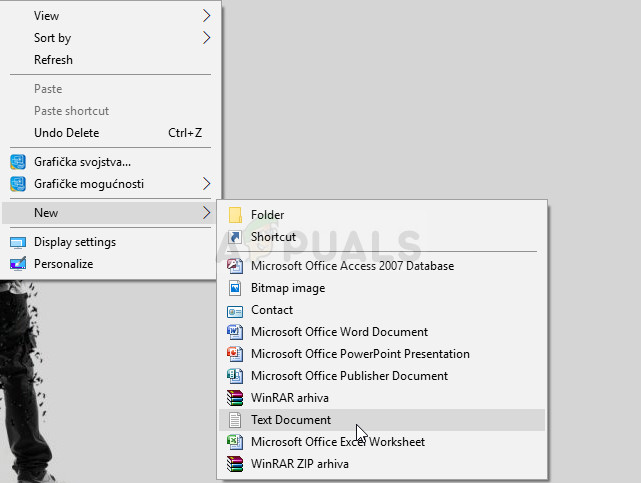
- Copy and paste the following text into the document and make sure you preserve proper formatting, meaning that each command which is here displayed in a new line should also ne in the new line in your document.
if exist C:\Windows\System32\nvapi64.Old goto Old
chdir /d C:\Windows\System32
ren nvapi64.dll nvapi64.Old
taskkill /F /FI "IMAGENAME eq nvxdsync.exe"
echo @ Named
pause
goto End

:old
chdir /d C:\Windows\System32
ren nvapi64.Old nvapi64.dll
echo @ Renamed
pause
goto End
:End
- Click on File from the menu at the top of the window and choose Save as… Under the Save as type dropdown menu, choose All files and make sure you name the file something like “command.bat”. The name is not important but the “.bat” extension is.
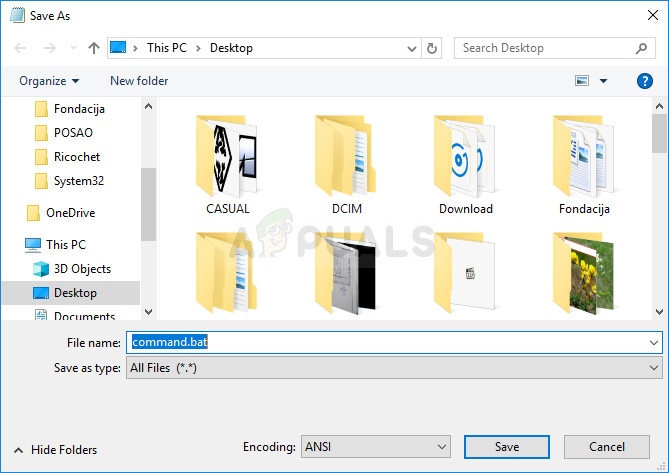
- After you have saved the file, right-click on it and choose the Run as administrator option. Wait for a couple of seconds, restart your computer, and check to see if your game now works.
Solution 2: Quick Fix for NVIDIA Users
If you are an NVIDIA user struggling with DXGI_ERROR_DEVICE_HUNG error on your computer which usually appears when trying to play a certain video game, this quick fix might be worth for you to consider as it has helped plenty of users. Make sure you check this out!
- Right-click on your desktop and select the NVIDIA Control Panel option from the drop-down menu or double-click the NVIDIA icon in the system tray. The NVIDIA Control Panel is also available in the regular Control Panel.
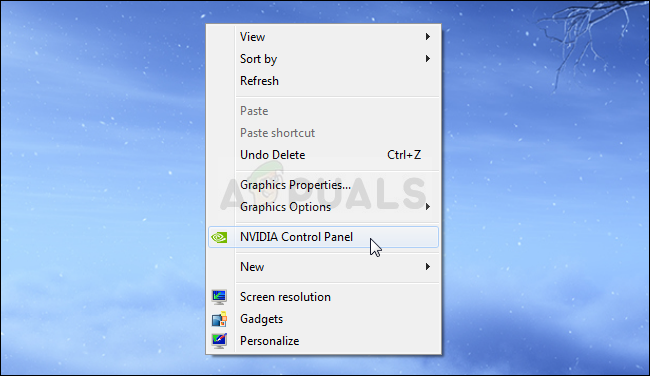
- Under the 3D settings section at the left navigation pane, click on the Adjust image settings with preview option. At the new screen, check the radio button next to the “Use the advanced 3D image settings” option and click on Apply.
- After that, click on Manage 3D settings at the left navigation pane and navigate to the Program Settings tab.
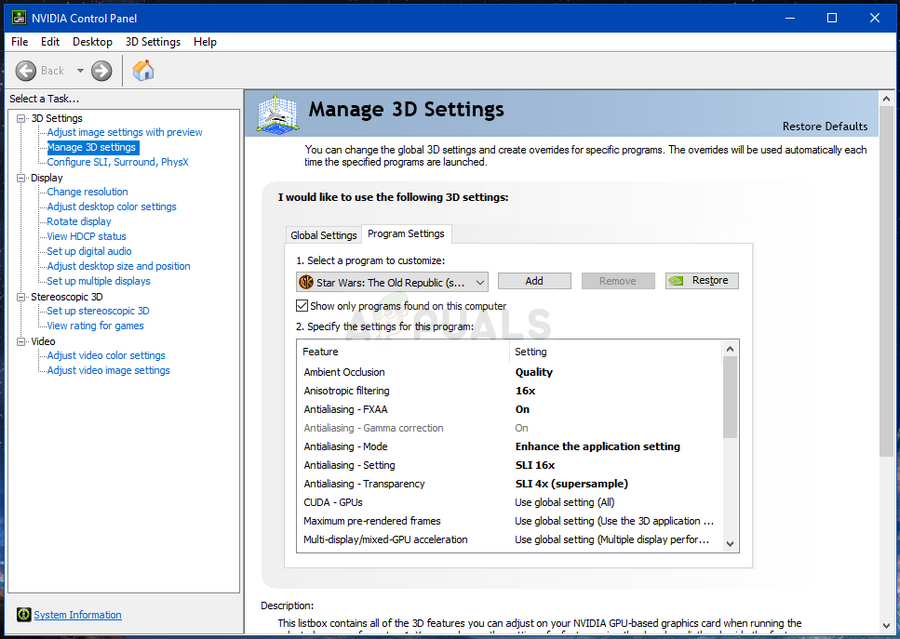
- Click on Add and make sure you browse your computer for the executable which is used to launch the game you are experiencing issues with. The easiest way would be to right-click the game’s shortcut on the Desktop and choose the Open file location option which will also select the required executable.
- You can also browse manually if you know where you have installed the game. It is installed to C >> Program Files by default. From the dropdown menu under the “Select the preferred graphics processor for this program” option, select “High-performance NVIDIA processor” and click on Apply.
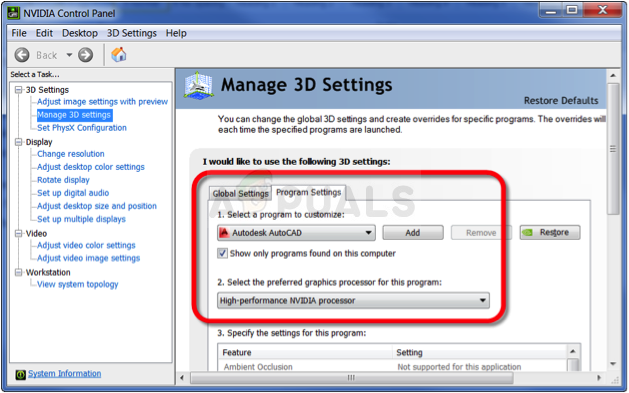
- Check to see if the problem has disappeared after you restart your computer.
Solution 3: Stop Overclocking Your Computer
Overclocking is a process where you change the maximum frequency of the processor to a greater value which is above the recommended factory value. This can give your PC a significant performance boost but you have to absolutely careful since there were situations where entire rigs broke down and even ended up in flames.
Some CPUs were definitely not made to be overclocked and it’s a fact that some models perform better than the others. What’s even more important is that different tools used to overclock your processors (CPU or GPU) work better or worse depending on the processor which is being used.
Returning your CPU’s frequency to its original state depends on which software you used to overclock in the first place. Intel and AMD have their own applications available to download which let users overclock their CPUs but they sometimes implement factory overclock settings which are activated when, for example, running the game. Check to see if the problem still occurs.
Solution 4: Uninstall GeForce Experience
GeForce Experience is a companion application to your GeForce GTX graphics card and it’s developed by NVIDIA. It keeps your drivers up to date, automatically optimizes your game options, and gives you the a way to share gaming screenshots and videos.
That being said, the program is not that important and nothing depends on it to run properly. Additionally, users have reported that simply uninstalling the GeForce Experience program from Control Panel or Settings managed to fix this issue with a video game.
- Make sure you have logged in with an admin account on your respective computer as you won’t be able to uninstall programs using any other account.
- Click on the Start menu button or the search bar next to it and open Control Panel by searching for it. Alternatively, you can click on the gear icon in order to open Settings if you are a Windows 10 user.
- In Control Panel, change the “View as:” option at the top right part of the window to Category and click on Uninstall a Program under the Programs section.
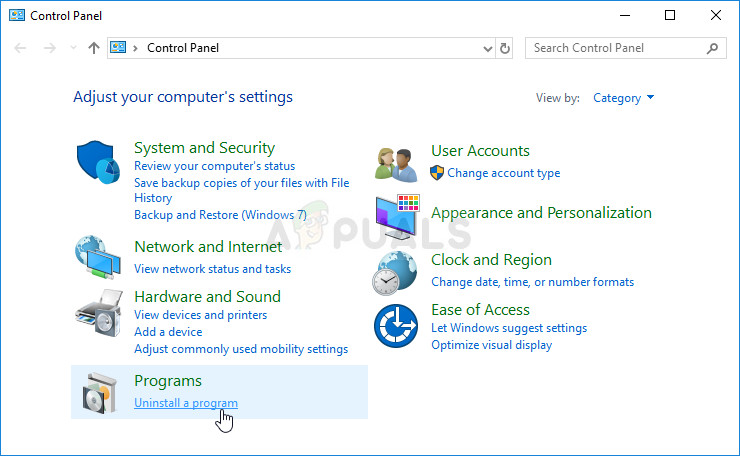
- If you are using the Settings utility on Windows 10, clicking on Apps should immediately open a list of all installed applications on your PC.
- Locate the GeForce Experience entry on the list and click on it once. Click on the Uninstall button which will appear above the list and confirm any dialog boxes which may show up. Follow the instructions on-screen in order to uninstall GeForce Experience and restart your computer afterwards.
Solution 5: Add a Certain Registry Key
Disabling TDR (Timeout Detection and Recovery) can sometimes help you prevent unnecessary errors such as DXGI_ERROR_DEVICE_HUNG from appearing but you should still firstly try out the methods below as TDR can sometimes be very useful on your computer.
- Since you will need to edit the registry in order to follow through this solution, we highly recommend you check out this article we have prepared in order to safely backup your registry to prevent other problems which can occur.
- Open the Registry Editor utility by typing “regedit” in either the search bar window, the Start menu or the Run dialog box on your Windows PC. Navigate to the following key in Registry Editor by using the left pane navigation:
HKEY_LOCAL_MACHINE\SYSTEM\CurrentControlSet\Control\GraphicsDrivers
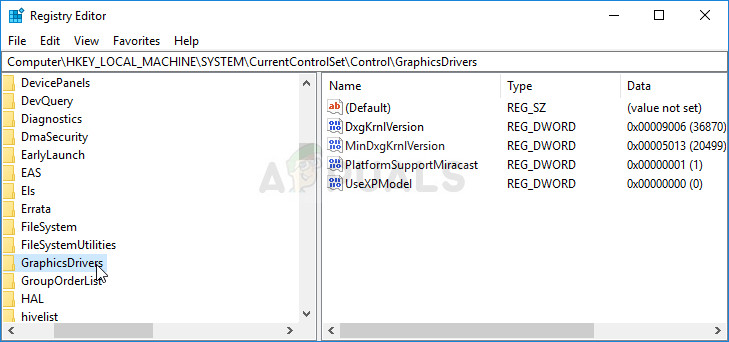
- Right-click on the blank right side of the Registry Editor screen with the GraphicsDrivers key being the last selected key in the address bar and choose New >> DWORD (32bit) value or QWORD (64bit) depending on the architecture of your Windows installation. Right-click on the key you have just added and click on Rename.
- Set the name of the key to TdrLevel. Right-click on it once more and choose the Modify option from the context menu. Under the value data, set it to 0 and change the Base option to Hexadecimal. Click on the OK button, restart your computer, and check to see if the problem has disappeared.
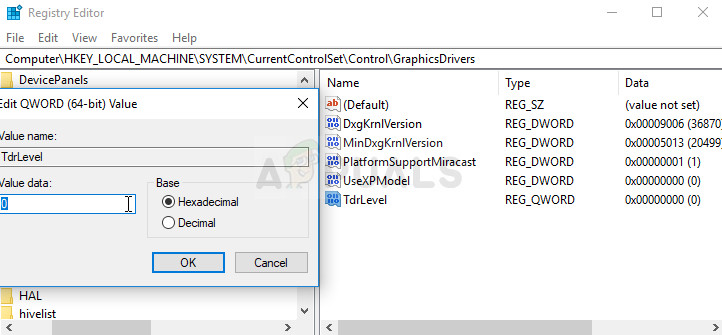
- Restart your computer and check to see if the “Could not reconnect all network drives” error still appears on startup.
Solution 6: Disable Steam Cloud Synchronization
This method was reported to be a working one by plenty of users but the game which was fixed by this method was Call of Duty: WWII in almost all cases. That might mean that this method is specific to that video game but trying it out won’t hurt except that you lose the benefits of Steam Cloud.
- Open your Steam client by double-clicking on its icon on the Desktop or by searching for it in the Start menu, and navigate to the Library tab in the initial screen which will open.
- Right-click on the game which is causing these issues and select Properties from the drop-down menu which will appear.
- Navigate to the Updates tab and in the Properties window and uncheck the box next to Enable Steam Cloud Synchronization. Make sure you apply the changes and exit Steam for now.

- Restart your computer, run the problematic game, and check to see if the DXGI_ERROR_DEVICE_HUNG error still appears while playing the game.
Solution 7: Update Windows to the Latest Build
There are several users who were lucky enough to find out that the problem has sorted itself with the latest available Windows update. It often occurs to users who are running a little behind on the latest updates but it can happen to anyone.
Windows 10 users may notice that the updates are carried out almost automatically as Windows always checks for them. Still, if you think the process is broken, you can check for updates manually.
- Use the Windows Logo Key + I key combination to open Settings on your Windows PC. Alternatively, you can search for “Settings” in Start menu or the search bar or simply click the gear-like icon in the Start menu.
- Locate and click on the “Update & security” sub-section in the Settings app.
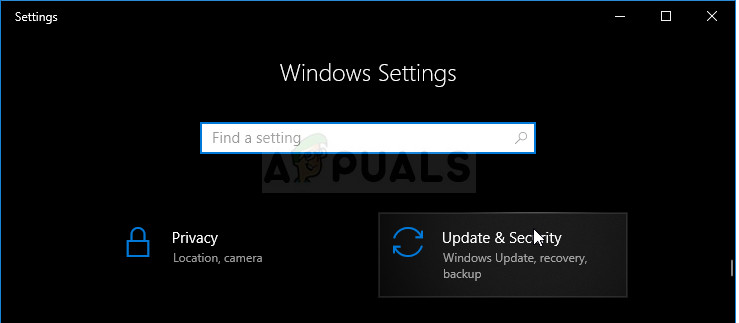
- Stay in the Windows Update tab and click on the Check for updates button under the Update status section in order to check whether there is a new build of Windows available.
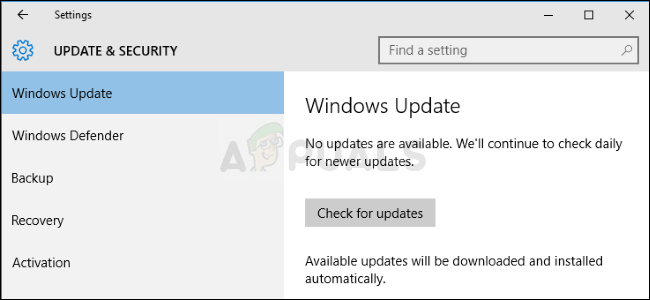
- If one is available, Windows should start with the download process immediately and the update should be installed as soon as you are available to do a restart.
If you are using another version of Windows, it should be important to state that the automatic updating process can be easily disabled and you may have done so unwillingly or willingly. Either way, a simple command may be able to install the latest updates on any version of Windows.
- Open the PowerShell utility by right-clicking the Start menu button and clicking on the Windows PowerShell (Admin) option at the context menu.
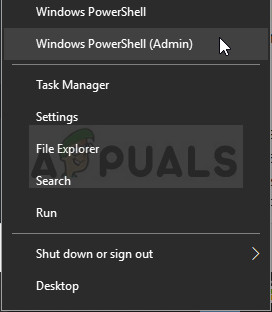
- If you see Command Prompt instead of PowerShell at that spot, you can also search for it in the Start menu or the search bar next to it. This time, make sure you right-click on the first result and choose Run as administrator.
- In the Powershell console, type in “cmd” and stay patient for Powershell to switch to the cmd-like window which might appear more natural to Command Prompt users.
- In the “cmd”-like console, type in the command shown below and make sure you click Enter afterwards:
wuauclt.exe /updatenow
- Let this command do its thing for at least an hour and check back to see if any updates were found and installed without issues. This method can be applied to all Windows operating systems, including Windows 10.


