Fix: DisplayPort No Signal
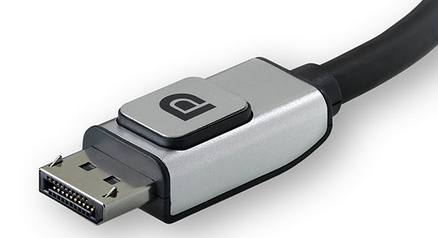
DisplayPort is a digital display interface primarily used to connect a video source to a display device (mostly monitors). It also carries other forms of data such as audio, USB etc. This port is widely used for connecting CPU’s to monitors for high-end graphics.
Many users face the problem where their DisplayPort doesn’t show any significant output to the monitor. There can be cases where HDMI works perfectly but DisplayPort doesn’t. This can be due to a number of reasons but most of them all trace back to hardware problems.
Solution 1: Restarting and Reconnecting Device
The most effective workaround which works in almost all cases is restarting and reconnecting the display device (the monitor). Simply powering off the monitor and turning it back on doesn’t solve the problem as apparently there are several capacitors which need to be discharged completely before you try connecting your PC again. You need to power it off using the mains switch.

- Shutdown your computer properly and then unplug its power cable from the switch.
- Now turn off your monitor and unplug its power cable from the main switch.
- Disconnect the DisplayPort and wait for a couple of minutes.
- Connect the computer and monitor back and connect the Displayport to the monitor accordingly.
- Now start the computer again and power the devices back on. Hopefully, the problem will be solved.
Note: You can also turn the monitor back on manually after connecting its power supply so it doesn’t automatically.
Solution 2: Checking DisplayPort connection
There have been several cases where the no signal issue arises from the DisplayPort not connected properly. You might have connected it perfectly in your view but sometimes the pins are not plugged inside properly. Inserting the pins incorrectly might be the cause why the DisplayPort is giving you the issue.
You should unplug and re-plug the display port properly and make sure that you push the connection firmly until you feel the pins locking into position. You can also try solution 1 again after performing solution 2.
Note: It was also seen that third-part DisplayPorts required solution 1 to be carried out again and again until the signal came back on. It is no big deal and happens with people all around the world. The third-party adapters are not ‘perfectly’ made for the hardware you are using; hence, they require a jumpstart for them to work.
Solution 3: Updating Graphics Driver
Another reason why the cable fails to deliver any output is that your graphics driver isn’t updated to the latest build or isn’t compatible with your computer. You should head over to your manufacturer’s website and download the latest graphics drivers for your computer. Then you should attempt to install the driver manually as automatic isn’t that much reliable.
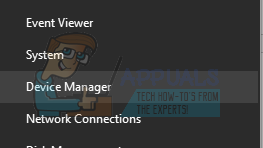
- Right-click on Windows key and select Device Manager from the list of options available.
Another way to launch the device manager is by pressing Windows + R to launch the Run application and typing “devmgmt.msc”.
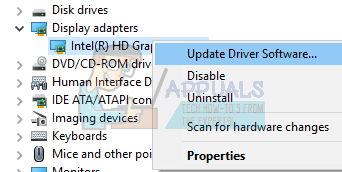
- Right-click on the adapter and select “Update Driver”.
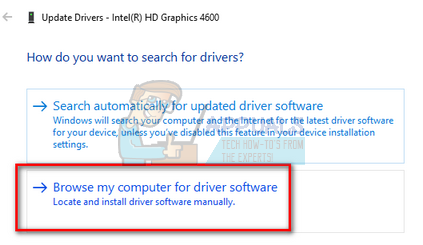
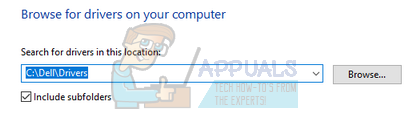
- Now a new window will pop up asking you to whether update the driver manually or automatically. Select “Browse my computer for driver software”.
- Now browse through the folders to where you downloaded the drivers. Select it and Windows will install the required drivers. Restart your computer and check if the problem got solved.
Solution 4: Testing with another Cable
If all the above solutions don’t work, we can try testing the computer with another cable. It might be possible that the cable which you are using is defective or one or more of its pins are broken. You should clearly inspect both the cable and the adapter for any dust settled and clean if necessary. If the cable still doesn’t work, you should try using another cable and check if it works as expected. Feel free to implement solution 1 when you are trying to connect the new cable to your computer.
Note: In some cases, it was seen the problem arose because of incorrect refresh rates of the monitor and the GPU on your computer. Try changing the resolution of your GPU as well as refresh rates. Experiment around until you are completely sure that the problem isn’t arising because of this.