Fix: Disk Cleanup Bug 3.99 TB Used by Windows Updates
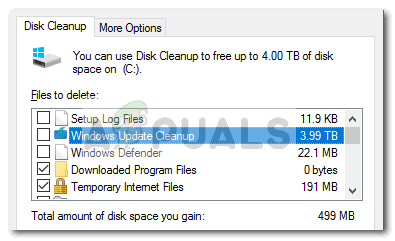
If you’re using Disk Cleanup regularly, you might be scratching your head after applying the latest Windows 10 cumulative update. A lot of users have been reporting a weird bug where the Disk Cleanup tool (cleanmgr.exe) of Windows 10 is incorrectly displaying 3.99 TB as being actively taken by older Windows updates.

As exciting as this might look, this is only an esthetic bug and will not magically grant you more hard disk space. As it turns out, the issue is entirely caused by the installation of the KB3194798 update on Windows 10. As you can imagine, the update contains a minor bug that will trick the Disk Cleanup tool to the point where it miscalculates the size of the Windows Update Cleanup folder.
Why does this happen?
The apparition of this weird bug is due to hard links. A hard link is a file system object that enables two different files to refer to the exact same location on a disk. Thanks to this hard link concept, Windows is capable of keeping multiple instances of the same file in different places (but only virtually). So even though a file can be located in more than one folder, it’s actually only occupying hard disk space in a single location – the rest of instances are just hard links of that file.
In order to be memory efficient, some tools and utilities (including File Explorer) will determine the size of a particular directory without second-guessing the fact that some of the files contained in that folder might actually be hard linked.
Because of this, you might encounter situations where certain folders are advertised to be much larger than they really are – such as this particular case. With this bug, it’s clear that the issue happens because the Disk Cleanup tool isn’t programmed to check for hard links when it needs to calculate the size of the folders.
What actually happens with the KB3194798 is that the update stores multiple hard links of systems file in C: \ Windows \ SoftwareDistribution and C: \ Windows \ WinSxS. Because there are so many hard links and because the Disk Cleanup tool is not configured to exclude hard links from the equation, you end up seeing this extremely inaccurate calculation.
Should I run the cleanup tool?
Yes, you should. It’s entirely safe to continue the cleanup process and allow the Disk Cleanup tool to delete the unnecessary files. In fact, allowing the tool to delete the Windows Update Cleanup folder is likely to resolve the issue automatically. However, make sure to restart your system once the cleanup process is finished.
How to fix the Disk Cleanup 3.99 Bug
Keep in mind that this particular bug is in no way detrimental to the well-functioning of your PC. If the cosmetic aspect of it doesn’t bother you, it’s entirely possible to let it go without any further repercussions.
Note: Keep in mind that regardless of the actual storage space occupied by the Windows Update Cleanup folder, its contents will automatically be deleted after 30 days from when the update was applied – this is done via a scheduled task. So if you’re a patient person, simply wait it out and the bug will go away on its own.
However, if you’re bothered by the huge size of the Windows Update Cleanup folder, there are ways of force the Disk Cleanup tool to calculate the folder size accurately. Please follow the two methods below in order until you discover a fix that manager to fix the Disk Cleanup 3.99 bug.
Method 1: Deleting the Windows Update Cleanup folded with administrative privileges
You can manually clean up the Windows Update Cleanup folder and fix the Disk Cleanup 3.99 bug by using the opening Disk Cleanup as administrator and deleting the folder using the wizard. Here’s a quick guide on how to do this:
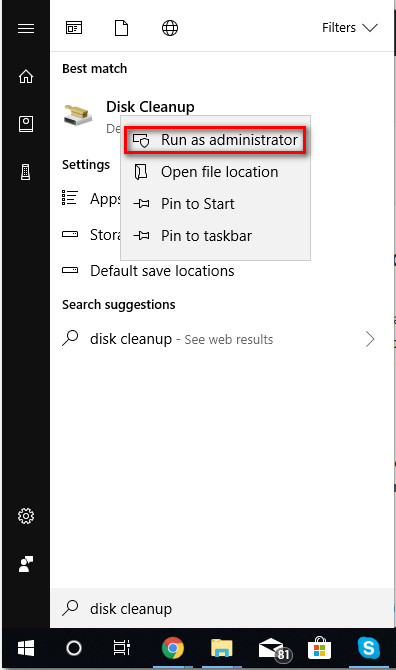
- Acess the Windows start bar (bottom-right corner) and type in “disk cleanup” to begin using the search function. Then, right-click on Disk Cleanup and choose Run as Administrator.

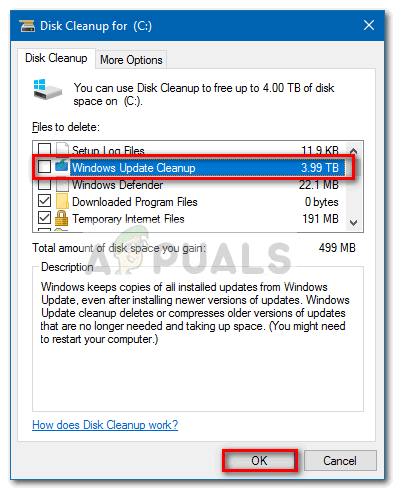
- Next, check the box associated with the Windows Update Cleanup folder and hit Ok to begin the cleaning process. Keep in mind that depending on your specifications this might take under or well over 10 minutes.

- Once the process is complete, reboot your computer and re-open the Disk Cleanup tool at the next startup. You should see that the size of the Windows Update Cleanup folder is read correctly.
Method 2: Cleaning up the Component Store using DISM
If the first method wasn’t effective or you’re looking for something even more efficient, you can use the DISM tool manually to perform a component cleanup that will delete the Windows Update Cleanup folder. This is the same procedure that your OS uses automatically to clean the leftover update files every 30 days.
Here’s a quick guide on how to run a cleanup of the component store that will resolve the Windows Update Cleanup error:
- Acess the Windows start by clicking the icon in the bottom-left corner or by pressing the Windows key. Type “cmd” to automatically use the search function, right-click on Command Prompt and choose Run as Administrator to open up an elevated Command Prompt.

- In the elevated Command Prompt, type the following command and hit Enter to trigger a component store cleanup:
dism /online /Cleanup-Image /StartComponentCleanup - Once the process is complete, close the elevated Command Prompt and reboot your computer. Open the Disk Cleanup tool again at the next startup, the Disk Cleanup 3.99 bug should now be fixed.


